Archive for the ‘DIY’ Category

h1

Scopes you can build: AstroMedia Newtonian reflector

September 4, 2020

I just realized that although I’ve built several AstroMedia kits, I’ve never given them more than a brief mention here and there on the blog. If you’re just here for the link, click here. If you want more info and pix on AstroMedia kits and what it’s like to build them, read on.

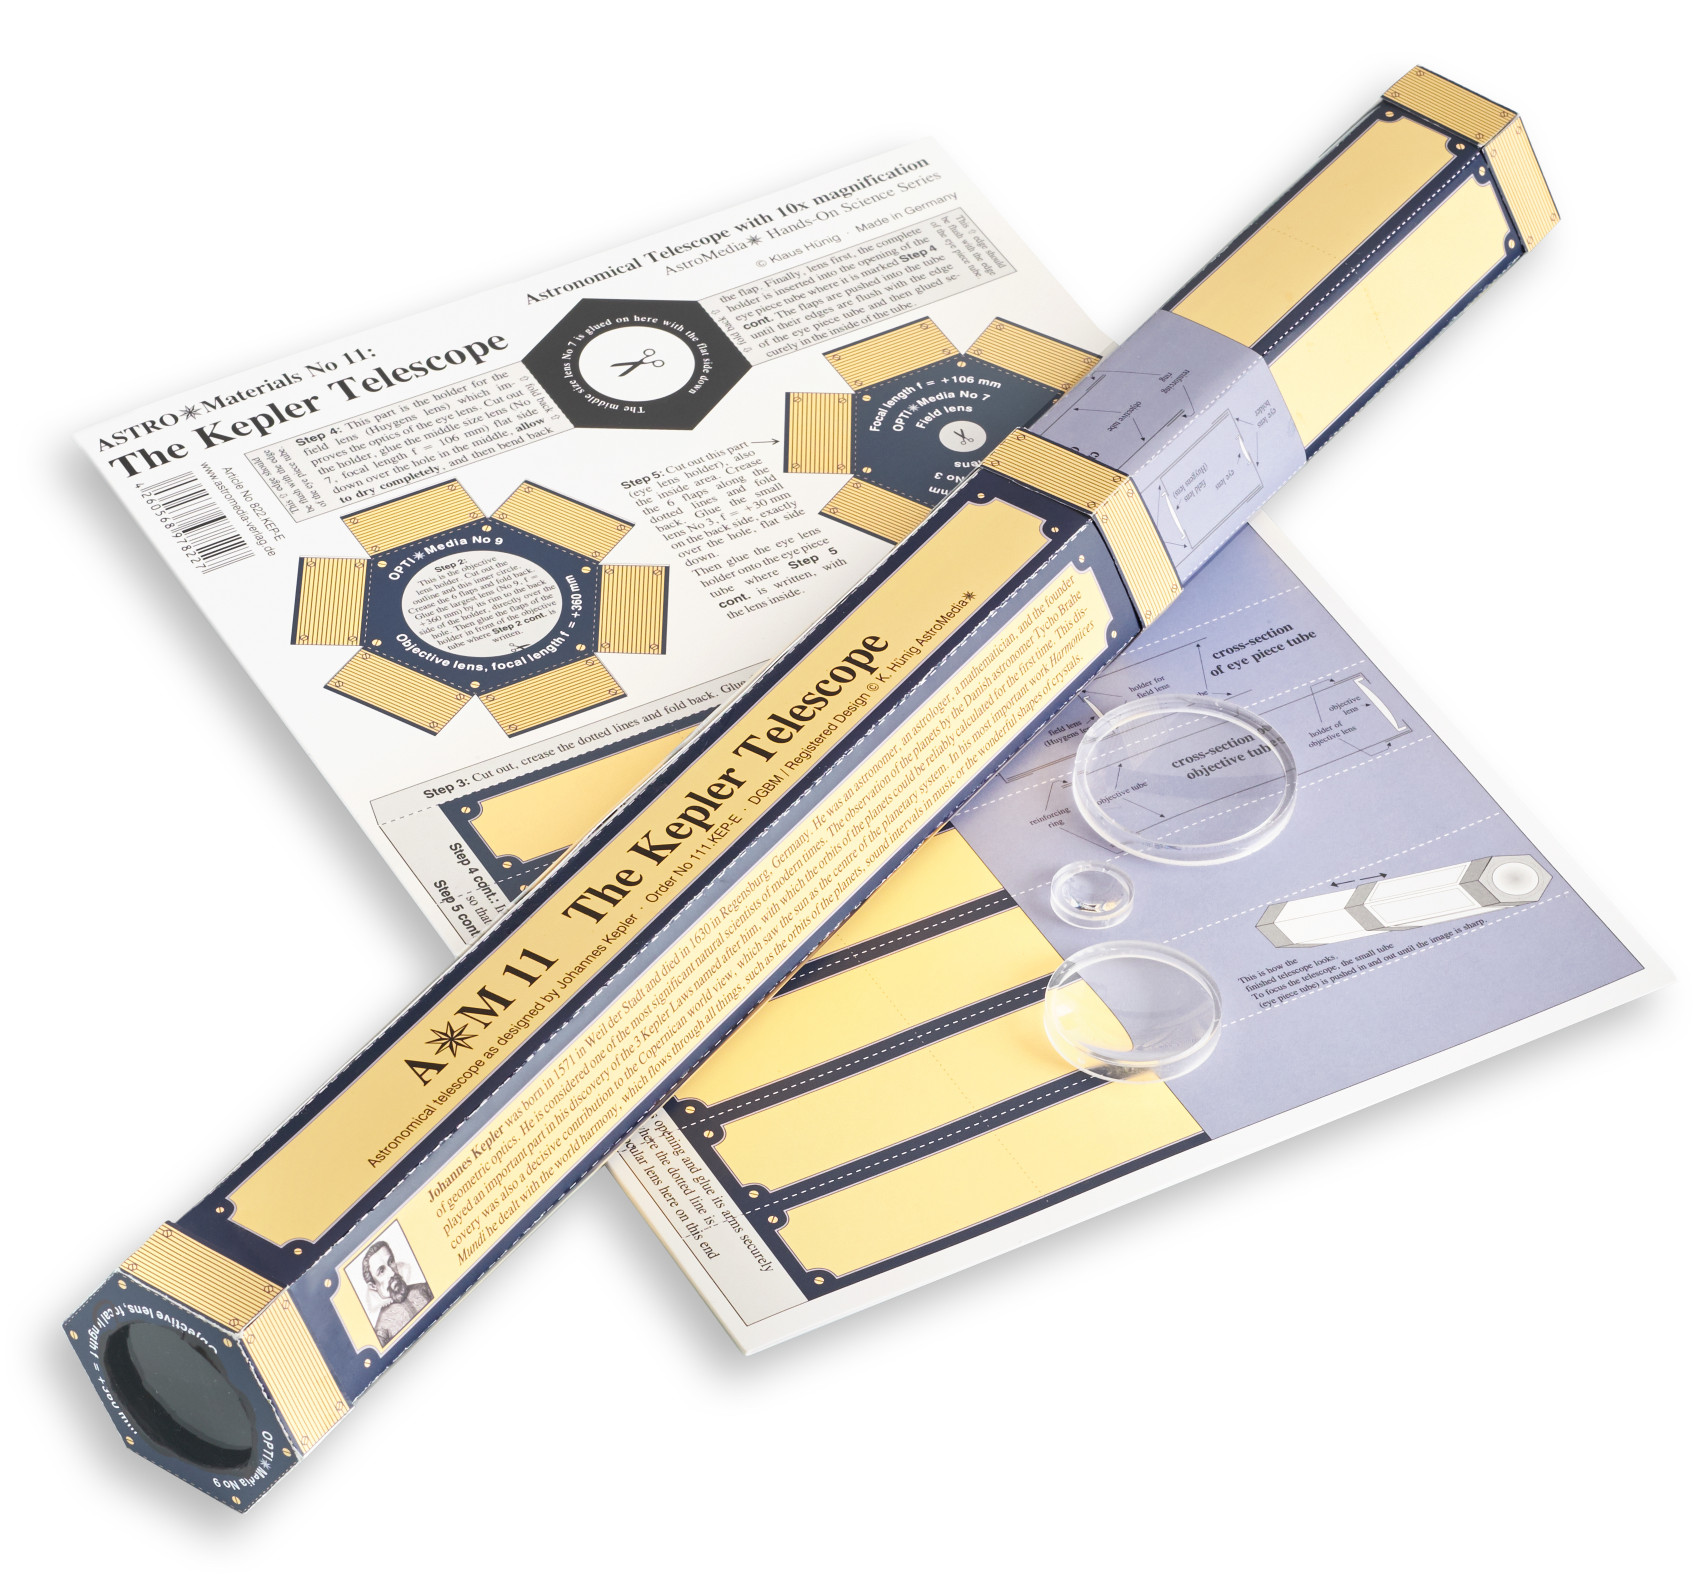
AstroMedia is a German company that makes primarily astronomy-related kits. That’s not all they do–they also have kits to build heat engines and musical instruments, and they carry meteorological and physics gadgets like Galileo’s Thermometer and Einstein’s Drinking Bird–but as their name implies, the lion’s share of their products are related to astronomy. That includes not just telescopes, but also a sextant, a handheld spectrograph, a sun movement simulator, a working orrery that includes the Sun, Mercury, Venus, Earth, and the Moon, and other things besides. But also, telescopes, including Galilean, Keplerian, and achromatic refractors, and a Newtonian reflector.

Of the AstroMedia kits that might be used for serious (or at least semi-serious) observing, the ones that stand out are the Plumber’s Telescope, shown here, and the Newtonian Telescope. I have built both. The Plumber’s Telescope is pretty cool: it includes the 40mm objective lens, lenses to make an eyepiece, cardboard mounts for the lenses, and a wooden mounting block for attaching the scope to a tripod. The tube and the eyepiece housing are made from plumbing parts, hence the name of the scope.

I built one of these for London a few years ago–here’s a photo of him using it at the 2014 All-Arizona Star Party. At this remove, I can’t remember if the scope natively accepts 1.25″ eyepieces and accessories, or if I built London’s with that capability. I put in a 45-degree correct-image diagonal to make it more intuitive for him to use. The scope focuses with a sliding drawtube, like an old-time spyglass.

I’ve thought several times about digging this scope out of storage and giving it a whirl from a dark site, but I haven’t actually gotten around to doing that. I talk a lot about small-scope observing, but lately it’s been more mid-scope observing, with the C80ED, SkyScanner 100, and Apex 127. More on that soon, probably.

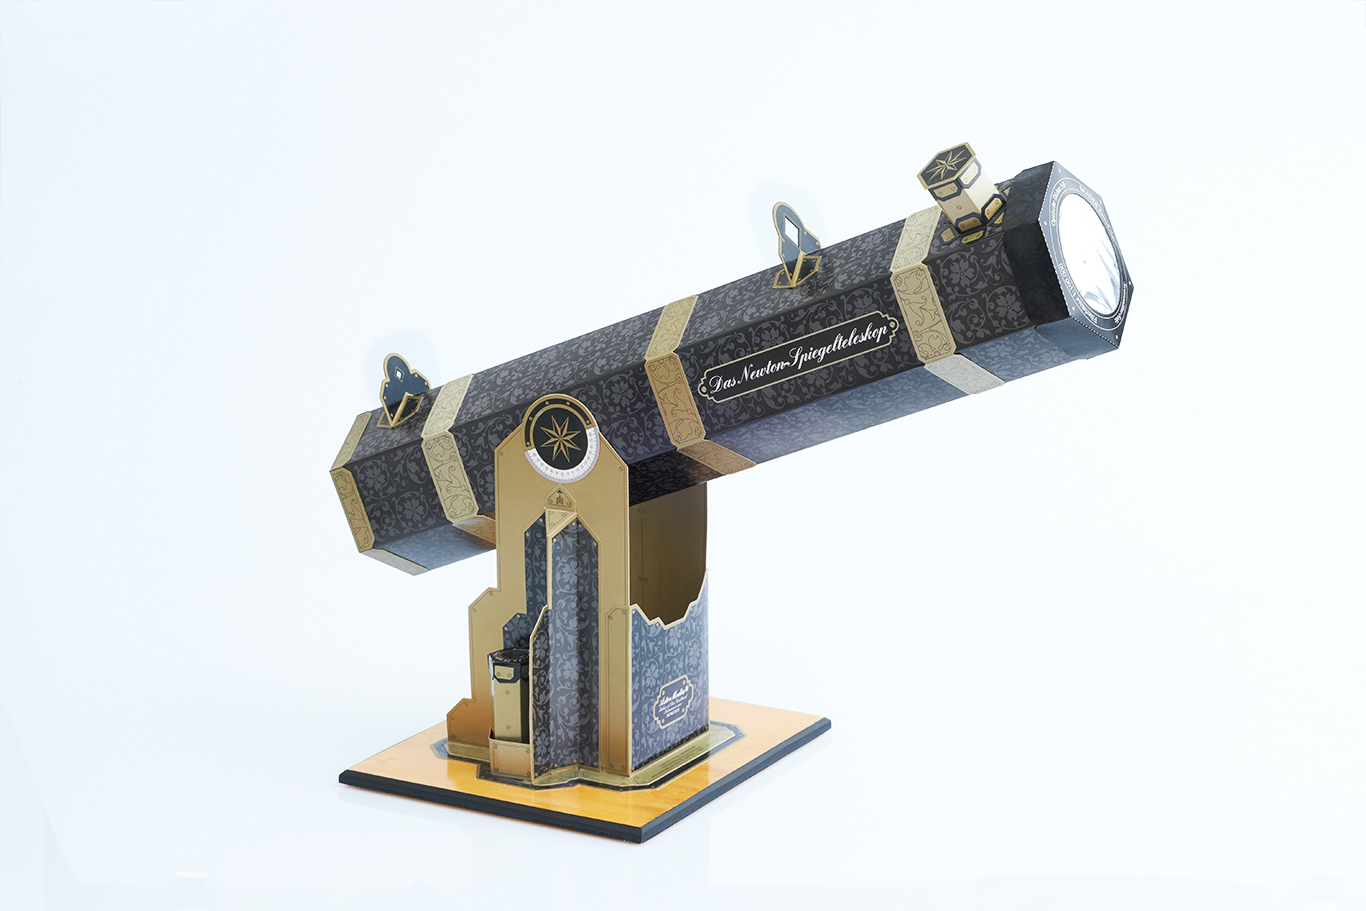
The mother of all AstroMedia telescope kits is the Newtonian Telescope, shown here in an AstroMedia photo with the optional full-aperture solar filter made with Baader solar film. I built one of these a few years ago, and documented the process in photos, I just never got around to posting about it until now.

The primary mirror is spherical, and as shipped it has a diameter of 70mm and a focal length of 450mm, for a focal ratio of f/6.4. But in the assembled kit, the outer 5mm of the mirror are masked by the telescope’s front aperture and by two additional light baffles inside, which make the operational diameter 60mm, for a focal ratio of f/7.5. This is getting up into the range where spherical mirrors perform almost as well as parabolic ones, and that factor alone might explain the decision to mask the mirror down to 60mm.

I knew right out of the gate that I wanted my scope to be a little stronger than the default cardboard tube, so I got some wooden dowels and punched holes for them in the bulkheads/baffles that separate adjacent tube sections.

Here I did a test fit of the tube, without glue, to figure out how long I needed to cut the wooden reinforcing struts. You can see a page of the instruction manual at the upper left corner. I should say here that the AstroMedia instruction manuals are in English (at least from AstroMediaShop.co.uk), and they are excellent. Very detailed, with illustrations, clearly written by people who have actually built these kits firsthand and recently. In the depressing swamp of crappy telescope instruction manuals, AstroMedia a rare point of light.

Here’s the tube going together.

And the final product. You can see a bit of dowel sticking out the back of the OTA. The primary mirror is glued (or maybe double-sided taped? I can’t remember now) to a hexagonal piece of cardboard that forms the back of the OTA. That piece of cardboard can be left loose, so that fine adjustments can be made to achieve collimation. I went a step further and made a simple collimatable cell, with push-pull collimation using three bits of dowel that stick out of holes on the back of the tube. Friction of the cardboard mirror cell against the walls of the tube are enough to keep the mirror in place once it’s collimated.

Here’s a view down the hexagonal focuser drawtube. The white circle is the reflection of the primary mirror, sitting inside a slightly larger dark square that is the flat secondary mirror on its two-vane cardboard “spider”, and containing a smaller black reflection of the secondary mirror, within which is the black and blue of the case, body, and camera aperture on my old iPhone 5c, which I used to take this photo. As you can see, collimation is not bad; everything is at least roughly in alignment.

The two eyepieces can ride in little carrels on either side of the base. The kit includes 2 eyepieces, a 15mm Ramsden (30x) and a 28mm Steinheil (16x), which is a 3-element eyepiece type I was not previously familiar with. Focus is achieved by sliding the eyepieces up and down in the focuser tube. Possibly 0.965″ eyepieces would work as-is with the scope, although you’d have to be careful about their weight either pushing down the front end of the scope or deforming the tube.

How does it work? The mini-Dobsonian mount works great, as does the straight-through peep-sight finder–at least for the bright stuff that you’ll probably use this telescope to look at. Optically, it has the limitations you’d expect from an obstructed 70mm spherical mirror in a cardboard tube with plastic eyepieces. Which is to say, it’s good enough to demonstrate the principles of a Newtonian reflector, but I’ve not undertaken any serious observing projects with it. It should be good enough for a Messier survey, for someone with sufficient fortitude. For me, it was a fun project and it looks cool on the shelf, but I’m unlikely to press it into service as long as I have more convenient options available. Also, right now the kit goes for about $27 for just the telescope, and $30 for the scope plus solar filter, so you’re not risking much if this sort of thing appeals to you.

I have heard of people buying this kit just for the mirrors, and building mini-reflectors around them using wood, plastic, metal, and more exotic materials. A few years ago I found a webpage where a group of amateur astronomers in Germany all bought these kits and formed a “70mm club”, with each person building their own take on a 70mm reflector. There were some really creative designs on that page, which to my intense irritation I can no longer locate (if you know if it or find it, please let me know in the comments!). So if you’re in the market for small Newtonian optics for a STEM project or demonstration, this kit is an inexpensive way to get a decent primary and secondary mirror set, whether or not you build it as shown.

Verdict? You have to look around a bit to get a good Plossl eyepiece for the cost of this kit, which gives you a whole working telescope. I’m a big fan of people either buying cheap astro gear and taking it apart, or building their own–even if the results are ugly, as mine often are–both to understand the principles of astronomical optics better, and to demystify the process for the day when they need to take apart a scope they care about, either to clean it or repair it. Plus this one is fun and the results are pretty cool. Recommended. Here’s the general AstroMediaShop homepage (link), the one specifically on this and other telescopes (link), and the one on the package with this scope and the solar filter (link).

skyscanner-100-before-hacking

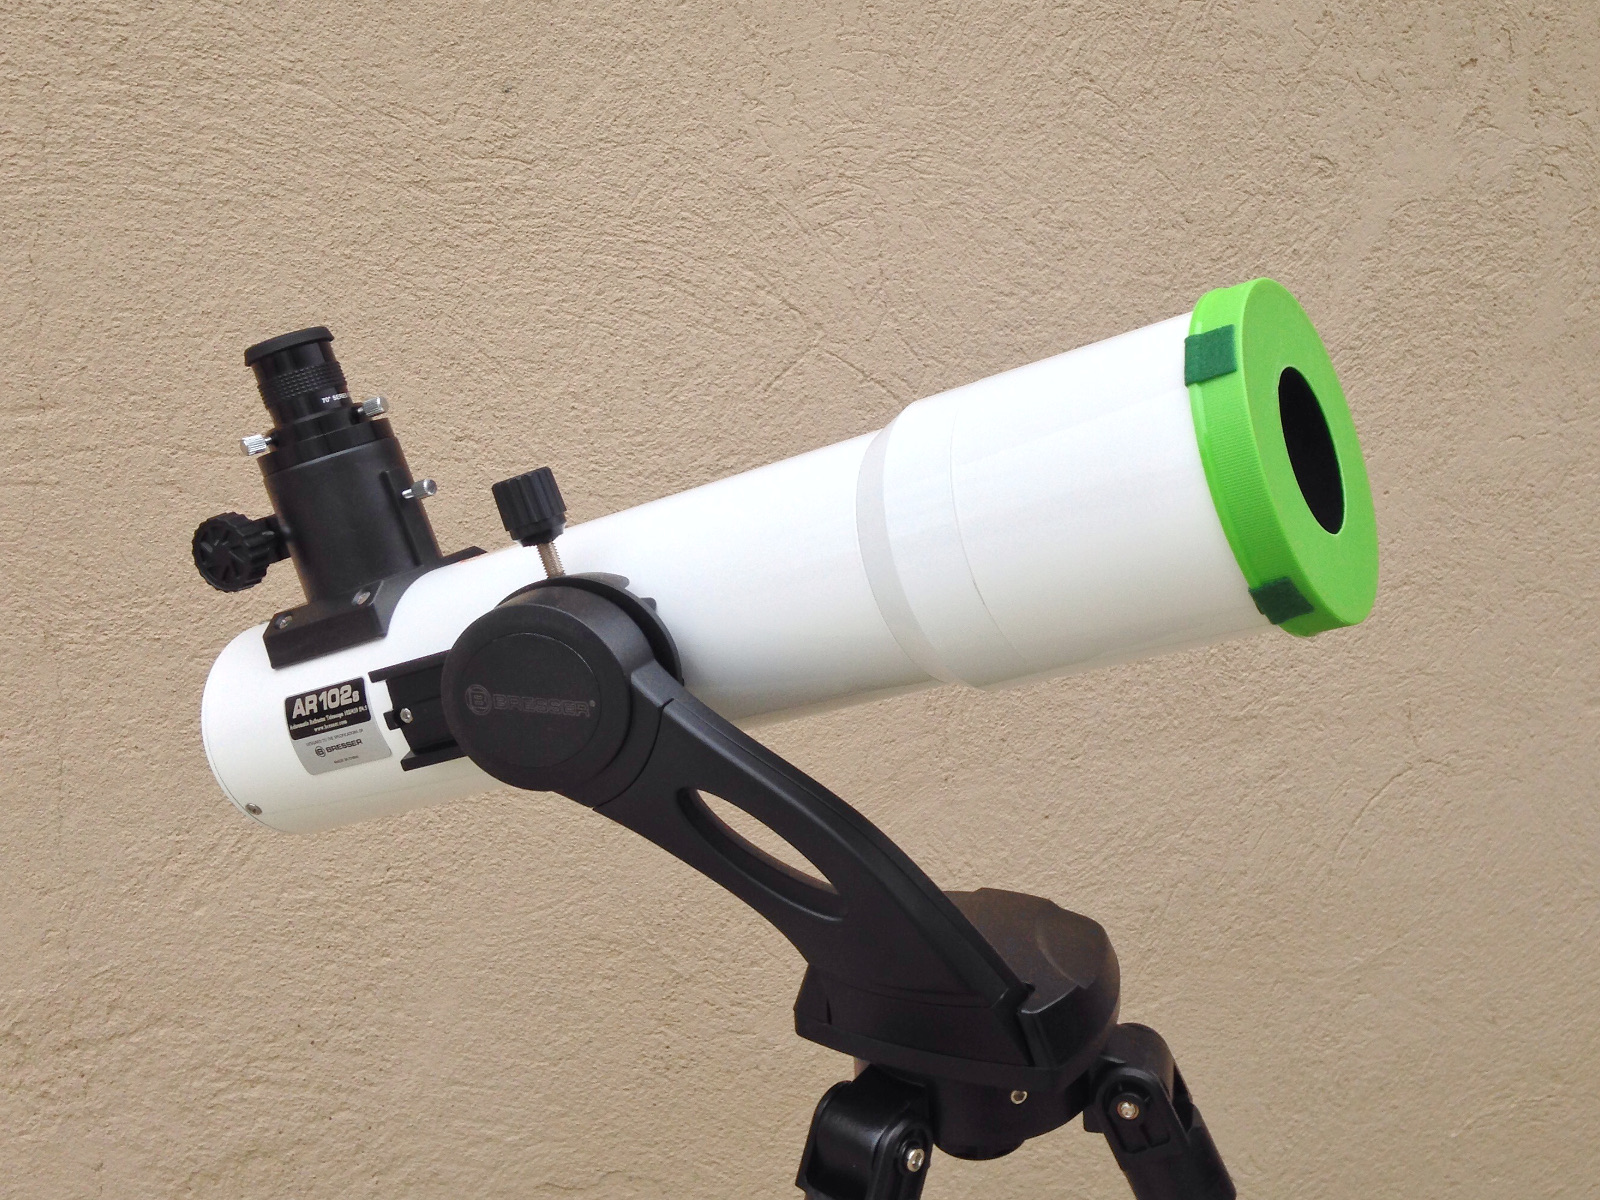
If you have built this and want a step up, or want something like this without having to build it, the Orion SkyScanner 100 is a serious piece of kit that will show you a lot for about $100. Its elder sibling, the StarBlast 4.5, is a little bigger, a little easier to use, and a little more nicely appointed. You really can’t go wrong with either one.

h1

Dollar store mustard bottle sun finder

August 20, 2017

IMG_1050.JPG

Probably self-explanatory from the picture, but just in case: tape it to the scope, parallel to the tube, and when the spot of light coming through the nozzle is centered on the bottom of the bottle, you’re on target. Some nice sunspots today.

IMG_1060.JPG

Update August 23 – Another nice thing I discovered at the eclipse: because the condiment bottle is translucent (at least this model), you don’t have to get behind it to see if it’s working. Peering through the side of the bottle is good enough. Handy when the sun is high in the sky.

h1

From sub-aperture mask to replacement dust cap

February 23, 2017

aperture-mask-2-4-length-comparison

Here’s something dumb. The Bresser AR102S Comet Edition is optimized for two things: widefield, low-power scanning, and portability. At 20″ for the OTA it’s just within the bounds of airline carry-on-ability, but you can unscrew the dewshield and shave off another 4″, at which point the options for storage and transport expand wildly.

BUT the stock dust cap for the objective is dome-shaped, for no good or obvious reason, which means it sticks out about a full centimeter longer than necessary. When you’re thinking about flying with a scope, that is one centimeter more stupidity than you should have to put up with.

There’s another problem with the stock dust cap: when the scope gets cold, it gets loose and falls out easily. Nothing unique to this scope about that – I’ve had to shim the majority of my scopes’ dust caps for the same problem, including the C80ED and XT10. One cheap package of sticky-back green felt has kept me going since 2010. I think I’ve used almost a third of it.

Now, I already have a nice 60mm sub-aperture mask for this scope (construction details here). If I could plug the central hole securely, I’d have a replacement dust cap that would be shorter, would get tighter rather than looser if it shrunk in the cold, and would serve double-duty as both a dust cap and a sub-aperture mask. The problem was finding a plug the right size, with a good lip on it to keep dust out, that would grab the edges of the mask hole securely.

aperture-mask-2-1-tootsie-roll-can

And it’s the dollar store to the rescue again, with this container of Tootsie Rolls that is intended to double as a coin bank. The hard plastic lid snaps down into the cardboard tube very securely, and the plug bit is just a shade over 60mm in diameter.

aperture-mask-2-2-external

I used the Dremel and some sandpaper to enlarge the hole in the sub-aperture mask ever so slightly, and voila. There’s a small lip that runs around the top edge, and even a little recess in which to hook a finger and pull out the plug.

aperture-mask-2-3-internal

Here you can see the ridges on the plug. By sanding in short increments, I was able to fine-tune the hole diameter until the plug snapped in very securely, without stressing either piece. I need to put some tape or a little epoxy or something over the perforated slot, which is intended to be punched out so the candy container can become a coin bank. Or cut out the center and replace it with another, smaller plug, so I’d have a dust cap and two aperture masks in one package…

aperture-mask-2-5-dust-cap-replacement

Boom. Now the scope is a centimeter shorter for travel, and I don’t have to keep the sub-aperture mask in my eyepiece case.

What I really want is for someone with even rudimentary 3D modeling skills to create a series of nested aperture masks, like Russian dolls, in 10 or 20mm increments, which could be 3D printed on demand in whatever combinations people needed. Most of them could be standard sizes, with only the outermost adapter for each telescope model needing to be custom. Then you could order the adapter for your scope and whatever set of nested masks you wanted, or maybe all of them to simplify, so your 100mm scope could also be an 80mm, a 60mm, a 40mm, and even a 20mm (the “Galileo model”) if you liked, just by taking out the relevant bits from the dust cap. Sure, it would be gross overkill for most people, but for those of us who like playing “what if” (“what if my C80ED was a C40ED?”) it would be a godsend. And with 3D printing no-one would be stuck with a bunch of useless stock when the idea inevitably bombed.

Anyway, if someone would to that, it would save me the trouble of building my own “Mask-ryoshka” dust cap out of junk from the dollar store. But if I’m being totally honest, avoiding building my own stuff out of junk from the dollar store was never the point of the exercise, was it?*

* With apologies to Adam Savage.
h1

Why and how to make a sub-aperture mask for a refractor

February 11, 2017

60mm-aperture-mask-6-comet-edition-close-up

Here’s the Bresser Messier AR102S Comet Edition with a homemade aperture mask. I just converted the scope from a 102mm f/4.5 to a 60mm f/7.7.

“WAT!? You took a refractor, the most aperture-challenged of the three basic telescope designs, and made it even smaller?”

Yup. For several reasons.

The first and most obvious is to control chromatic aberration (CA), also known as false color. Despite the name ‘achromat’, which literally means ‘no color’, doublet refractors without extra-low dispersion (ED) glass do show some false color, because their lenses do not bring all of the colors of light to the same focus point (they’re still a LOT better than scopes with a singlet objective lens, like those used by Galileo). For dim objects like galaxies, nebulae, and most field stars, the effect is not noticeable, even in large and optically fast scopes like the AR102S Comet Edition (nickname needed). But bright objects like the moon, planets, and first magnitude stars will be surrounded by purplish halos, and may have yellowish margins. In effect, the purple and yellow-orange parts of the spectrum are forming out-of-focus images that are superimposed on the main in-focus image.

The problem is that CA gets bad fast as refractors get bigger. There are a couple of standards that are commonly used to describe the focal ratio necessary to minimize CA to acceptable levels, the Conrady standard and the Sidgwick standard. By the Conrady standard, the focal ratio must be 5 times the aperture in inches; by the less stringent Sidgwick standard, 3 times the aperture in inches is good enough. Note that the standards describe focal ratios, not focal lengths, so they go up fast with increasing aperture. Here are some apertures, focal ratios, and focal lengths required to meet the Sidgwick standard:

  • 50mm (2″) : f/6 : 300mm
  • 76mm (3″) : f/9 : 684mm
  • 102mm (4″) : f/12 : 1224mm
  • 127mm (5″) : f/15 : 1905mm
  • 152mm (6″) : f/18 : 2736mm

This, along with mounting considerations, explains why reflectors and catadioptric scopes are progressively more common past 4″ in aperture. A 6″, f/8 Newtonian will be free of false color (as are all reflectors) and has such a gently converging light cone that it is easy to collimate and to focus – it’s easy for such scopes to achieve ‘planet-killer’ status if the mirror is good. A 6″, f/8 achromat will be a beast to mount and it will show lurid false color on bright objects.

But people still make, buy, and use such scopes! Why? Horses for courses: big, fast achromats can be superb deep-sky scopes, where chromatic aberration is typically not a problem. With the fixed sizes of standard eyepieces, achieving wide true fields requires short focal lengths (not just short focal ratios), and bright images require aperture, which drives the development of large but optically fast scopes like the AR102S Comet Edition. At f/4.5, it is well into ghastly CA territory on bright targets. The other night I stayed up late to catch Jupiter, and in the AR102S the planet wouldn’t even come to a clean focus. It was just a bright ball of light inside a sea of purple. I switched over to London’s 60mm f/11 Meade refractor and Jupiter snapped into a sharp and essentially color-free focus. There was a moon emerging from behind the limb of planet, already one moon-diameter out into black space, that was completely invisible in the CA-smudged view of the AR102S.

I’m okay with that – as I noted in a previous post, observing bright solar system targets with the AR102S is deliberate misuse of the scope. When I want good planetary views, I have a 5″ Mak and a 10″ Dob that can both be pushed to 500x (assuming the atmosphere is steady enough). But their max fields of view are pathetic compared to the AR102S – about 1.1 degrees for the Mak, and a shade over 2 degrees for the Dob, versus 3.6 degrees for the refractor, which is enough to take in all of Orion’s sword at once, with space left over on either side.

Still, I’m not going to take all of my scopes out with me every time I go observing, and chances are good that at some point I’ll want to look at something bright even if my main goal for the evening was low-power sweeping with the AR102S. Under those circumstances, it’s easier to have an aperture mask shoved in my eyepiece case than to pack a second scope. Hence this project and this post.

But I’m getting ahead of myself. There are other reasons to stop down a scope besides reducing CA:

  • To reduce glare from bright objects. Mostly applies to the moon when it’s full or very gibbous.
  • To give a more aesthetically pleasing image when the seeing is bad. Opinions differ on this point. Some folks prefer to look through a larger aperture despite the increased susceptibility to bad seeing, on the grounds that in the moments when the atmosphere does settle down a bit, you’ll see more detail. I suppose it depends on whether one is in exploration mode or aesthetic observation mode.
  • To make it easier to focus. F/4.5 is a steep light cone, and it’s easy to overshoot the point of best focus. Stopping down the scope makes a shallower light cone, so it’s easier to watch the image transition from out of focus, to near focus, to in focus. I’m going to test this method of finding best focus on some close double stars.

I had done some calculations in advance to figure out what sizes of aperture masks I’d want to try out. Given that the AR102S has a fixed focal length of 459mm, here are the focal ratios at full aperture and at 10mm decrements:

  • 102mm gives 459/102 = f/4.5
  • 90mm gives 459/90 = f/5.1
  • 80mm gives 459/80 = f/5.7
  • 70mm gives 459/70 = f/6.5
  • 60mm gives 459/60 = f/7.7
  • 50mm gives 459/50 = f/9.2
  • 40mm gives 459/40 = f/11.5

3-inch-sub-aperture-mask

I didn’t want to trade away too much resolving power, so I tested the scope on the moon using cardboard masks of 76mm and 60mm, made from the light cardboard spacers from a box of wet cat food. The 76mm is shown above. Perhaps unsurprisingly, at this aperture and focal ratio (f/6) the view was still unappealingly soft. But 60mm looked good, with minimal CA. This makes sense – the working focal ratio of f/7.7 is a healthy step beyond the f/7.2 that the Sidgwick standard suggests for a 60mm aperture. Going any smaller would be trading away valuable resolution, without significantly improving the image.

60mm-aperture-mask-1-gallon-jar

The light cardboard aperture masks were fast and easy to make, but they weren’t very sturdy. To make a more permanent mask, I needed plastic, heavier cardboard, or foam-core board. So I unscrewed the dewshield from the scope and walked down to the dollar store, where I looked for food packages and storage containers that might fit. Finally on the last aisle I found this 1-gallon plastic jar. The lid slip-fit over the dewshield with just a bit of extra room, which I knew I could shim out with some sticky-back felt.

60mm-aperture-mask-2-marking

I wanted to make sure the lid would fit before I did the hard work of cutting, so I put the felt on first. This was very familiar – it seems like every other scope I get has a loose dust cover that has to be shimmed to fit correctly. I’ve been slowly chipping away at the same package of sticky-back felt since 2010. I didn’t have a compass handy, so I used a small paper ruler to make a ring of marks around concentric 60mm circle inside the lid. Then found a lid to a jar of vitamins that was exactly 60mm in diameter and used that to trace the circle neatly.

60mm-aperture-mask-3-completed-mask

I was going to cut out the aperture using hobby knife, but the plastic was too tough. So I moved up to a box knife, and then a linoleum knife. Then I said heck with it and got the Dremel. The hole I cut wasn’t perfectly circular and had rough edges to boot, so I wrapped some sandpaper around a pill bottle to make a tool for rounding out the aperture.

60mm-aperture-mask-4-comet-edition-before

Here’s the scope before…

60mm-aperture-mask-5-comet-edition-after

…and after.

Even with the aperture mask, the AR102S is not a champion scope on solar system targets. The C80ED blows it away, which makes sense – it has a 33% resolution advantage over the stopped-down AR102S, and frankly just better glass. But at least the view now is clean and not appallingly degraded. A dramatic way to see the difference is to get a good tight focus on the moon with the mask on, then quickly take it off without removing one’s eye from the eyepiece, and watch the view get a lot brighter and a lot softer at the same time.

I have a few more things I want to do. The 60mm aperture mask fits over the end of the scope so securely that it could work as a dust cover, if only I can find or make something to plug the central hole. Also, I think I am going to play with making aperture masks in other sizes, just to see what happens.

And finally, I have another 4″ scope that will be fun to make an aperture mask for. But that will be a subject for another post.
skyscanner-aperture-mask-test-fit-jar-lid

h1

Hacking the SkyScanner 100: six easy pieces

February 7, 2017

skyscanner-100-before-hacking

Remember this thing? It’s a lovely little scope, but I got tired of crouching over it. And it’s made out of tractable materials – rolled steel and particle board, mostly – and costs next to nothing as these things go ($100 as of this writing), so it was basically crying out for customization. I made six fixes – two on the base, two on the outside of the tube, and two on the inside of the tube. They’re all cheap, fast, and easy, hence the title of the post (with apologies to Richard Feynman!).

skyscanner-hacks-1-eyepiece-rack-and-handle

My first two mods were to the base. (1) I had a leftover eyepiece rack, which I screwed to the base in the only place and at the only angle that it would fit. It works great. My very first scope, an Orion XT6, came with an eyepiece rack like this (which has since been dropped from the base model XT6), as did my XT10, and I’ve always found them to be very convenient. It took me a long time to realize that an eyepiece rack didn’t have to be horizontal to work, especially if the eyepieces are always capped so they can’t fall out.

(2) The second mod is the wire handle on the top of the base, which I scavenged from an earthquake stabilization kit for furniture. It’s just a small woven steel wire with an eyelet at either end which is screwed into the particle board that makes up the base. When I put it on, I thought I’d cut a piece of aquarium tube to slide over it as a cushion. I still might do that at some point, but so far I haven’t needed to. The whole scope and mount only weighs 6 lbs, maybe 7 with a full eyepiece rack, and I’m never carrying the scope that far. Basically from the garage to the driveway, or from the car to a picnic table. So the wire handle has not had the opportunity to get uncomfortable yet. This was the simplest mod but may be the one that has made the most difference in terms of overall convenience. Orion should just build ’em this way, even if it bumped up the price by five bucks.

The piece of tape on the tube is covering the holes intended for mounting the dot finder. I never used it, and now the holes are in an inconvenient place. I’ll come up with a more permanent and better-looking solution than the tape, but at least it keeps dust out of the tube for now.

skyscanner-hacks-2-focuser-position-and-laser-trough

This photo shows the two mods to the outside of the tube. (3) Originally the focuser pointed straight up, with the focus knobs on the opposite side of the base arm. I wanted the focuser to face up at a comfortable angle, so I wouldn’t have to lean so far over the scope while using it. And I wanted the knobs on the same side as the base arm, so the eyepiece rack would face the user. Achieving both of those goals meant moving the scope’s dovetail bar about 135 degrees around the tube. To do that, I had to drill new holes in the tube. I used a paper wrap to get the new holes lined up with the old ones and with each other, made pilot dents using a thumbtack, then drilled them out with a cordless electric drill. It’s not a good idea to have metal filings flying around precision optics, so I removed both mirrors before drilling the holes. It’s fun to take a telescope all the way apart and put it back together, especially if it works better after you’ve done so. Everyone should try it.

(4) Once I had the dovetail moved over to the new holes, I had a couple of perfectly good holes in the tube in a convenient place, and at a convenient angle from the dovetail and the focuser. So I built a laser trough to go there. It’s an idea I got from Ken Crowder, a former PVAA member. Back in 2010 on one of my first trips to the Salton Sea, Ken had his 8-inch SCT set up with a video camera for taking integrated shots of deep sky objects. To help get on target, he had wooden bracket pretty much like the one you see above, into which he would lay his laser pointer. Lots of companies make special rings for adapting handheld laser pointers into telescope finders. But like me, Ken wanted to be able to do other stuff with his laser at a moment’s notice, like trace out constellations for newcomers, or point out especially nice things in the sky without moving his telescope. The wooden bracket lets you drop in the laser and get on target quickly, and then lift it out and use it for other things.

To fine-tune the aim, Ken would shim his with little scraps of wood and paper, and I intend to do the same if necessary. But with the SkyScanner’s 400mm focal length, a 32mm Plossl yields 12.5x and 4-degree true field of view, and even a 25mm gives 16x and a 3-degree field, so even without shimming the laser is usually good enough.

skyscanner-hacks-3-laser-trough-close-up

Here’s a close-up of the laser trough. I built it out of wood scraps and glue. The hardware store didn’t have hex-cap metric screws in the size I needed so I got machine screws and washers. I used a spade bit to cut little indentations for the hardware. The two square stringers on the bottom are to help keep the whole rig aligned with the long axis of the tube.

skyscanner-hacks-4-primary-center-spot-and-secondary-bolts

Finally, the two inside-the-tube mods. (5) I center-spotted the primary to aid in collimation. The best thing to use for this is a notebook reinforcing ring. I have a whole package of those somewhere, but I can’t find it. But I did find a package of the little round stickers of the kind you use to make price tags at garage sales, and made it into a ring with a handheld hole punch. It works great. I have doubts about its longevity, but if and when it falls off, I’ll just make another. It seriously takes less than five minutes. Most mass-produced reflectors these days ship with their primary mirrors already center-spotted, and it really helps with collimation.

(6) As explained in the last post (link), I swapped the stock Allen bolts for secondary collimation with standard hex-cap bolts that I can turn by hand and lightly tighten with a small pair of pliers.

skyscanner-hacks-5-all-ready-to-go

So how does the reborn SkyScanner work? Pretty darned well! It was already an extremely convenient and easy-to-use scope, and now it’s even moreso.

I’m not done hacking on it. As shipped, the primary mirror can’t be collimated. I read on CN about lengthening the bolt holes in the OTA that the mirror cell is screwed into, so that the mirror cell can be tilted to achieve primary collimation. I tried this and didn’t like the results. It’s very hard for me to get the mirror cell mounting bolts tightened down enough to keep the mirror cell from shifting. Especially because it’s natural to grab the back of the scope to help aim it, and in doing so I almost always shift the mirror cell relative to the OTA and subtly throw off collimation. Or not subtly – at f/4, every last arc-second of collimation matters. So I’m going to build a fully-collimatable mirror cell.

And I’m going to figure out a better way to cover those holes in the tube for the finder. And flock the inside of the tube, and make a long dewshield to keep stray light from hitting the secondary and the focuser drawtube. And probably do some other stuff I haven’t thought of yet. I’m basically going to treat this scope as a testbed for every hack I can think of. Should keep me busy for a while.

h1

Upgrading secondary collimation bolts on a reflector

February 5, 2017

dscn1615

Here’s a fast, cheap, and easy hack that I do to every reflector that passes through my hands. I hate messing around with hex wrenches while collimating my reflectors, so I replace the Allen bolts with standard hex-cap bolts that can be turned by hand and lightly tightened with a socket wrench or pliers.

I’ve done the mod to all three of the StarBlast 4.5s that the PVAA has placed with the Claremont Public Library – which I am responsible for servicing every couple of months – as well as to my XT10, my SkyScanner 100, London’s XT4.5, and the 5″ f/5 SkyWatcher Newt I had a few years ago. You’ll notice that so far, all of the scopes I’ve done this to have been Synta-made and Orion or SkyWatcher branded. All of the smaller ones have taken identical hardware, but I did the XT10 so long ago I don’t remember – I think it took longer and possibly larger-diameter bolts, but I could be talking crazy.

If this is something you’re interested in doing, you need to take two measurements, make a run to the hardware store, and do about five minutes of work when you get back home. Or you can get a set of Bob’s Knobs, which are much nicer and designed for no-tool use. But making your own with hex-cap bolts costs less than five bucks and gives passable results, and doesn’t stop you from picking up Bob’s Knobs later if you like.

The first thing you want to know, that you can only find out from your assembled spider/secondary mirror mount, is the length of bolt that you’ll need. The secondary holder has two parts, the hub that the spider attaches to, and the 45-degree-angled mirror holder that is usually attached to the back of the secondary mirror itself with double-sided tape. The collimation bolts engage with threads in the hub, and bear against the flat back surface of the mirror holder. The Allen bolts that the scopes ship with are much shorter than the distance from the mirror holder to the front of the hub. So collimation requires sticking a hex wrench down the hole blindly and fumbling a bit to get it seated in the socket (at least for me – if that doesn’t bother you, this post will probably not be of much use).

secondary-mirror-diagram

If you’re going to replace those little shorty Allen bolts with regular bolts, you need to know the distance from the mirror holder to the front of the hub – it’s the dimension between the dotted lines in this diagram, labeled “min. length for bolts”. Your replacement bolts need to have shafts at least this long, or their caps are going to run into the hub before they engage with the mirror holder. It doesn’t really matter how much longer they are, as long as it’s not ridiculous – you don’t want them sticking so far out of the front of the scope that they’ll catch on things or scatter light into the tube.

The second thing you need to know is the type of collimation bolt your scope has – its diameter and thread pitch. If you don’t know that, and you probably won’t the first time out, just back one (and only one!) of your Allen bolts all the way out, and take it with you to the hardware store.

metric-bolt-gauge

At the hardware store you’ll find a bolt gauge like this one. Actually you’ll probably find two, one for English hardware and one for metric. If you have a scope made in China, it probably uses metric hardware, so start there.

testing-original-bolt

Here’s a close-up of me testing one of the collimation bolts from the SkyScanner in the metric bolt gauge. As you can see, it fit the 4mm socket.

replacement-bolt-bag

I already knew from measuring the scope’s secondary that I needed bolts longer than 20mm. And here’s my part: a 4mm x 25mm (diameter x length) bolt, part #81494 at Orchard Supply and Hardware. I bought six – three for my SkyScanner 100, and three for London’s XT4.5, which I hadn’t done yet.

testing-replacement-bolt

My motto is “trust but verify”, especially before buying hardware. If unbagging a part to test it in the store makes you queasy, you can just push the end of one bolt through the bag, enough to try it on the bolt gauge. This won’t destroy the packaging should you need to put it back – buy it or leave it, you can poke the bolt back into the package and only leave a tiny hole (in this case, 4mm!).

original-allen-bolts

Here are the old bolts ready to go into the bag, which has all of the original Allen bolts from half a dozen reflectors now. I don’t know why I save them. I ‘m kind of an astro-hoarder. If anyone out there wants these, let me know and I’ll send them to you gratis.

Anyway, so far, so good. You get home, back out the Allen bolts, and replace them with the hex-cap bolts. Now, this is important: for your sanity, replace the bolts one at a time. If you screw all of the original Allen bolts out before putting in any of the replacements, your secondary is going to be flopping around uselessly. It may well rotate in place and end up not even facing the focuser drawtube. Take it from an idiot who has done this! But if you replace the bolts one at a time and get all of the replacements finger-tight, the mirror will maintain its radial orientation and may even stay in pretty good collimation through the procedure, although of course you’ll want to recheck and touch up the collimation when you’re finished.

There are loads of good sources on Newtonian collimation online so I’m not going to reinvent that particular wheel. I’ll just add a couple of tips that have made my life a lot easier. The first is to try to balance the push and pull on the three collimation bolts. In other words, if you want to screw in one bolt, back off another one first. If you only ever collimate by screwing in, you’re going to either run out of travel, jack up your mirror holder, or force it farther down the tube, depending on what the deal is with the mounting bolt (some are spring-loaded, some aren’t). When I sit down to collimate the secondary, I quickly go around to each bolt and turn it both ways, backing out first and then screwing in, to get a sense for what each bolt does.

The second tip is specific to these replacement hex-cap bolts on the Orion/Synta scopes that I own and service. Once I get the secondary collimation where I want it by tightening the bolts with my fingers, I go back around and give each one a small additional twist, maybe a sixth of a turn, with the little pliers I keep in my eyepiece box (see here). If I do this evenly to all three bolts, it doesn’t affect the collimation, and the extra bit of tightness helps the scope stay in collimation longer. That might no be needed or even helpful depending on how the mounting bolt engages the mirror holder. Play around with it and see what works for you.

Replacing these bolts was just one of half a dozen hacks I made to the SkyScanner 100. The rest will be covered in another post very soon. Until then, clear skies!

h1

What’s in my eyepiece case

January 9, 2017

eyepiece-case-1

In the 9.3 years I’ve been stargazing, I’ve had three eyepiece cases. The first was a Plano tackle organizer with a thin layer of bubble wrap taped into the lid, which held half a dozen 1.25″ eyepieces. After that I got one of the cool foam-lined purpose-built eyepiece cases that Orion and everyone else carry, but that one didn’t last long – probably less than a year. The problem was that although it did a fine job of holding the eyepieces, it didn’t have room for all the other stuff I wanted to cram inside.

Then in 2012 or so I got the eyepiece case that I’m currently using, and the one that I’ll probably be using for a long time to come. It’s not bespoke – it’s a $20 Craftsman toolbox I picked up at Orchard Supply and Hardware. I think this particular model has been discontinued, but there is something almost identical on the shelves today, and there probably will be from now until the end of time (or at least civilization). This one is probably the current incarnation, and hey, it’s only 10 bucks and has a better latch.

The exterior doesn’t deserve much comment. I put my name on it, and its contents, mostly to make it clear to anyone who might find it among my stuff if they’re going through the garage looking for tools of the terrestrial variety. I don’t fully trust the single latch so I keep a zip tie run through the hole where the lock would go. The zip tie goes in the top shelf when the case is open.

eyepiece-case-2

The top shelf, which is removable, holds my red flashlight, Astro-Tech dielectric diagonal (previously discussed in this post), eyepatch, Barlow, and quick-look and outreach eyepieces – various Plossls, the 6mm Expanse, and the dreadful 4mm VITE that I haven’t yet thrown away. Not shown in the photo are a spare pen and a little Sharpie, both buried under the bag containing the diagonal. You can see that all of the eyepieces are still living in the boxes or cases they came in, and they’re held in place against rocking or tipping by a thick layer of bubble wrap taped into the lid of the tool box.

eyepiece-case-3

Another sheet of bubble wrap sits below the top shelf and cushions the gear in the bottom of the toolbox.

eyepiece-case-4

The bottom of the toolbox holds my ‘top shelf’ eyepieces and a lot of spare gear besides. The three Explore Scientific eyepieces came clamshelled in foam, and each one rests in the bottom half of its original clamshell. One of the top halves forms a bed for the 5mm Meade MWA. The two slots in the middle used to hold my Stratus eyepieces before I let them go – the ES models are smaller, easier to handle, and do a significantly better job. Now those slots hold the 32mm Astro-Tech Titan, my only 2″ eyepiece, the GoSky iPhone adapter I blogged about here, and a cord to hang my eyeglasses when I’m observing.

Around the edges I have all kinds of stuff crammed into the spare spaces. Clockwise from the top:

  • Contact info, just in case the case ever gets lost and found by someone decent. Has my name, address, email, and cell number.
  • Lens cloth, just in case.
  • Spare AAA batteries for the green laser, the red flashlight, and the laser collimator.
  • A ziploc. Never know when you’ll want a small waterproof bag. Sometimes holds spent batteries if I have to do a field swap.
  • Laser collimator. Reminds me, I need to blog sometime about how to collimate a laser collimator.
  • A set of hex wrenches for collimation.
  • Small pliers for the same purpose – I’ve swapped the hex bolts on a lot of scopes for standard hex-head bolts that I can tweak with pliers. Much better than farting around with hex wrenches.
  • Green laser. Super-useful when stargazing with newbies and old hands alike.
  • Tiny atlas – so I’m never without one. This is the Collins Gem Guide to Stars, which has little charts of the constellations and a short list of the most impressive DSOs for each one. Unlike Sky & Tel’s Pocket Sky Atlas, this thing truly is pocket-sized, and small enough to take up essentially no space or weight in the case. It has saved my butt a couple of times when I forgot all other atlases.

There is one other thing. In the third photo you can see a light blue bag through the intermediate layer of bubble wrap. I think that’s the bag the eyeglasses cord came in. Now I use it to hold a set of iPhone earbuds, which serve as a remote trigger when I’m taking pictures with the iPhone adapter, as shown and explained here.

That’s it – an inexpensive, sturdy, and above all roomy case for my eyepieces, with nooks and crannies for a whole lot more.

What’s in your eyepiece case?

h1

My first telescope-building adventure: a 3-inch reflecting travelscope

November 20, 2014

I got my first telescope, an Orion XT6 dob, back in October of 2007. It wasn’t an impulse buy – I had spent almost exactly one month reading the telescope recommendations in books and magazines, on Cloudy Nights, and on countless other webpages, including Ed Ting’s amazing scopereviews.com.

Inevitably during this time of rapid, omnivorous consumption of all available telescopic information, I came across many websites that dealt with amateur telescope making (ATMing). Even more interestingly, I found that lots of folks had built little scopes, mostly reflectors, that could fit in a carry-on bag for airline travel. Probably the most exciting to me was Bob Bunge’s 4.25-inch f/4 reflector, which he named “Pringles” – exciting because it looked like something I could actually build. Although I have not to date built any scopes along those specific lines, Bunge’s little scope showed that it was possible to get good, useful results from a fairly humble structure.

I should mention that I was fascinated with airline-transportable telescopes mostly because I was living in Merced at the time, in California’s central valley. It was a fairly depressing place to be a stargazer. The central valley is ringed by mountains and in the summer, smog from vehicle traffic and dust from agricultural work just pile up in the atmosphere. I actually experienced worse smog in Merced than I do here on the edge of the LA basin. (It didn’t help that the only astronomy club within 50 miles of Merced had gone defunct a year or two before I got there.) Anyway, Vicki and I grew up in Oklahoma and that’s where most of our extended family lives, so we go back to visit once or twice a year. I was really keen to get out under dark Oklahoma skies with a telescope, but I figured it would have to be a telescope I took with me.

So that’s me in the autumn of 2007: mad about telescopes, unhappy with my skies, interested in building something airline-transportable. Then one day I was following London through the toy section of a department store and saw a 3-inch National Geographic branded reflector telescope on sale for about forty bucks. I’d seen a lot of travelscopes in that aperture range online, so I bit.

National Geographic 76mm reflector

I did at least try to use the scope as sold. It was a decidedly mixed bag: the tripod was actually fairly sturdy, and the 6×30 finder, although 100% plastic (even the optics), actually worked. But the whole thing went to hell in the last four inches of the light path. The 0.965-inch plastic focuser was the roughed rack-and-pinion unit I’ve ever used – trying to focus was like driving down a washboarded country road in an old pickup with no suspension. The drawtube was so loose that when it was racked out you could move it from side to side by almost half a centimeter. The final insult, though, is that to make the plastic focuser look like metal they painted it silver – inside and out. That meant that when you looked through the focuser you get all kinds of horrible reflections from inside the focuser drawtube! With an insane amount of effort, one could get something into the field of view, only to be rewarded with the mushiest, most chromatically-aberrated views I have ever seen in a Newtonian, which I blamed (correctly, as it turned out) on the beyond-crappy, entirely-plastic eyepieces. Now I understood why every piece of advice for beginning astronomers included a warning about department store trash scopes. Shame on National Geographic for lending their imprimatur to such an unusable instrument, which was good for only two things: making newcomers hate astronomy, and spare parts. I promptly disassembled mine.

my travelscope v1

Here’s the v1 test rig I lashed together as a proof-of-concept. The scope is held onto a tripod by a 1/4-20 T-nut embedded in the bottom strut. The helical focuser is made from plumbing parts, which are stuck to the upper tube assembly (another plumbing fitting) with Automotive Goop.

my travelscope v2-1

Here’s the v2 incarnation. I shortened the upper tube assembly and painted the whole thing. The grooves at the back of the struts are so I could slide the mirror back and forth to get in the neighborhood of focus, then touch up with the helical focuser. That also meant I had to recollimate, but I had to do that anyway.

my travelscope v2-2

Lots of things require explanation in this picture. First, my super-simple all-axis adjustable spider is just a pencil with an eraser on either end, wedged into the upper tube assembly. There’s a ridge inside the UTA right where the erasers needed to bite, so I ground it down with a Dremel. But I only discovered that after I painted everything, which is why there is a patch of bare white plastic showing. The back end of the scope is the metal-and-plastic mirror cell from the original scope, complete with spring-loaded collimation screws. I had removed the mirror, drilled three equidistant holes in the side of the mirror cell, and glued in 1/4-20 nuts for the eyehooks to thread into. The red rubber band around the mirror cell was to give the struts a bigger, no-slip contact patch. At the front end, you can just make out an extra 1/4-20 nut between the bottom strut and the UTA. I actually had one of these inboard of each strut, because the UTA was slightly smaller than the mirror cell and I needed the nuts as spacers to keep the struts straight. Finally, there is simply a boatload of hardware here: 6 eyebolts, 6 thumbscrews, 6 washers, 3 extra nuts up front…gah.

DIY 3-inch travelscope reborn

Here’s the scope in its final – or at least current – version. The first simplification was to go from three struts down to two. Second was to realize that since I was collimating by sliding and rotating the mirror cell anyway, I could ditch the oversized original mirror cell and just stick the primary mirror in a drain endcap that would match the diameter of the UTA. Third was to realize that I could get by with a lot less hardware: just 4 thumbscrews and 4 washers for a total of 8 bits, and I could even glue on the front washers if I was so motivated. And the wooden struts are even the right width to fit into a Vixen-style dovetail, so I can attach the scope to an astronomical tripod with no extra parts, although one strut is still threaded with T-nuts for attaching to a camera tripod (you can see it mounted that way in this post, in a photo from 2008!). Still rocking the pencil spider. I should at least paint that thing black.

So, how does it work? Surprisingly well, given that there’s almost nothing to it. I had it out last night for a quick spin around the sky, and took in the Pleiades, the Ring Nebula, Albireo, the Double Cluster, and Stock 2. None were spectacular, but all were recognizable. I’ve never rigged a shroud, so scattered stray light definitely gets into the mirrors and eyepiece and cuts down the contrast, which isn’t good since the scope gathers so little light to begin with. I actually got a noticeable improvement in contrast just by cupping my hands above the mirror cell. I should really make a decent shroud and give this odd little duck a fair shake. I’ve only used it a handful of times, always more for testing than for actual observing, and I’ve never flown with it, so it’s never gotten to serve its intended purpose. On the plus side, in addition to throwing up an acceptable image, it makes a great model for demonstrating the principles of a Newtonian reflector. And it’s still the only complete telescope (minus the optics) that I’ve built from the ground up on my own.

The main legacy of this scope was to convince me that I was a telescope user, not a telescope maker. That may change someday – I do tackle the odd DIY project here and there – but it was definitely the right decision in my first year as an amateur astronomer.

h1

How to build a stand for a Dobsonian telescope

November 19, 2014

DIY dob stand 1

London got an Orion XT4.5 for his birthday last week. We’ve had it out a couple of times and it is an awesome scope. It strongly reminds me of my old XT6–the XT4.5 is a bit smaller, but probably not as much as you’d think from looking at photos of it. It’s solid, moves well, and the optics are great.

It is, however, too short. Even for London, and he’s just a bit over 4 feet tall. Clearly, we needed to get the scope up off the ground. The first night out, just to test potential setups, I put the scope up on an old plastic milk crate. This is the heaviest, sturdiest milk crate I’ve ever seen, and the scope still rocked back and forth on it. We needed a 3-legged solution.

Now, Orion makes a dedicated Dob stand that is really nice. It has grooves instead of divots to accommodate Dobs of many sizes. It also costs about $145, which I think is stark raving lunacy for 4 pieces of wood that any idiot could screw together.

DIY dob stand 2

The Dob stand I am about to show you will also accommodate any size of Dob, as long as you build it that way. It also costs next to nothing. For me it was precisely nothing since I used old crap I found in the garage: wood from a long-defunct futon (the same futon that gave some of its physical body to my old DIY Dob base), some metal shelf supports from a project that never got off the ground, screws from my “spare screw” box, and the modest tools I already owned, namely a saw and a handheld drill.

Step zero was to have London sit in one of the folding chairs that we use when we go camping or up Mount Baldy to stargaze, then set up the XT4.5 in front of him on the floor, pointing straight up, and measure the vertical distance between the eyepiece and his eye. As always when building anything to do with a Dob, it’s better to skew low–it’s always easier to bend down an extra inch to get to the the eyepiece at the horizon than it is to lift your butt an extra inch when the scope is pointed straight up. My rough target height for the stand was about 6 inches.

Conceptually this thing is dead simple: it’s just a ‘T’ of wood, reinforced on either side with the shelf supports. I figured out the dimensions by putting the XT4.5 down on a big sheet of paper and tracing the feet, and then laying the wood down on the paper sheet and tracing the cuts that I would need to make.

DIY dob stand - top close-up

Once I had the basic T-shape together, I set the XT4.5 on it and traced the feet again, directly onto the wood, then used a spade bit to drill out some depressions. The spade bit has a triangular tooth at the center that cuts a deeper hole, and that became the pilot hole for the screw that holds each leg on. So the legs are precisely below the feet of the Dob for maximum strength and stability.

DIY dob stand - foot close-up

In addition to the big screws that run down their long axes, the legs are reinforced with small angle brackets. These are probably overkill, but I wanted to build this thing once and then not worry about it for the next decade or two. In retrospect, angling the two “back” legs toward the center might have been smarter than making them parallel to the cross-bar. But like I said, this thing is probably over-built as it is.

DIY dob stand 3

The last step was to paint it with a couple of coats of black primer, which I also had lying around in the garage. The black paint definitely classes it up a bit. From a few feet away in the dark, you might even mistake it for something that had shipped with the scope.

How does it work? Wonderfully. I took care when I used the spade bit to cut the depressions so that the feet of the XT4.5 just fit inside their outer edges. Once the XT4.5 is settled in place, it will not slide or rock at all; it practically snaps in. You’d have to knock it over to get the ground board to move. You can grab the tube and swing it all over the sky and the ground board and stand stay put. And there’s no detectable vibration. The legs are each 5 1/4″ long and the T is 7/8″ thick, so the height is acceptably close to my “roughly six inches” goal. More importantly, London is able to observe comfortably while seated, whether he’s looking at Polaris low in the northern sky or the Andromeda galaxy dead overhead (and it was the other night, too, darn near straight up).

DIY dob stand 4

There is one final addition I want to make before I call it done: I want to sink a cap nut into the bottom of each leg. That way I can screw bolts of various lengths into the legs to make smaller feet. The stand as built does not rock on any surface on which I have tried it (driveway concrete, grass, and gravel so far), but the bottoms of the legs are long enough that it potentially could. Using bolts as feet would make the contact patches smaller and reduce the opportunity for rocking. Plus, that way the stand can grow with London: as he gets taller, we can swap out the foot-bolts for progressively taller pieces. I’d use cap nuts instead of T-nuts so the support bolts couldn’t punch through and damage the wood.* With a bigger Dob, I might put on casters. In fact, the swiftness and ease with which this thing came together–I did essentially everything but paint it in one afternoon–has got me thinking about building a rolling unit for the XT10. If that ever happens, you’ll read about it here.

* It just occurred to me as I was finishing this post that if it wouldn’t have upset London to start hacking on his brand-new scope, I could have sunk cap nuts into the ground board of the XT4.5 itself, and put long threaded bolts straight into them to make feet. If I ever get an XT4.5 of my own, I’ll probably do exactly that.**

** It further occurred to me after the post went up that the ground board already has threaded holes for the rubber feet, which have embedded bolts and screw in from the bottom. So in fact if I had thought it through I probably could have skipped the whole Dob stand entirely and just screwed 6-inch-long bolts into the ground board; if the included rubber feet are loafers, those long bolts would be stiletto heels. I haven’t actually tested that setup, mind you, but it seems like it ought to work.

If you don’t have a bunch of crap lying around in your garage, you can probably still build something like this for under $20, maybe less than half that if you can scrounge the wood. If you don’t have metal shelf supports and don’t want to spring for them, you could cut pieces of wood to reinforce each side of the ‘T’ diagonally. Painting is optional, the thing works just as well in its unpainted ugly state. If your woodworking skills are like mine–nearly nonexistent–you can also use the unpainted unit to make your carpenter friends cry. Have fun!

h1

Guest post: David DeLano’s ultimate Galileoscope quest, Part 5 – SCT focuser notes

March 15, 2014

Well, our long journey is at an end (for now!). No new pictures, just some notes on how long the various bits are, should you want to add an SCT focuser to your GS (or just about anything else). For previous posts in this series, go here. Thanks, David!

IMG_1242

Yes, that is a 2-inch focuser on David’s Galileoscope. Why do you ask?

SCT Focuser – 90mm
Low Profile 2″ – 1.25″ adapter – 10mm
Tele Vue Low Profile SCT adapter – 38mm
SCT M-M – 10mm

For F/11 objective, need something close to 75mm + 50mm = 125mm
Above parts are 90mm + 10mm + 38mm + 10mm = 138mm
Need to cut down 23mm, though 20mm might be enough.

Could use a zero clearance 2″ – 1.25″ adapter or negative adapter (ScopeStuff) (negative won’t work, since the diag won’t slide into it).

From Agena

SCT Focuser – 90mm
Low Profile 2″ – 1.25″ adapter – 1mm
TV Low Profile SCT adapter – 40mm (probably a better figure than OPT)
SCT M-M – 1mm

Total – 90mm + 1mm + 40mm + 1mm = 132mm (5-7mm too much)

However……since not using the SV helical, there might be gain on the diag EP end.