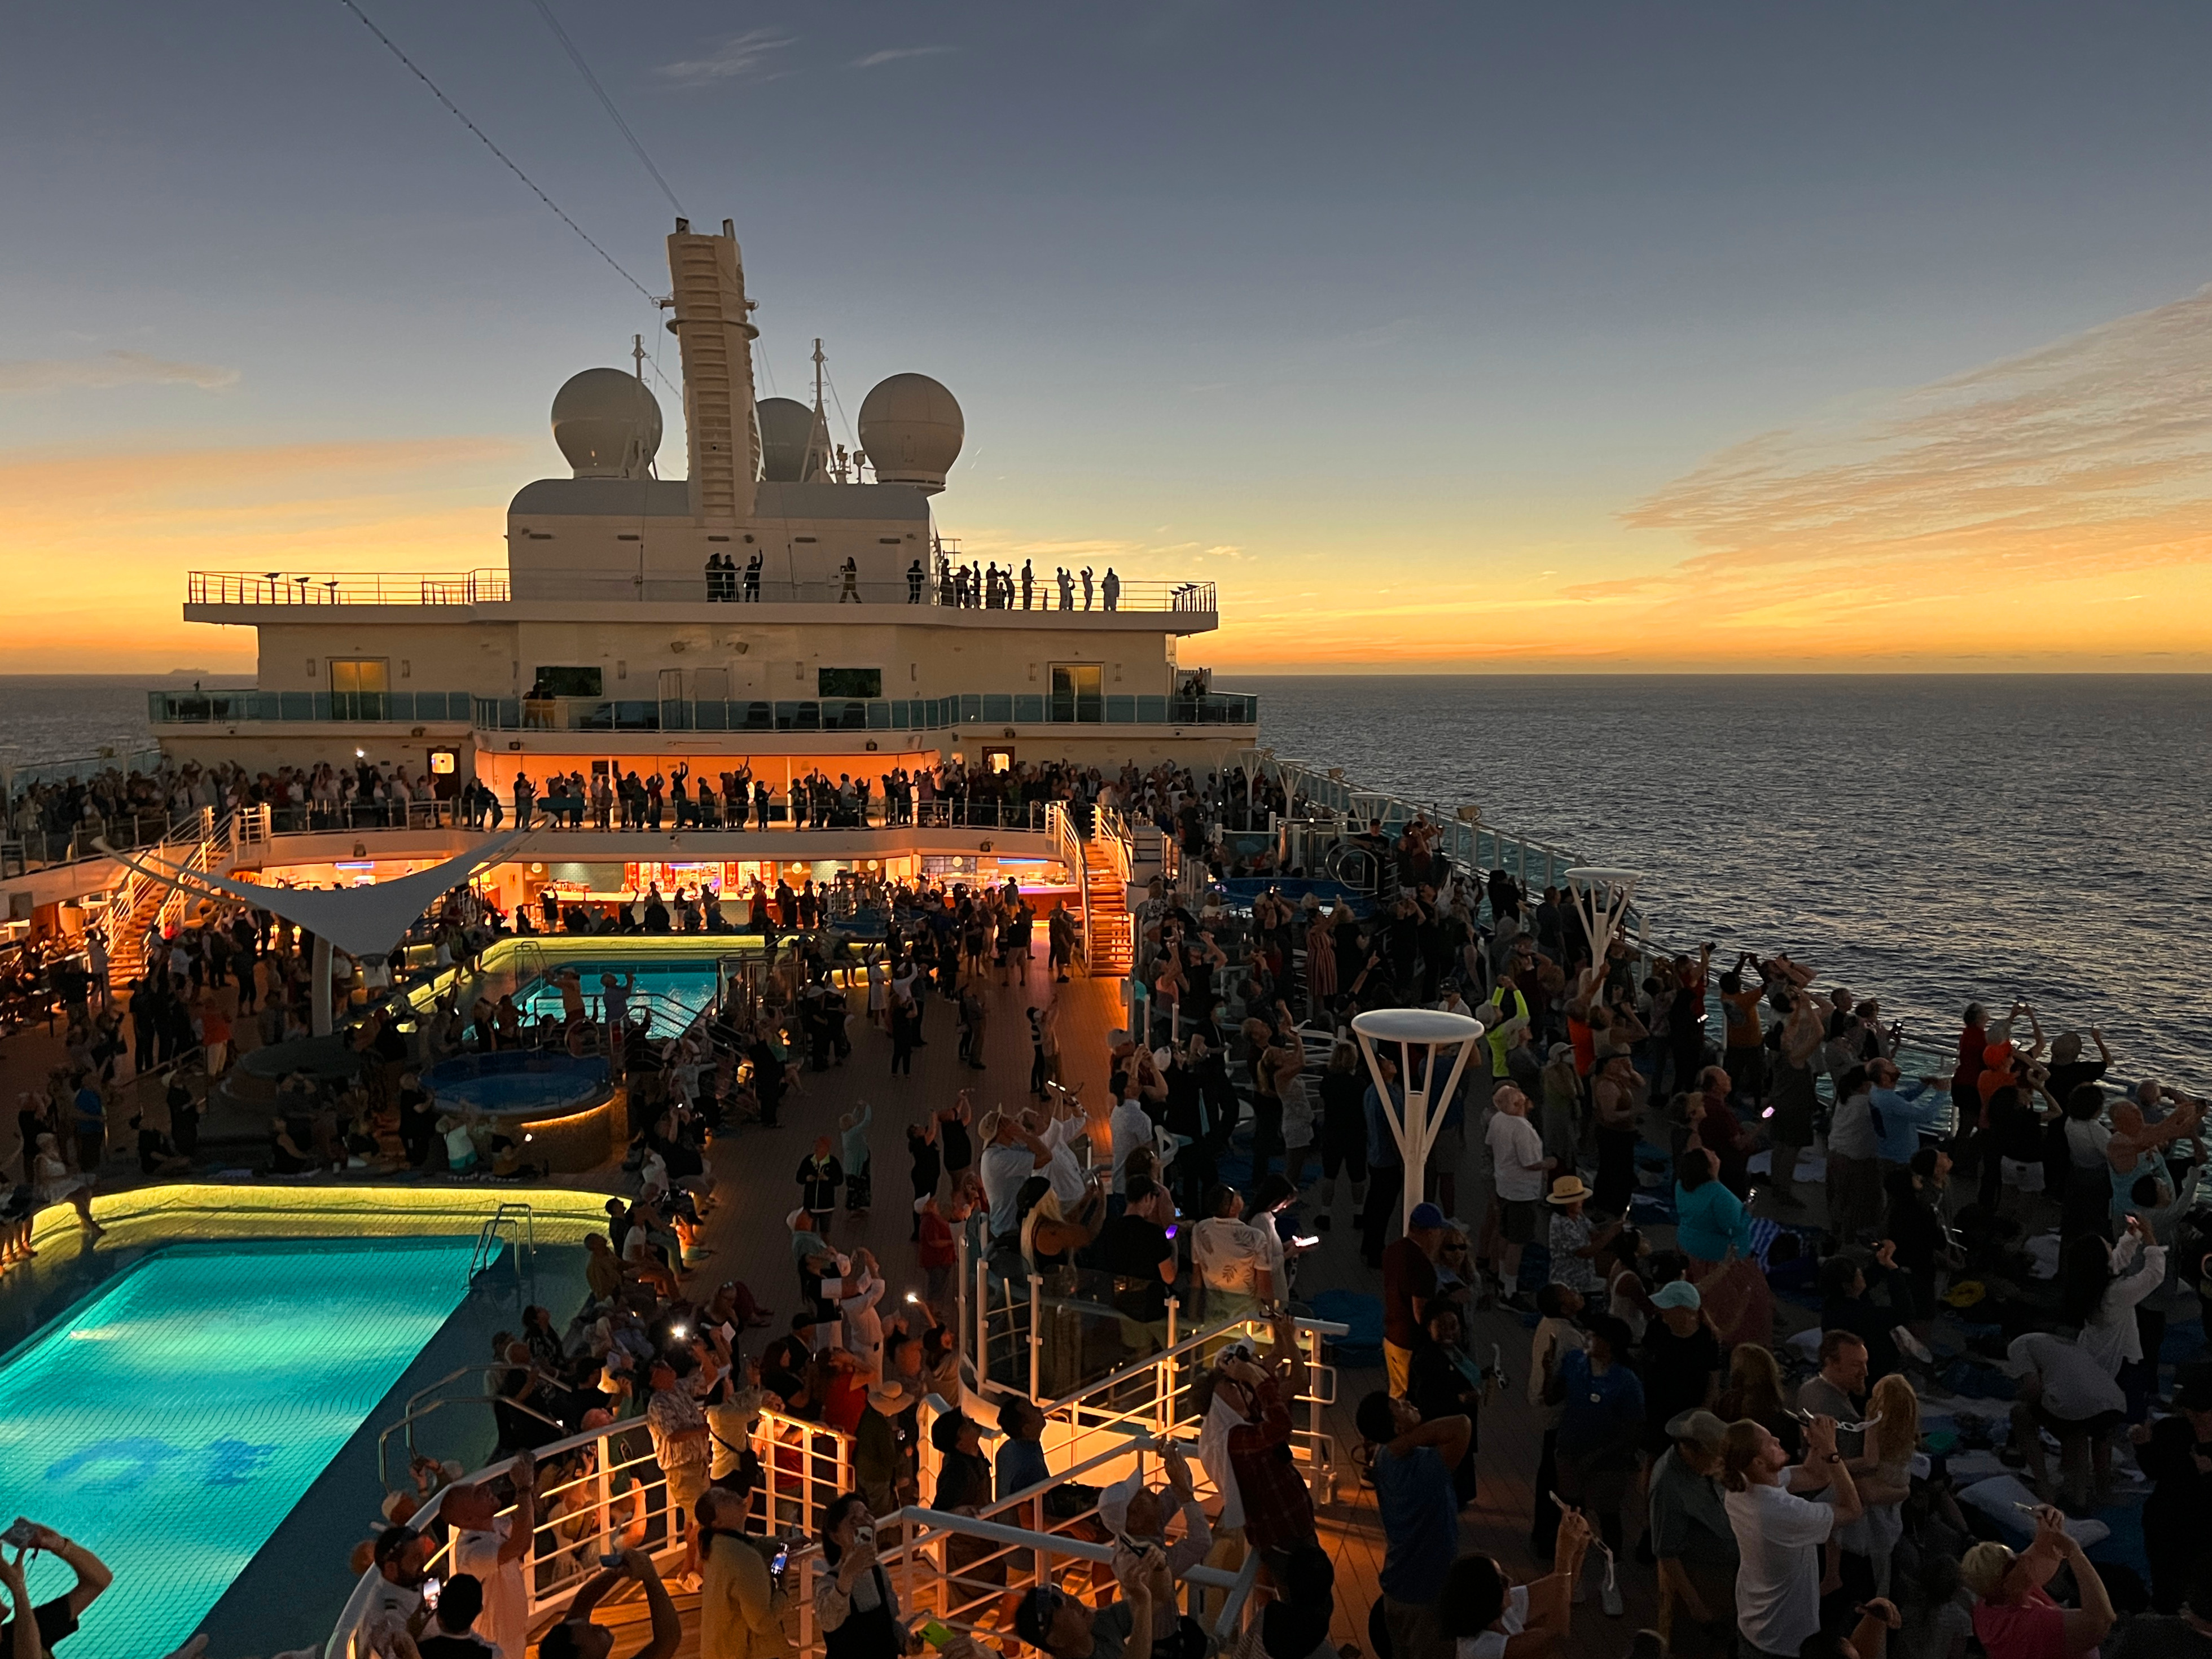
I was fortunate to get to be a speaker on the Discovery Princess on an eclipse cruise to the Mexican Riviera. I’m posting some photos here not only as a quick-and-dirty observing report, but also to make them available to my fellow travelers. Folks: download, post, and print at will!
During the eclipse on April 8 I did some pinhole projection.
I used a paper template that showed the west coast of Mexico, including our ports of call: Cabo San Lucas, Mazatlan, Manzanillo, and Puerto Vallarta.
Possibly my favorite effect during a total solar eclipse is the 360 sunset. Here’s my view looking forward on the starboard side, just after the start of totality.
After totality, I enjoyed on of the ‘Eclipse’ drinks that the bars on board were serving.
Photos of my piece of the Sikhote-Alin meteorite — the one I was carrying around the ship and inviting people to hold for themselves — are in this post (link). And the meteorite now has its own profiles on Facebook (link) and Instagram (link). Come say hi!
Photos of many of the other meteorites and impactites from my “Space Rocks: Meteorites and Tektites” talk are available in previous blog posts, under the ‘My Meteorites’ category (link). Here are a few that aren’t:
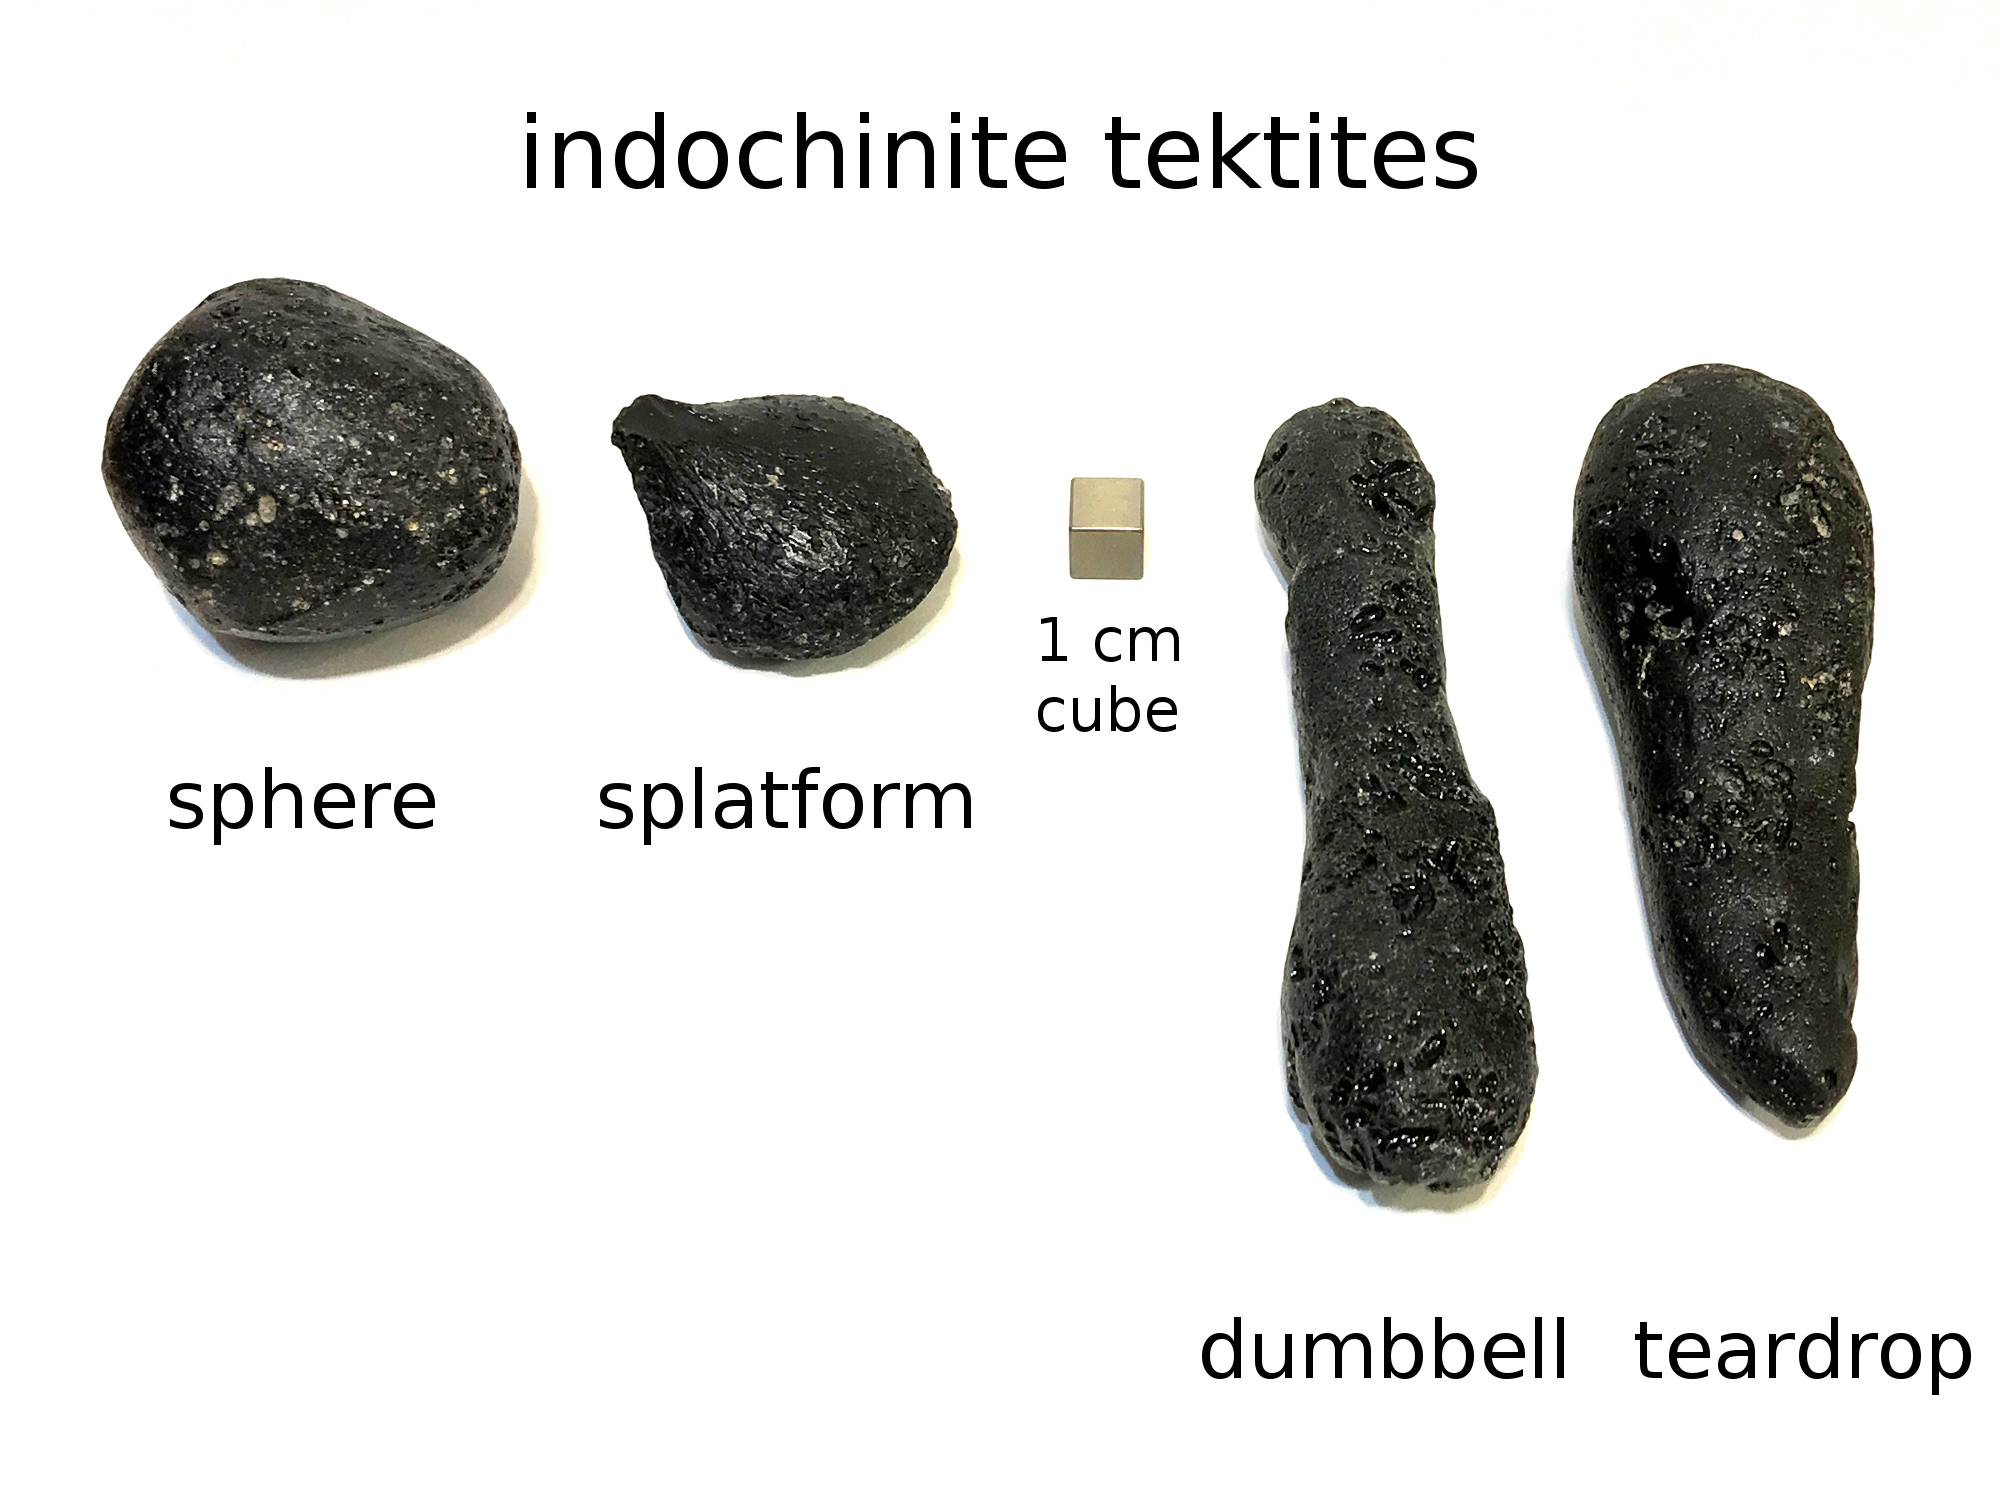
Here’s my personal collection of indochinite tektites, showing a range of different shapes.
The same photo without labels.
Other tektites and impactites from my collection.
And that photo without labels.
My cast of a little australite “button” tektite. Like many of the objects in my collection, both the tektite cast and the 1cm cube came from meteorite vendor Gary Fujihara, “Big Kahuna” on eBay (username fujmon). I’ve bought a lot of stuff from Gary over the years, and I’ve had only great experiences.
To my fellow travelers: many thanks for making my cruise so enjoyable! I hope to see you again in the future.
An index card cutout showing our route from SoCal to the centerline of the eclipse path.
I’d been so focused on next year’s total solar eclipse that spring was halfway over before I realized that there was going to an annular eclipse this fall. Not only that, but the path of annularity would slash right through central Utah, where I usually go to hunt for dinosaurs. But by the time I wised up, all of the hotels in Utah were either booked up or charging ruinous prices. I looked farther east, and found affordable lodging in Gallup, New Mexico. So that became the base camp for my family’s eclipse expedition.
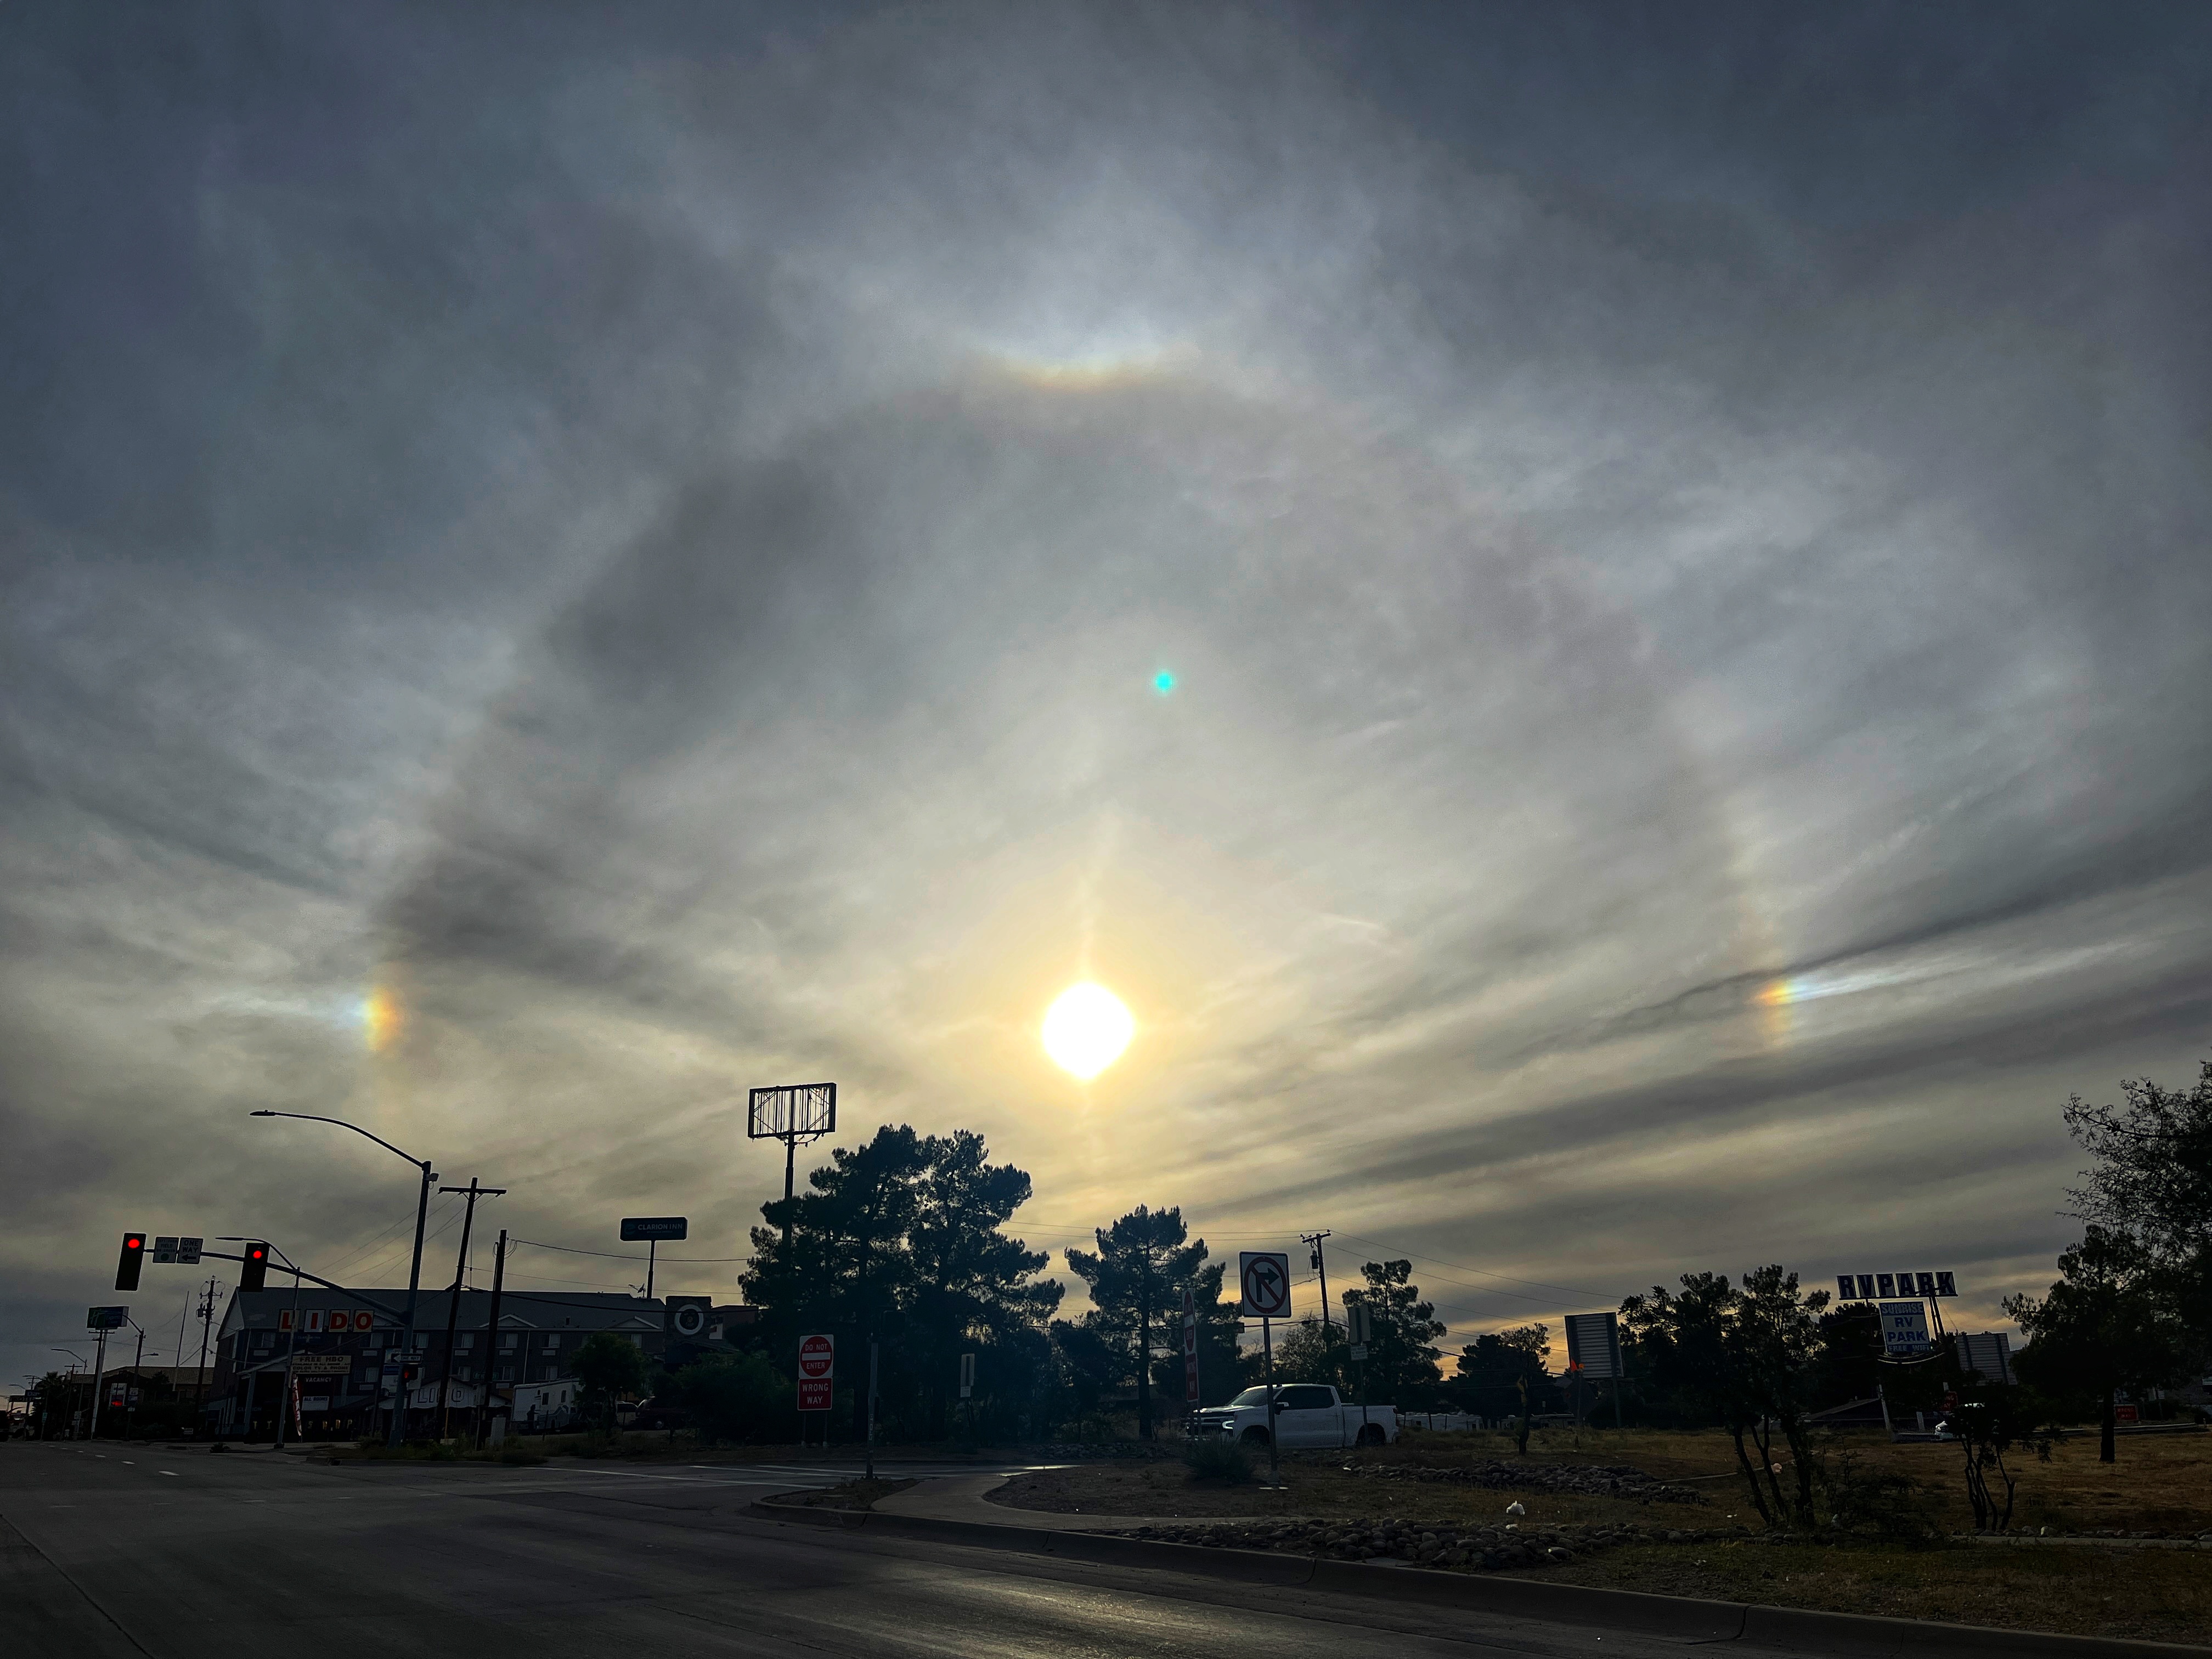
Solar halo and sun dogs, from Kingman, Arizona, on Friday, Oct. 13, 2023.
We drove to Gallup on Friday, October 13. It was a long drive, but a beautiful one. We stopped for gas in Kingman, Arizona, and some high, thin cirrus clouds produced the best solar halo and sun dogs that I’ve ever seen. The forecast for October 14 in northwestern New Mexico was originally partly cloudy, but by the evening before the forecast has cleared out.
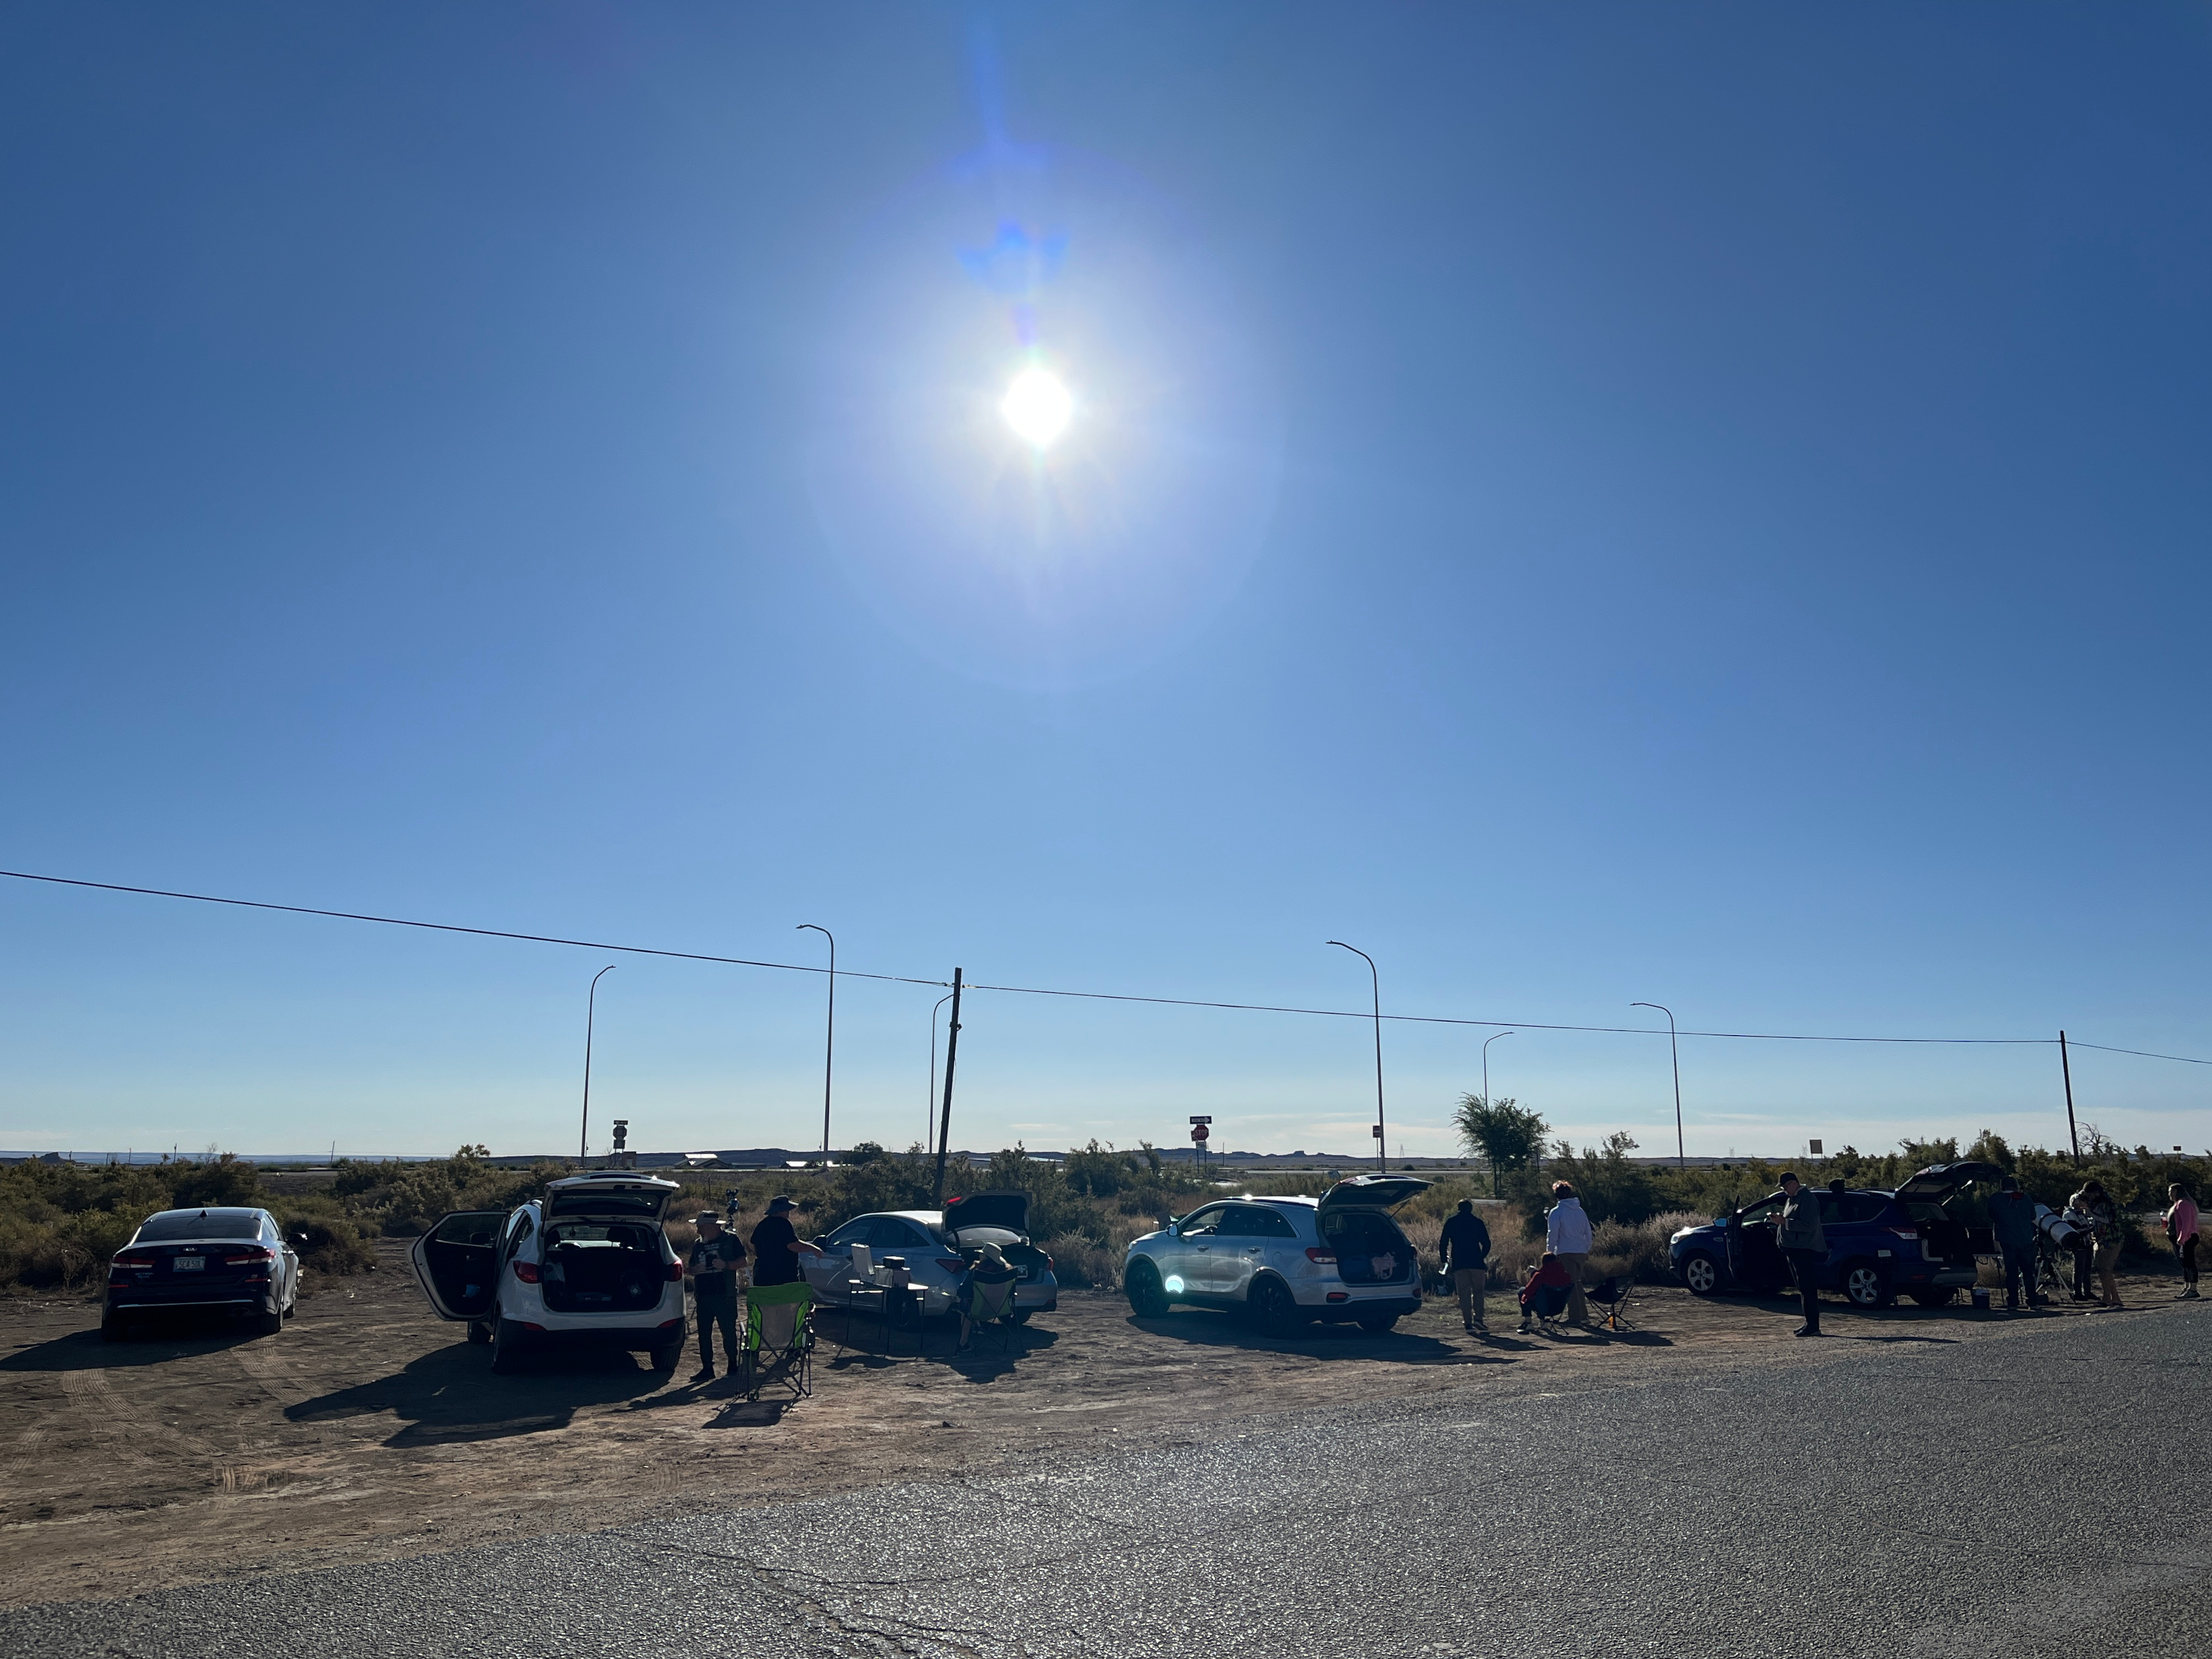
The observing field at Little Water, New Mexico. The SUV in the center with the open hatch is mine.
The day dawned clear and cold – at least, cold by Southern California standards. We headed north on US 491, to a point about halfway between Newcomb and Shiprock. I’d originally planned to meet up with fellow PVAA member Frank Nelson, who had a spot picked out bang on the centerline. Just a few miles short of that spot we came across Little Water, New Mexico, which seemed to consist entirely of one gas station and a house some way in the distance. The gas station had a convenience store and restrooms, it was only about six miles from the centerline of the eclipse, and a gaggle of other eclipse chasers was already setting up there to observe. We decided to stay there in Little Water and take advantage of having snacks, drinks, and a restroom close to hand.
My usual solar observing rig: SkyScanner 100, homemade Sun Funnel, and dollar-store mustard bottle sun-finder. When the dot of sun shining through the cap of the mustard bottle is centered on the bottom of the bottle, the scope is pointed at the sun!
For observing the eclipse we had eclipses glasses and a small telescope with a Sun Funnel. I’d built my first Sun Funnel back in 2012 for the annular eclipse that cut across the desert southwest that May. After 10 years, a total eclipse, and transits of Venus and Mercury, that original Sun Funnel was old, dusty, and falling apart. I discarded it when I moved households this spring. Fortunately they’re easy and inexpensive to build, and I got the new one together and tested in the back yard a couple of days before go time.
The Adams-Wedel party at annularity: Aidan, Jenny, London, and me.
We shared the observing field with about twenty other amateur astronomers, who had come from Southern California, Arizona, New Mexico, and Colorado – the most distant being from Crestline, California, and Denver. Other observers at the site had filtered binoculars, hydrogen-alpha refractors, and a computerized 10-inch Newtonian with an eyepiece camera sending live images to a laptop. We all shared views through our setups.
Baily’s Beads at third contact. I got better views of them this time than I ever have before.
My little reflector and Sun Funnel were pretty popular, especially for observing Baily’s Beads – detached points of light formed by sunlight streaming through valleys on the limb of the moon – at the start and end of annularity. The skies were clear and the cool air made for pleasant viewing, since we were all sitting or standing in the sun for the better part of two hours. We did notice that it got distinctly cooler for a few minutes on either side of annularity, which is an effect I’d only experienced before with a total eclipse. We also took time to enjoy our weird shadows during annularity:
All too soon the show was over and it was time to get back on the road. We drove northeast to Monument Valley, and spent Saturday evening in Flagstaff, before coming home on Sunday. All in all it was a great trip, and it’s already got me looking forward to future eclipses.
Our head editor at Sky & Telescope asked all of us who write for the magazine to submit observing reports from the eclipse. Mine got included, with one of the photos I sent in — it’s about 3/4 of the way down the page here.
Whew — it’s been a minute! Ironic, then, that this post is probably right on the cusp of being too late. The Sky & Telescope for a given month is on newsstands the month before the cover date, and it usually hits newsstands a week or so before that. So I’d expect the October S&T to appear on newsstands at the end of this month, but I’ve already seen it out in the wild. Which means the September issue is about to get yanked.
ANYWAY, I have a feature article in the September issue, and although some of my previous feature articles have gotten a notice on the cover, this time my piece is the cover article, which is a first for me. It’s a binocular tour of the late summer Milky Way, but it should be fun for telescopic observers, too. Go check it out, if it’s not too late! (And if it is, the issue will be in S&T online shop before long.) There’s also a finder chart for the article online, which seems to be a free download here.
There’s a thing flying around Facebook, and probably other social media sites, that purports to show a panorama of a starry night sky over the Perseverance rover. There are a couple of problems with it.
For one, it’s a fake. The landscape around Perseverance is real, and the sky is real, but it’s an Earth sky, not a Mars sky, and the two have been composited together. How do we know?
If it was dark enough to see all those stars, it would be waaaay too dark to see the ground in front of the rover.
So I checked the NASA website and found the original photo (link):
EDIT: to be perfectly clear, so there’s no confusion: the Martian landscape is a genuine photographic panorama from NASA, which is shown and linked below, and the night sky is a genuine photographic panorama taken from Earth, and the two have been misleadingly composited by a YouTuber, who I am not going to name or link to because I don’t want to promote his work. NASA didn’t fake anything here!
Not only is the composite a fake, it’s a particularly clumsy and hilarious fake. I realized that since the sky above the horizon at any one time is a hemisphere, there is a 50% chance that Mars would be in the sky in the panorama, and I thought that would be pretty hilarious. So I went looking, and I found it. Here’s the proof:
The ecliptic–the plane on which the sun, moon, and all of the planets appear to move across the sky as seen from Earth–goes right by Regulus. There is no bright star at the circled point, so it must be a planet. And I’m certain that the bright “star” in the image is Mars, because it’s red, and because Jupiter hasn’t been by there in a few years–it’s currently on the other side of the sky.
So the composite panorama has the amazing spectacle of Mars in the night sky above…Mars. That’s a pretty spectacular fail.
This composite thing is bogus and stupid. If it comes your way, don’t give it any likes, or any clicks. Put up a link to this post instead. It’s not like Mars isn’t amazing on its own! Reality doesn’t need any enhancement.
Briefly: I wrote an article about the 25th anniversary of the Caldwell Catalog for the December issue of Sky & Telescope, and Frank Timmes of the American Astronomical Society interviewed me about it for the AAS YouTube channel. It was a fun interview and I’m grateful to Frank for his interest and for a fun conversation.
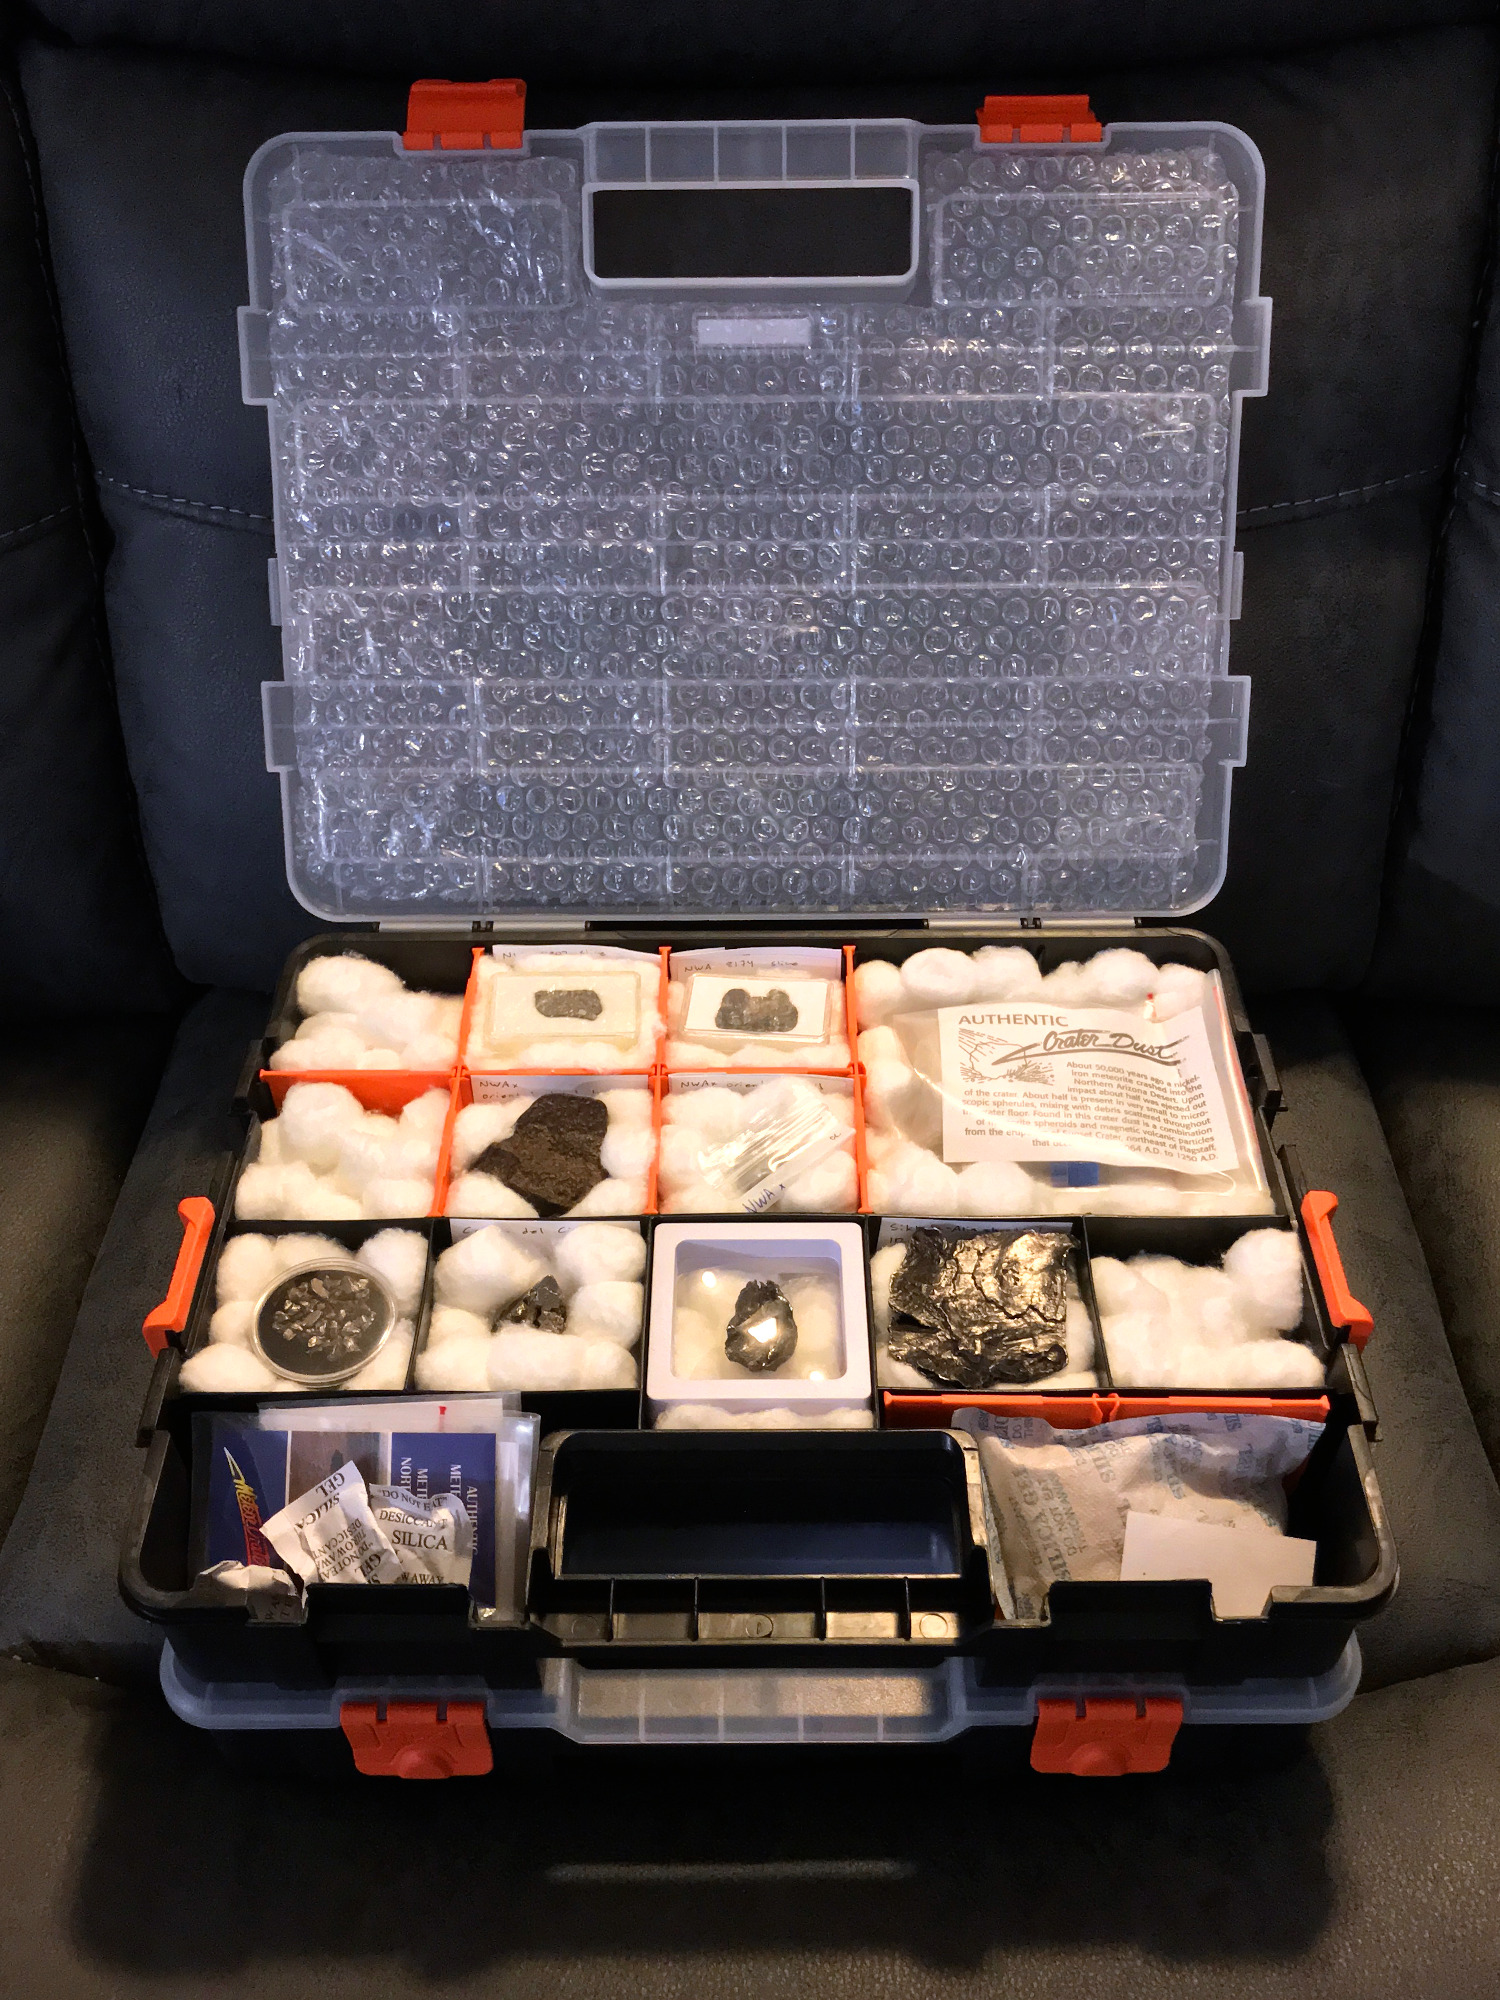
I finally got around to organizing my (small) meteorite collection. I don’t have the space for a display cabinet right now, and when the pandemic lifts I’d like to be able to easily transport everything to schools and club outreach events, so I got a couple of HDX storage cases from the toolbox section at Home Depardieu. I think these things are the bee’s knees. They’re big, sturdy, and dirt cheap–right now you can get two cases, which lock together with the side tabs, for ten bucks. Best deal going. I got a couple of sets for Vicki, to help organize her histology slides, and they’re working great for her, too. I’m tempted to buy a bunch of them just to have them on hand in case they ever stop making them or jack up the price.
I cut bubble wrap to fit and taped it into the lids, padded the little cubbies, put cards at the back of each cubby with info on each specimen, and every time I get silicone gel packets with anything I toss them in the front of the case.
I did the same for my impactites. At the meteorite show-and-tell at a PVAA general meeting a couple of years ago (described here), the sight of Ken Elchert’s monster tektite really fired my interest, and I went on a little tektite-collecting binge.
Here are my indochinites, from an impact in Southeast Asia, about 780,000 years ago, that produced the Australasian strewn field (australites, indochinites, philippinites, rizalites).
And here are the rest. The philippinite is from the same impact as the indochinites, it just flew further. The australites flew the farthest of all, and as they re-entered Earth’s atmosphere (yeah!) their front edges melted and flowed to produce perfect little aerodynamic heat-shield shapes called ‘buttons’. Real ones are a little outta my price range right now, but I got a nice cast of one from Gary Fujihara on eBay (here’s his store). The bediasite is a personal favorite–it’s from the impact 35 million years ago that gouged out Chesapeake Bay. That tektite was sitting in east Texas for more than half of the Age of Mammals before someone recognized it and collected it.
Why am I so fascinated by tektites, in particular? I think it is the diversity of shapes. Tektites are travelers in space and time, a frozen snapshot from the moment that a giant rock from space slammed into our planet. Each one is unique, and its shape tells a story about its flight through the atmosphere and subsequent erosion. Tektites embody everything that interests me: space, time, astronomy, geology, aerodynamics, and the history of our planet.
Not a tektite: a 31g piece of nickel-iron shrapnel from the Sikhote-Alin airburst in 1947. See this post for more details, and photos of a bigger piece.
Parting shot: I have a question about storage. Right now I’m just using cotton balls for padding in my cases, because they were fast and cheap. Are there any downsides to using cotton balls over the long run? Should I spring for some Polyfil, or other artificial fiber? I live in a fairly dry climate and mold and mildew are generally not problems. Thanks in advance for any wisdom!
Warning: long, navel-gazey confession inbound. To wit: I used to be a bit of a snot when it came to planetarium apps. When I put together my “Astronomy Wish List for Beginning Stargazers” post back in 2014, I wrote:
Yes, you can get a free app for your phone that will show you thousands of celestial objects. If you get one with a good night-vision mode AND turn the brightness way down on your phone, it might not destroy your night vision, but it will still only show you a small slice of the sky at one time. At best, you’ll be outside under the stars and still looking at a dadgummed screen. Here’s a thought: put all the devices away, get out a lawn chair or just lie down on the grass, grab a planisphere, and spend a quiet half hour picking out the constellations. One of the chief advantages of a planisphere over an app is that you can see essentially the whole visible sky displayed at once, so you can figure out how the constellations relate to each other.
Ugh! That was written out of ignorance and prejudice, and I cringe to read it now. Especially the bit about how an app would supposedly only show “a small slice of the sky at one time”. I didn’t own a smartphone at the time and I hadn’t actually used a planetarium app, I’d only seen other people use them, so I didn’t know about using two fingers to zoom in and out, which by now has become such second nature that it’s like looking back and realizing I didn’t know how to turn a doorknob.
My favorite constellation: Cassiopeia.
In any case, no, every planetarium app I know of will show as much or as little of the sky as you want. And most offer a red-based night vision mode for preserving your dark adaptation, which combined with the native screen brightness controls and night vision modes on most smartphones mean that you can use the apps under dark skies without sacrificing all your dark adaptation. (Another easy solution: close your observing eye when using the phone, and ask any companions to look away.)
So what pried me out of my self-dug hole of stupidity regarding astro apps? Direct experience. In 2015 I got my first smartphone, and in 2016 I got the job of writing the ‘Binocular Highlight’ column for Sky & Telescope magazine. I decided it was time to drag my ass into the 21st century, and since I was finally in a situation in which stargazing was bringing in money instead of consuming it, I could afford a decent astro app. I went with SkySafari 5 Pro, and it didn’t take long for it to eclipse almost all of my other astronomy tools put together in terms of how often I referenced it and how much I relied on it. Four years later, I’m on to SkySafari 6 Pro, and I’m sure that when 7 is released I’ll trade up.
For the Binocular Highlight column, we plan for and illustrate a 5-degree circle, and the ability to zoom the SkySafari screen to show a 5-degree field is extremely useful for planning my observing and my writing.
Also, I started noticing at public outreach events and star parties that basically everyone else was using planetarium apps. For people just starting out, they offer a ton of functionality that a planisphere doesn’t. Allow me a metaphor. I firmly believe that Wikipedia is how encyclopedias are supposed to work, and that the beloved World Books and Encylopedia Britannicas that I grew up with were about the best possible implementations of that idea in paper, but hobbled by not having hyperlinks, not being available via wifi, not being continually updated, etc. Similarly, even thought I love planispheres, I can admit that they are basically physical planetarium apps that restrict you to one latitude, one magnification, and a tiny subset of stars and deep sky objects. The digital apps are more intuitive, period, and not just for beginners. Experienced folks use them all the time, too, and for the same reasons: faster, easier, more information. Nowadays I find myself hauling out my phone almost every observing session–to check the positions of Saturn’s moons, or the classification of the components of a double star, or, most often, simply to find the distance to a celestial object.
I’ve enjoyed chasing the moons of Saturn this summer, and SkySafari has been clutch for making identifications — only after I’ve made my own sketches, to avoid spurious detections.
My app use in the field took another jump when I got the NexStar 8SE. Before I got that scope, I was pretty darned proud of my knowledge of the sky. I didn’t quite know all the Messiers by heart, but I could find probably 3/4 of them without even checking an atlas. But the NexStar taught me a hard truth: I may know most of the constellations backwards and forwards, but I know very few stars by name. Caph? Nunki? Alpheratz? Might as well be Farsi, Swahili, and Linear B to this monolingual doofus. So when it comes time to find alignment stars, out comes the phone, because with a handful of exceptions–Polaris, the Summer Triangle, the Winter Hexagon, and a few favorite doubles–I don’t know what these darned things are called.
Oh, hey, there’s Nunki!
(Aside: in a way, this reminds me of what it was like when I first started stargazing in the fall of 2007. Every month, new stars and constellations were up in the eastern sky. I still remember vividly the first time I got up before dawn to see the spring constellations. I’ll get a taste of that in the coming year, as I have to keep familiarizing myself with new alignment stars.)
So to sum up, actually using planetarium apps myself, and seeing how much they opened up the sky to other people, forced me to belatedly pull the stick out of my butt.
The bright, popular double star Eta Cassiopeiae consists of a Sun-like yellow main sequence star and an orange dwarf, which lie only about 19.5 light years from Earth. I didn’t know that until the star party at the park last Saturday, when someone asked if the Eta Cass companion was a red dwarf, and I was able to look up the answer in SkySafari.
There’s another, larger point, which is that I think it’s stupid to criticize how anyone else enjoys the night sky. I’m glad I missed the GoTo wars of the 90s and early 2000s, and I have no time for the limited conflicts that are going on right now over Electronically Assisted Astronomy–essentially, looking at the night sky with night-vision googles, with or without a telescope–and smart telescopes like the Stellina and eVscope. It was always pretty selfish and short-sighted to worry about how anyone else was engaging with the night sky. It’s not like people who have different preferences regarding their gear or observing habits are hurting anyone. Surely we should be able to focus on what matters–our shared love of the cosmos, and getting out to enjoy it–and not whether anyone else is doing stargazing the “right” way. And that’s especially true now, in a year that sees the world shambling among catastrophes like a shell-shocked orphan. With all the horribleness going on, I just don’t have it in me to be upset at other people when they’re not hurting anyone else, especially over something as innocuous and ultimately positive as stargazing.
To the (near) future: the moon will visit Jupiter and Saturn on the evening of October 22.
So I say, bring on the technology. Cameras, electronic eyepieces, smart scopes, light enhancement devices, and the things that no-one has yet thought of. There is plenty of room out there in the dark for those things to coexist with traditional stargazing, and if they bring a few more folks into this wonderful pursuit, so much the better. If the expense bothers you, go look at what people spend on boats and motorcycles, let alone gambling and drugs, and also, check out what serious astrophotographers spend on the rigs that get their photos into Sky & Tel and Astronomy, and also, seriously, just mind your own beeswax. If dealing with the computerized gizmos isn’t your cup of tea, or you feel like using night-vision goggles is cheating, fine, I’m pretty sure no-one will ever force you to use them. I’m also pretty sure that no matter how fancy the hardware and software gets, there will be times that I feel like heading out with nothing but a manually-driven scope or some trusty old binos for “unplugged” observing. But I’m going to try to not close myself off to any more observing experiences a priori, without even trying the new things to see what they have to offer. That was dumb.
My club, the Pomona Valley Amateur Astronomers (PVAA), is gradually adjusting to the pandemic. From March through June, we didn’t hold any club activities. In July we had our first board meeting since February, virtually of course, and we decided to dip our toes into holding virtual general meetings. We also wanted to give people a way to interact in person, but safely, and someone proposed having a socially-distanced get-together at a local park. We had our first one of those at the end of July. I was out of town, on a brief family vacation after the end of summer teaching, so I missed that one. We’ve been trying to hold another one ever since, but heat and poor air quality have bedeviled us. We finally held another “PVAA at the park” event last night.
It was a combination swap meet, star party, and social event. In the photo above, we were just setting up, but we ended up with five telescopes on the field, representing every major design:
our club Treasurer, Gary Thompson, brought the blue homebuilt 8″ Dobsonian reflector you can see at the left of the above photo;
board member Jay Zacks brought his Meade ETX 90, a Maksutov-Cassegrain;
I had my Celestron NexStar 8SE, a Schmidt-Cassegrain;
club member Karen Lenz brought a 60mm or 70mm Tasco refractor (I forgot to check the specs);
club members Thomas and Stephanie Chavez brought their Celestron FirstScope, another small Dobsonian reflector.
Karen Lenz had brought her refractor to donate to the club. By complete coincidence, we had a visitor in need of a scope: an enthusiastic and knowledgeable 6th-grader. So Karen passed on her scope, our visitor got his first serious telescope, and everyone was happy. Despite the reputation of small, “department store” refractors, this one was solidly mounted and optically sharp, and it got a lot of use throughout the evening.
I took the NexStar 8SE, and used it to show guests Jupiter and Saturn, and the double stars Polaris, Mizar & Alcor, and Eta Cassiopiae. I tried various deep-sky objects, but they all looked pretty yucky. The only one that looked good enough to show off was M11, the Wild Duck Cluster.
I was having too much fun bopping around among the various telescopes and chatting with visitors to be in gear-evaluation mode. I was aware that the FOV of the C8 was bigger with the new focal reducer attached, but I didn’t do any serious testing. That will have to wait for another evening.
Around 8:30 we decided to carry some of the scopes over to the west, in hopes of seeing Mars over the trees at the east edge of the park. We got good views of Mars in Gary’s 8″ Dob, and then we spotted a break in the trees to try and get the moon. Our young visitor brought over the Tasco refractor, and Thomas and Stephanie brought over their FirstScope, and we spent 10 or 15 minutes just enjoying the sight of the moon coming up through the leaves. I got the above photo through the refractor, and it reminded me of the fun I used to have catching the moon rising through distant trees up on Mount Baldy (here and here). I need to get back to that.
All in all, it was a great evening. We had a good turnout, conditions were nice, we had a nice variety of scopes set up, and I think everyone enjoyed themselves. I’m already looking forward to the next one.
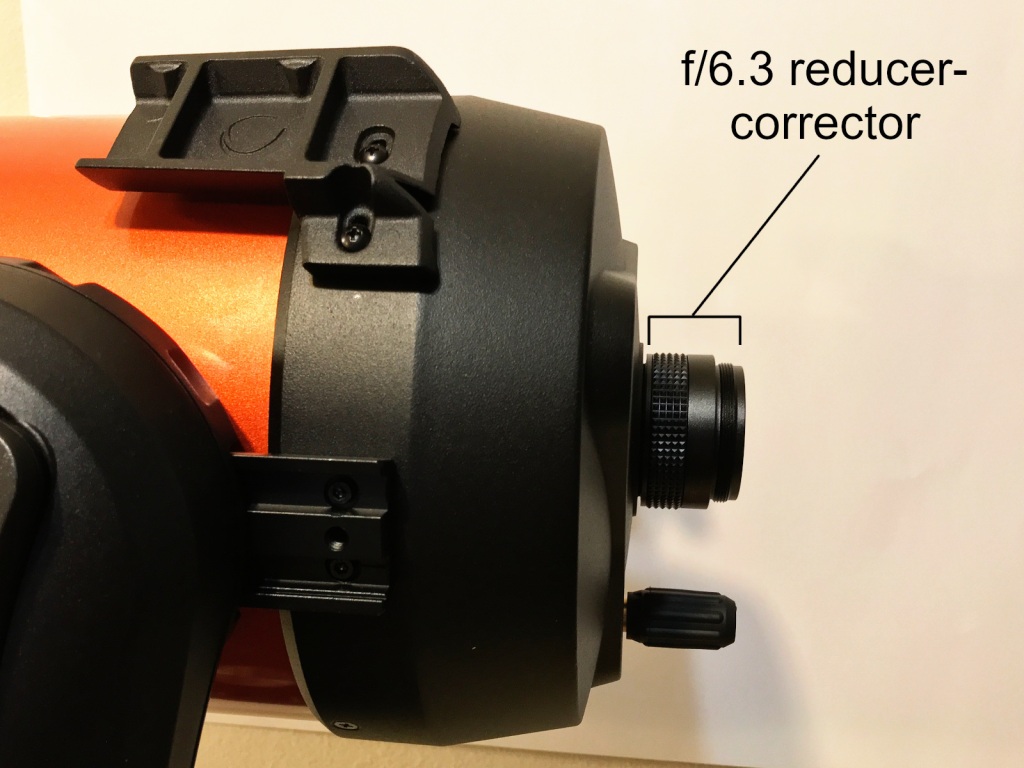
Even before I had decided to get the NexStar 8SE, I knew that if I got a big SCT, I’d want a focal reducer-corrector for it. SCTs and Maks have secondary mirrors, which partially obstruct incoming light. This implies a necessary tradeoff: make the central obstruction small, which results in a long focal ratio–typically f/10 to f/15 for commercially-available SCTs and Maks–or get a shorter focal ratio by using a larger secondary mirror, which blocks more light and degrades the contrast.
There is a third solution, which is to use a focal reducer to make a steeper light cone and a shorter focal ratio. Astrophotographers use these all the time to making their scopes optically ‘faster’ so they can get brighter images with shorter exposure times. For SCTs they are useful because they bring the focal length of the scope down to something more reasonable, and increase the true field of view. As shipped, the Celestron C8 OTA has a focal length of 2032mm, so even a 32mm Plossl gives 63.5x, and the included 25mm Plossl gives 81x. The max true field of view with 1.25″ eyepieces is about 0.7 degrees, which can be a little claustrophobic. You can juuust fit the Double Cluster in a 32mm Plossl, as long as you don’t mind clipping the edges of both clusters. You can get M81 and M82 at the same time, as long as you don’t mind parking them on the extreme edges of the FOV.
The Celestron f/6.3 reducer-corrector turns the C8 from an f/10 to an f/6.3, with an effective focal length of 1280mm, which is pretty close to the mid-sized commercial Dobsonians–the XT6, XT8, and XT10 and equivalent models from other companies are all 1200mm scopes. That pushes the max true field to something like 1.2 or 1.3 degrees, which is a big jump over the native 0.7 or so. That’s enough to put some of the larger celestial objects, like the Pleiades and M44, back in a single field of view, although the Pleiades will be cutting it mighty fine (I will test this and report back!).
As the name implies, this unit is not just a focal reducer, it’s also a corrector, which makes the field flatter for better image correction across the entire field of view. In other words, stars at the edge of the field should still look round with this thing in, as opposed to oblong. This isn’t a factor for me–I don’t photograph stars, and the stars at the edge of the field in the C8 haven’t bothered me so far–but it’s nice to have if either of those things change.
Here’s the gizmo, out of its (unsealed) bag, with its custom dust caps. I got mine from Astronomics (here), and evidently it was one of the last they had, because the availability listing there says “More on the way”. Amazon has it, too (link), I just like supporting brick-and-mortar telescope stores and specialized astro-gear dealers whenever I can.
Why am I bothering to do an elaborate unboxing post for such a trivial piece of gear? Mostly because it took a lot of digging for me to figure out how one was used. What I wanted was a photo essay that showed how “this part goes here, that part goes there”. When I couldn’t find one, I decided to create my own.
Here’s how the NexStar 8SE OTA comes as shipped, with a 1.25″ visual back on the rear port. When I was first getting into this, it took me forever to understand what a “visual back” was. Did it mean anything other than the bit where you stick the eyepiece or diagonal? And if not, doesn’t every telescope have one?
The answer is that not everyone sticks an eyepiece or diagonal at the back of a scope. Some people put a camera, or a spectrograph, or who knows what else. So if you are going to use the scope visually, you need a doohickey that holds the eyepiece or diagonal, and that’s the “visual back”. It was just new to me because non-SCTs aren’t generally described as having a “visual back” (some high-end astrograph refractors excluded), they just have focusers.
ANYWAY, the focal reducer-corrector threads onto the rear port of the scope, after the visual back has been removed.
Then the visual back screws into the focal reducer.
Then you put eyepieces or diagonals into the visual back, as usual. Everything is just scooted back 3/4 of an inch or so by having the focal reducer interposed between the scope and the visual back.
Incidentally, this is something to keep an eye on for NexStar users: when the scope is pointing high, the diagonal already comes pretty close to the base of the mount, depending on how far forward the OTA is scooted in the dovetail clamp. I’ll have to mess around with the system, but I might have to start mounting the scope a smidge farther forward to make sure the diagonal clears the mount when observing up high.
And here’s where the last post and this post come together: the Baader Hyperion 8-24mm clickstop zoom eyepiece, riding in an Astro-Tech dielectric diagonal, inserted in the stock 1.25″ visual back that came with the C8, screwed into the f/6.3 focal reducer-corrector. All saddled up and ready to go (er, minus the finders). Now all I need is for night to fall.
I have one more piece of gear to write about, but it hasn’t come in yet, so the next post might be an observing report–hopefully, a first-light report on the focal reducer and the Baader zoom. Stay tuned.
It has been a long, long time since I got a new eyepiece. Three and a half years since I got my Edmund 28mm RKE, and just under five years since I got my Meade 5mm MWA, which was the last “premium” eyepiece I picked up (the 28mm RKE is one of my all-time favorites and most-used eyepieces, but at $85 I don’t think it counts as “premium”–for however much or little that is worth!).
I have been wanting to try this Baader zoom for years and years. It has an almost unbelievably positive reputation on Cloudy Nights, where at least some observers report selling off a lot of their premium fixed-focal-length eyepieces after acquiring the Baader zoom.
Does it really live up to the hype? Thanks to a bolt of consulting money coming in last week, I’m about to find out.
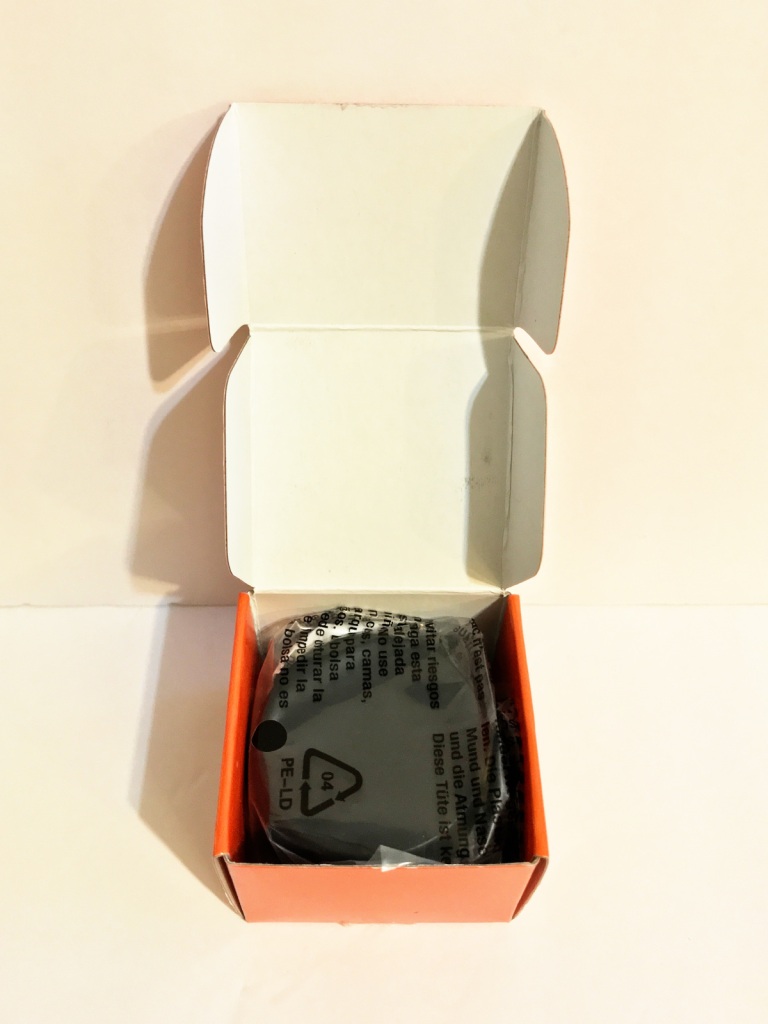
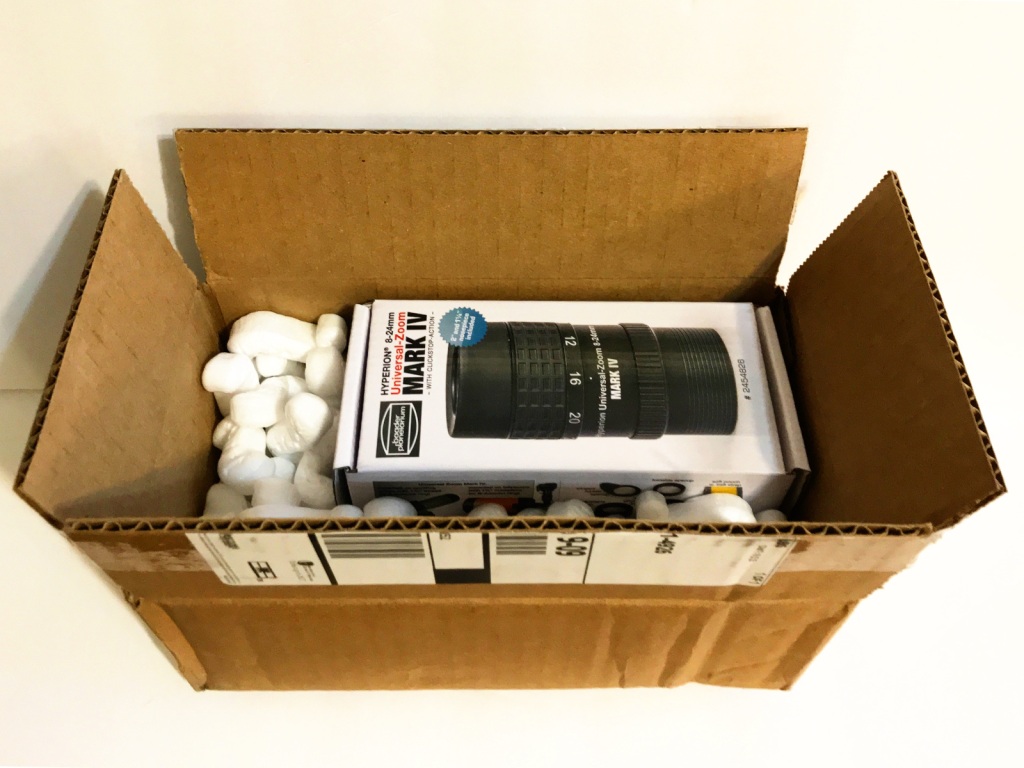
I found it in stock at Woodland Hills Camera and Telescope, and one arrived on my doorstep a couple of days later, extremely well-packed. Since I ordered mine, Woodland Hills seems to have run out of the standalone eyepiece, although they still offer it bundled with the matching 2.25x Baader barlow, which I skipped, for a little more dough (here). Amazon has it in stock, but for a little more than most other outlets–$325 right now, versus $289 or so most other places (here).
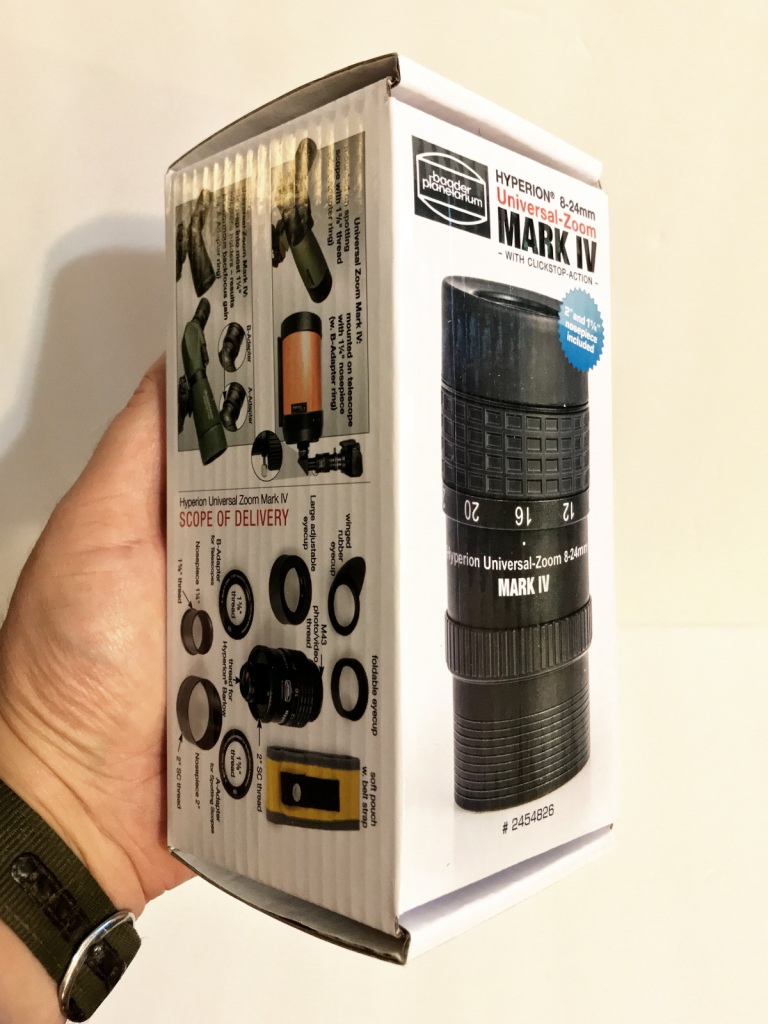
There’s no instruction book inside the box–the box itself is the parts inventory and instruction manual. I really dig this. I think every other eyepiece I’ve ever owned has come in an unadorned box, some of them quite fancy and nice enough to repurpose as gift boxes for birthdays and holidays (looking at you, Explore Scientific). This box is functional. Every surface is illustrated, and most of the sides show you how to use the eyepiece in various situations.
Even when you open the box, there are more instructions on the newly-revealed surface! Who does that? As a catalog-junkie who likes looking a photos of gear, this box ticks all my, er, boxes.
Now this is kinda awesome, and kinda hilarious. Instead of coming in a bolt case, like my two Bresser eyepieces; or clamshell foam, like all of my Explore Scientifics; or a sturdy plastic can with a screw-on lid, like the Celestron 8-24mm zoom; or just dust caps inside the cardboard box, like all of my Orion eyepieces, the Baader Hyperion 8-24mm clickstop zoom comes in a rugged nylon pouch with a velcro closure and–as you can see in the inventory photo on the side of the box–a belt strap. And it’s high-visability yellow so you won’t lose it.
This is pretty cool, and definitely functional, and also amuses the heck out of me. This is the kind of case I expect for a multi-tool, or a handheld GPS unit, or some other thing you might take hiking, not a telescope eyepiece. I guess if you ever wanted to bushwhack across Utah or Patagonia with a high-end telescope eyepiece on your hip, or clipped to the side of your pack, now you are prepared. I imagine I’ll keep mine in my eyepiece case, like any normal person.
Here are the eyepiece and the extra bits, out of their respective bags. The four things in the extra bag are (clockwise from top) the winged rubber eyecup, the fold-down eyecup, the spotting scope adapter, and the dust cap that goes with the fold-down eyecup. The eyepiece itself comes in the bag with the larger dust cap on top of the adjustable eyecup, which rotates up and down, and with the 2″ adapter and its dustcap on the bottom end.
I should mention right here that both plastic bags were open, not sealed, which is good, because it prevents dew formation. The one for the accessories had one of the little silica gel packs, which I always steal to throw in with my meteorites. (Note to self: blog about new meteorite storage system soon.)
Pull the dustcap off the 2″ adapter and you find inside the smaller dustcap on the 1.25″ adapter. You could use the eyepiece in a 2″ focuser or diagonal with both the 1.25″ and 2″ adapters in place, and I’m not sure if there’s any benefit to taking the 1.25″ adapter off.
Here’s the adjustable eyecup in the down position…
…and twisted up. I’m a fan of these things–I notice that civilians are much less likely to stab the eye lens with a greasy finger* if there’s something in the way. Plus it’s nice to be able to signal to people where they should put their eyes, something that can be surprisingly tricky with eyepieces that have long eye relief.
* I’m not mocking n00bs or people who come to public star parties. To astronomical optical surfaces, all fingers are greasy.
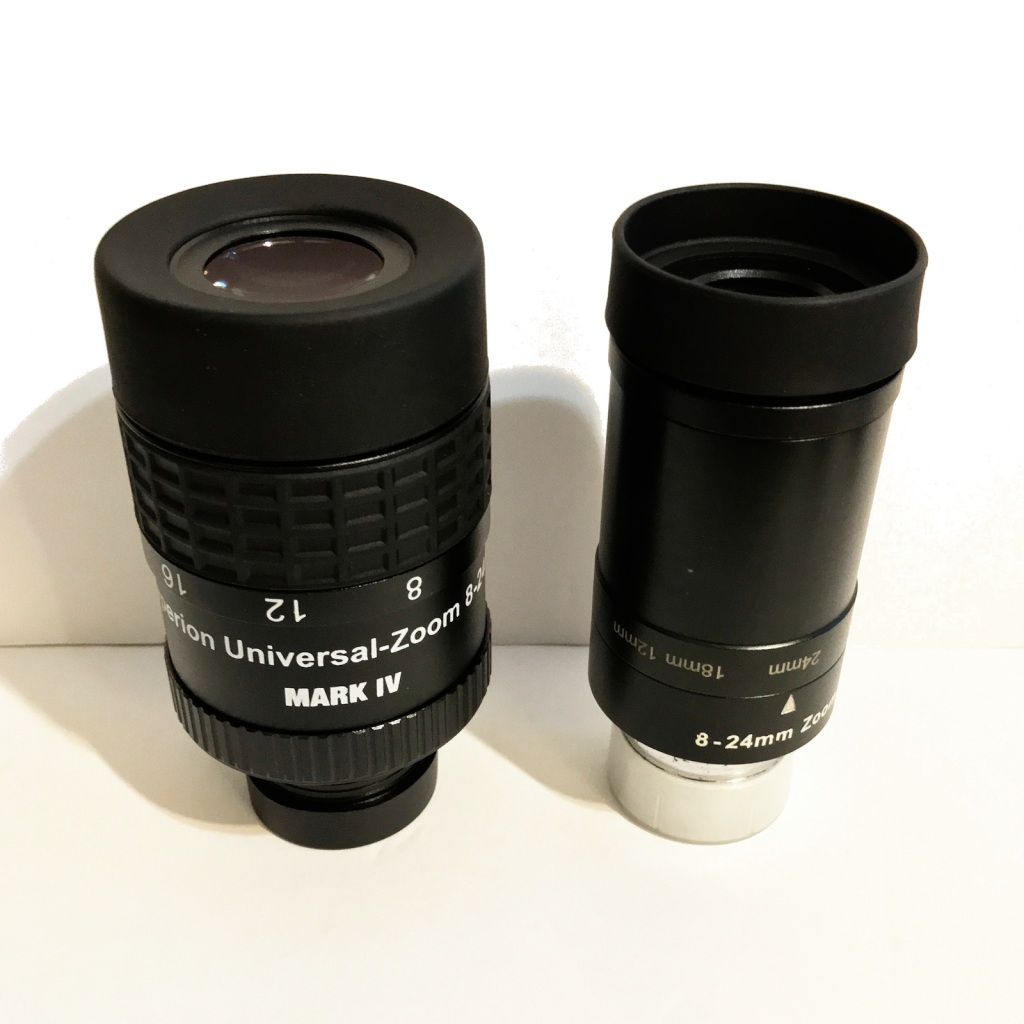
Here’s the Baader compared to my Celestron 8-24mm zoom. The Celestron has been in service for a few years and eventually the knurled rubber wrap around the middle of the eyepiece split and fell off, which doesn’t impact the function whatsoever.
I like the Celestron a lot. It’s been one of my most-used eyepieces, and along with a 32mm Plossl it is hands down the eyepiece that I’ve recommended the most. Long-time readers may recall that when I flew to Texas in 2017 for the Three Rivers Messier Marathon, the only eyepieces I took were the 28mm RKE and this Celestron zoom, and they proved to be all the eyepieces I needed.
In fact, it was my positive experiences with the Celestron zoom that convinced me to venture the money for the Baader zoom. I rarely splurge like that for a piece of gear in a class I’ve never tried. In normal times, the Celestron zoom runs $65-$75. With the temporary shortage of astronomy gear because of increased demand during the pandemic, the price has spiked a bit, at least at some retailers. I see it going for just over $90 at Amazon (link).
If I have one knock on the Celestron zoom, it’s that it is ever-so-slightly less sharp than the best of my fixed-focal-length eyepieces. The difference is subtle–I would not have been able to spot it in my first 3-4 years of observing, and even now it takes a determined effort for me to see it–but it’s there. (As always, your eyes, your experience level, and your sample of this piece of equipment might vary from mine, and probably do.) Which is another reason I wanted to try the Baader, with its sterling reputation for clarity and sharpness. If it lives up to that, I will be using it a lot.
I haven’t pulled out a ruler, but the eye lenses of the two zooms look about the same size.
My kitchen scale says the Baader zoom weighs 10.4 oz, or 296 grams.
And the Celestron zoom weighs about 3/4 as much, 7.7 oz or 218 grams. I was pleasantly surprised by the lightness of the Baader; at least to me, it looks like it might weigh a little more.
With any luck, I’ll have a first-light report along soon. And there’s more unboxing coming soon–stay tuned!