
Hacking the SkyScanner 100: six easy pieces
February 7, 2017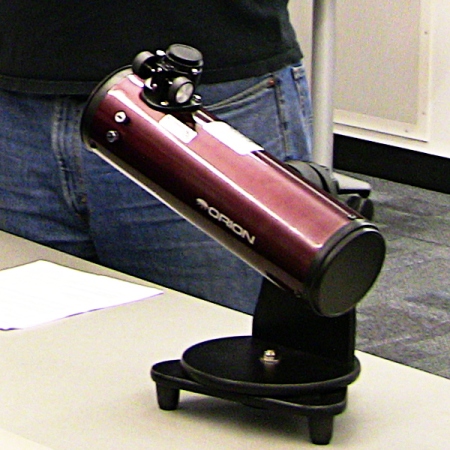
Remember this thing? It’s a lovely little scope, but I got tired of crouching over it. And it’s made out of tractable materials – rolled steel and particle board, mostly – and costs next to nothing as these things go ($100 as of this writing), so it was basically crying out for customization. I made six fixes – two on the base, two on the outside of the tube, and two on the inside of the tube. They’re all cheap, fast, and easy, hence the title of the post (with apologies to Richard Feynman
!).

My first two mods were to the base. (1) I had a leftover eyepiece rack, which I screwed to the base in the only place and at the only angle that it would fit. It works great. My very first scope, an Orion XT6, came with an eyepiece rack like this (which has since been dropped from the base model XT6), as did my XT10, and I’ve always found them to be very convenient. It took me a long time to realize that an eyepiece rack didn’t have to be horizontal to work, especially if the eyepieces are always capped so they can’t fall out.
(2) The second mod is the wire handle on the top of the base, which I scavenged from an earthquake stabilization kit for furniture. It’s just a small woven steel wire with an eyelet at either end which is screwed into the particle board that makes up the base. When I put it on, I thought I’d cut a piece of aquarium tube to slide over it as a cushion. I still might do that at some point, but so far I haven’t needed to. The whole scope and mount only weighs 6 lbs, maybe 7 with a full eyepiece rack, and I’m never carrying the scope that far. Basically from the garage to the driveway, or from the car to a picnic table. So the wire handle has not had the opportunity to get uncomfortable yet. This was the simplest mod but may be the one that has made the most difference in terms of overall convenience. Orion should just build ’em this way, even if it bumped up the price by five bucks.
The piece of tape on the tube is covering the holes intended for mounting the dot finder. I never used it, and now the holes are in an inconvenient place. I’ll come up with a more permanent and better-looking solution than the tape, but at least it keeps dust out of the tube for now.

This photo shows the two mods to the outside of the tube. (3) Originally the focuser pointed straight up, with the focus knobs on the opposite side of the base arm. I wanted the focuser to face up at a comfortable angle, so I wouldn’t have to lean so far over the scope while using it. And I wanted the knobs on the same side as the base arm, so the eyepiece rack would face the user. Achieving both of those goals meant moving the scope’s dovetail bar about 135 degrees around the tube. To do that, I had to drill new holes in the tube. I used a paper wrap to get the new holes lined up with the old ones and with each other, made pilot dents using a thumbtack, then drilled them out with a cordless electric drill. It’s not a good idea to have metal filings flying around precision optics, so I removed both mirrors before drilling the holes. It’s fun to take a telescope all the way apart and put it back together, especially if it works better after you’ve done so. Everyone should try it.
(4) Once I had the dovetail moved over to the new holes, I had a couple of perfectly good holes in the tube in a convenient place, and at a convenient angle from the dovetail and the focuser. So I built a laser trough to go there. It’s an idea I got from Ken Crowder, a former PVAA member. Back in 2010 on one of my first trips to the Salton Sea, Ken had his 8-inch SCT set up with a video camera for taking integrated shots of deep sky objects. To help get on target, he had wooden bracket pretty much like the one you see above, into which he would lay his laser pointer. Lots of companies make special rings for adapting handheld laser pointers into telescope finders. But like me, Ken wanted to be able to do other stuff with his laser at a moment’s notice, like trace out constellations for newcomers, or point out especially nice things in the sky without moving his telescope. The wooden bracket lets you drop in the laser and get on target quickly, and then lift it out and use it for other things.
To fine-tune the aim, Ken would shim his with little scraps of wood and paper, and I intend to do the same if necessary. But with the SkyScanner’s 400mm focal length, a 32mm Plossl yields 12.5x and 4-degree true field of view, and even a 25mm gives 16x and a 3-degree field, so even without shimming the laser is usually good enough.

Here’s a close-up of the laser trough. I built it out of wood scraps and glue. The hardware store didn’t have hex-cap metric screws in the size I needed so I got machine screws and washers. I used a spade bit to cut little indentations for the hardware. The two square stringers on the bottom are to help keep the whole rig aligned with the long axis of the tube.

Finally, the two inside-the-tube mods. (5) I center-spotted the primary to aid in collimation. The best thing to use for this is a notebook reinforcing ring. I have a whole package of those somewhere, but I can’t find it. But I did find a package of the little round stickers of the kind you use to make price tags at garage sales, and made it into a ring with a handheld hole punch. It works great. I have doubts about its longevity, but if and when it falls off, I’ll just make another. It seriously takes less than five minutes. Most mass-produced reflectors these days ship with their primary mirrors already center-spotted, and it really helps with collimation.
(6) As explained in the last post (link), I swapped the stock Allen bolts for secondary collimation with standard hex-cap bolts that I can turn by hand and lightly tighten with a small pair of pliers.

So how does the reborn SkyScanner work? Pretty darned well! It was already an extremely convenient and easy-to-use scope, and now it’s even moreso.
I’m not done hacking on it. As shipped, the primary mirror can’t be collimated. I read on CN about lengthening the bolt holes in the OTA that the mirror cell is screwed into, so that the mirror cell can be tilted to achieve primary collimation. I tried this and didn’t like the results. It’s very hard for me to get the mirror cell mounting bolts tightened down enough to keep the mirror cell from shifting. Especially because it’s natural to grab the back of the scope to help aim it, and in doing so I almost always shift the mirror cell relative to the OTA and subtly throw off collimation. Or not subtly – at f/4, every last arc-second of collimation matters. So I’m going to build a fully-collimatable mirror cell.
And I’m going to figure out a better way to cover those holes in the tube for the finder. And flock the inside of the tube, and make a long dewshield to keep stray light from hitting the secondary and the focuser drawtube. And probably do some other stuff I haven’t thought of yet. I’m basically going to treat this scope as a testbed for every hack I can think of. Should keep me busy for a while.

My, but you’re a clever fellow! These are really cool mods, especially the EP holder. This is such an inspiring post that it makes me a) regretful that I sold my SkyScanner last year, and b) want to buy a new one just so I can make these mods.
Great post.
Btw, after a long fallow period, you are really cranking out the lengthy and interesting posts complete with photos at a near-record rate.
Keep it up!
Doug
Matt – If you’re going to attempt building a cell, check out this one on Gary Seronik’s web site: http://garyseronik.com/category/telescope_making/page/3/. If open the page, just scan down a couple of items. It’s solid and uses no springs, so I think it would hold collimation well. Something you definitely want in a grab and go. By the way, nice article you wrote in S&T, “Wandering the Winter Milky Way”. If the lake effect clouds ever part in NW Pennsylvania on a dark moon period, I hope to do some wandering 😉 – Regards, John O’Hara
Wonderful mods Matt!
The two mods I did to my Sky Scanner:
1) Center-spotted the primary mirror, so I collimated the scope by just adjusting the secondary mirror screws until the dot was in the center of the ring (as seen through an Orion collimation cap).
2) Flocked the top half of the OTA with black adhesive felt.
Not sure what the effects of mod #2 were, but mod #1 did wonders for my planetary viewing. When I first started using this scope, I would never use it for planetary viewing, as the views weren’t sharp at all (kinda blurry).
Used this scope with a heavy duty (15.7 lbs. payload capacity) Manfrotto tripod screwed onto the bottom of the tabletop base. Stability was never a problem with this Sky Scanner/Manfrotto combo.
The scope has been tucked away in my storeroom for the past 3 yrs.
[…] Stargazing for people who think they don't have time for stargazing. « Hacking the SkyScanner 100: six easy pieces […]
Thanks, everyone, for the kind words. Doug, I don’t always have the energy or enthusiasm for blogging. I do now, so I am striking while the iron is hot. John, that’s a solid recommendation on the mirror cell design. I’ve been rereading Sam Brown’s All About Telescopes and he illustrates an essentially identical no-spring cell. Between Brown’s diagrams and Gary’s always-clear writeup, I should be in good shape. I’m glad you’re enjoying the Sky & Tel articles – I’m having a lot of fun writing them, and even more fun doing the “background research” at the eyepiece.
[…] solid (overbuilt, in fact), and I was loathe to take it apart (as opposed to the TravelScope 70 and SkyScanner 100, both of which were crying out for […]
[…] C80ED, there are a couple of buckles on the tube clamp that together form a de facto trough like the one I built for the SkyScanner 100. On the AR102S, the finder bracket serves the same purpose. But I forgot my […]
[…] The analogy goes further. I may spend a lot of time reading reviews of scopes and otherwise obsessing about them, but I also firmly believe that what one sees in the night sky is much more dependent on determination than on equipment, in the same way that fun around the game table depends much more on the creativity and sociability of the people present than on the particular ruleset they roll with. I still hack on RPG rulesets and tinker with them in the same way that I hack on my scopes. […]
[…] a little sun-finder, like the one David DeLano detailed in this post. My SkyScanner has a DIY wooden bracket that is square to the tube, so I just needed something round that I could use to project a spot of […]
Wonderful hacks, thanks. I did most of them and will discover southern skys with the scope next week!
Outstanding – have a wonderful trip! And thanks for the kind words.
Just returned from Melbourne (Australia) with the SkyScanner. Unfortunately, it was cloudy throughout my 2-week stay there and only managed two short 70-minute sessions. The dovetail on the OTA got loose and one of the screws fell off, couldn’t recover it. Going to put tube rings on the short dovetail so that the OTA can be rotated.
What should be the goal when adjusting the screws on the secondary mirror? Is it to center the image of the cheshire hole in the primary center ring, as it would be done when collimating the primary mirror? Can anything else be achieved? When I do so, the reflection of the secondary is elliptic, the secondary isn’t centered in the focuser and when the focuser is fully extended, some part of the secondary mirror isn’t visible anymore through the cheshire.
It helped a bit to tighten the center screw (in order to move the secondary closer to the OTA opening) and to rotate the primary mirror by 120°.
So far, I appreciate this little scope. It’s refreshing to have such a short focal length : it’s the first time I could see the complete pleiades or the coathanger through an eyepiece.
Thanks again for this very interesting blog!
[…] Apex 127, but my most-used scope for the Galilean moon survey was my serendipitously-purchased and much-modified SkyScanner 100. I didn’t have time for a big observing session every night, but I could grab […]
[…] target–or the whole scope on target, in the case of the SkyScanner, which I modified with a bespoke wooden trough to hold a GLP. On my other scopes, I can do without a mount for the GLP precisely because I use a […]