Archive for the ‘Travel Scope 70’ Category

h1

Revenge of the Celestron Travel Scope 70

October 15, 2013

IMG_0932

Update: This post seems to get a lot of traffic, especially around the holidays. If you’re looking for good gifts for amateur astronomers, including telescopes and binoculars that won’t break the bank, you may also be interested in myastronomical wish list for beginning stargazers.

– – – – – – – – – –

Last year I picked up a Celestron Travel Scope 70, mostly because it was cheap (~$65) and I was curious. Except for a couple of quick peeks with the scope, the only serious workouts it got were the transit of Venus and an all-nighter on Mount Baldy.

My feelings at the time–explained here–were that the scope was great a low-power scanning but useless at anything over 50x. Terry Nakazono suspected it was miscollimated, but I’d never collimated a refractor and I had plenty of other stuff to be getting on with, so I let the TS70 languish.

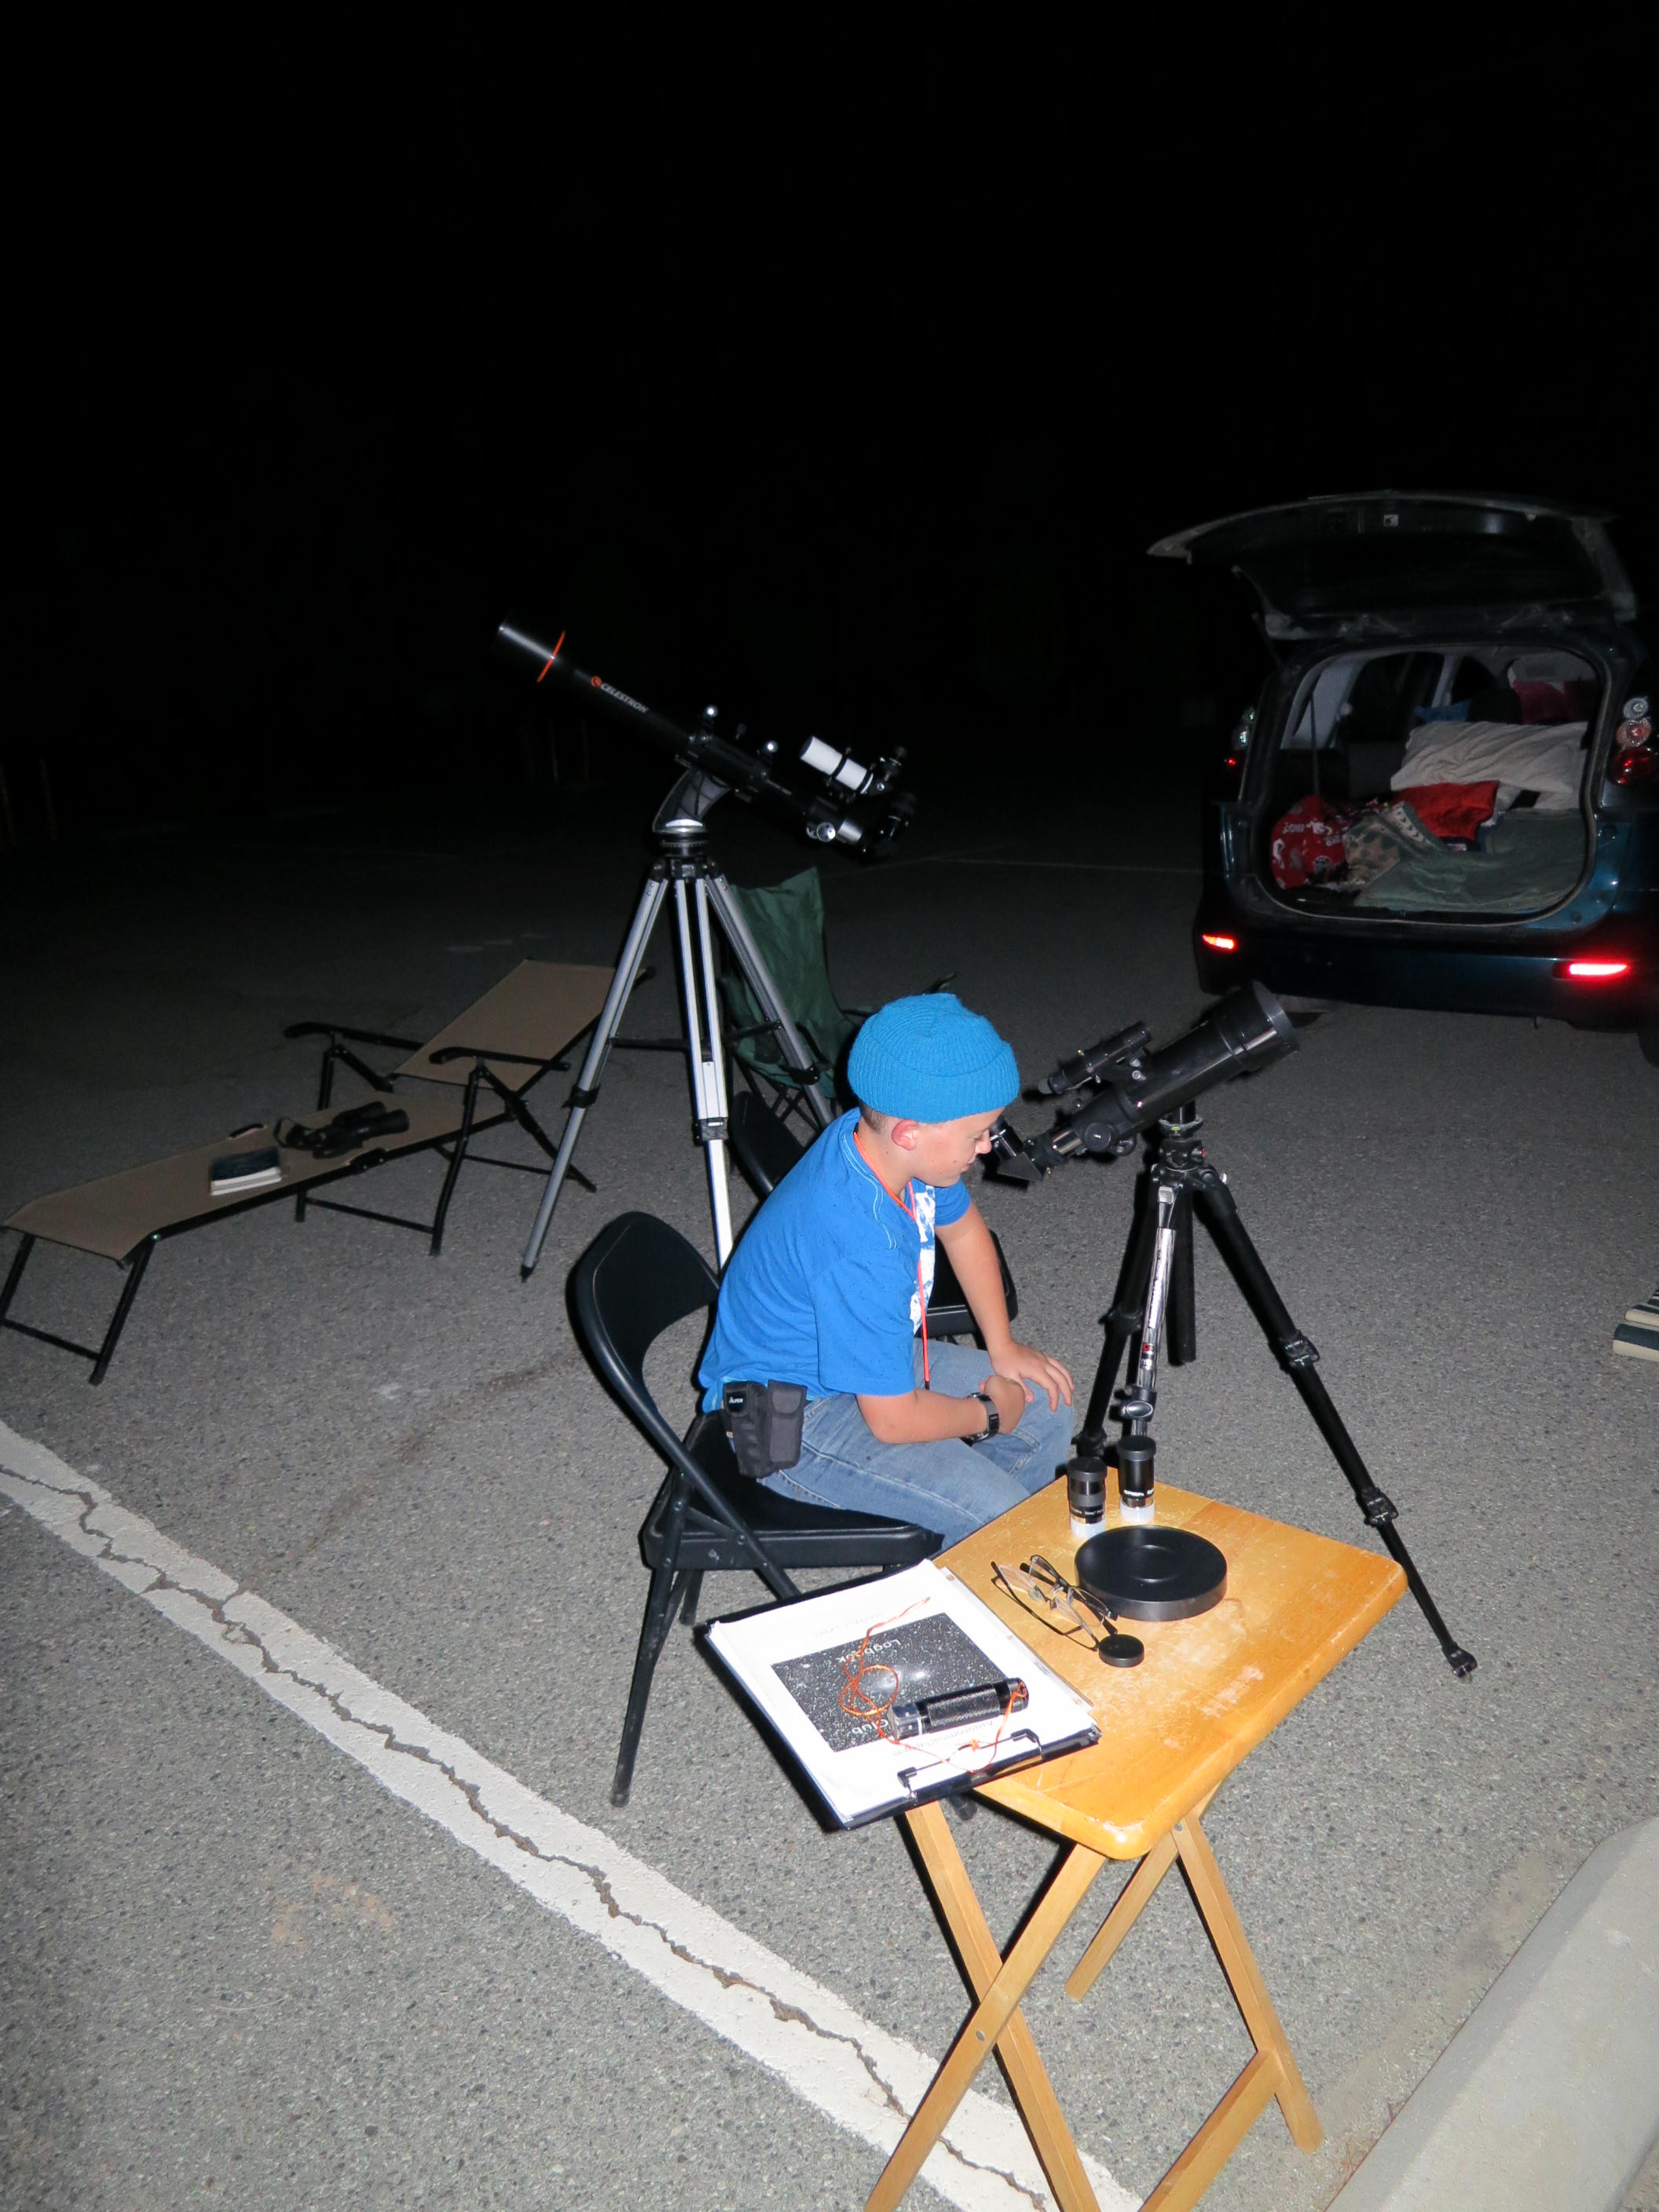
This fall, London has been showing more interest in astronomy and I let him have the TS70 as a hopefully more user-friendly alternative to the Astroscan, which is a cool scope but can be a real PITA to get on target with.

The first problem is that although the TS70 has an actual dovetail bar, it is so ludicrously short and so far forward on the tube that it is almost impossible to balance the scope. For reasons that escape me at the moment, I have several spare dovetail bars lying around, so I grabbed the next larger one to put on the TS70.

IMG_0801

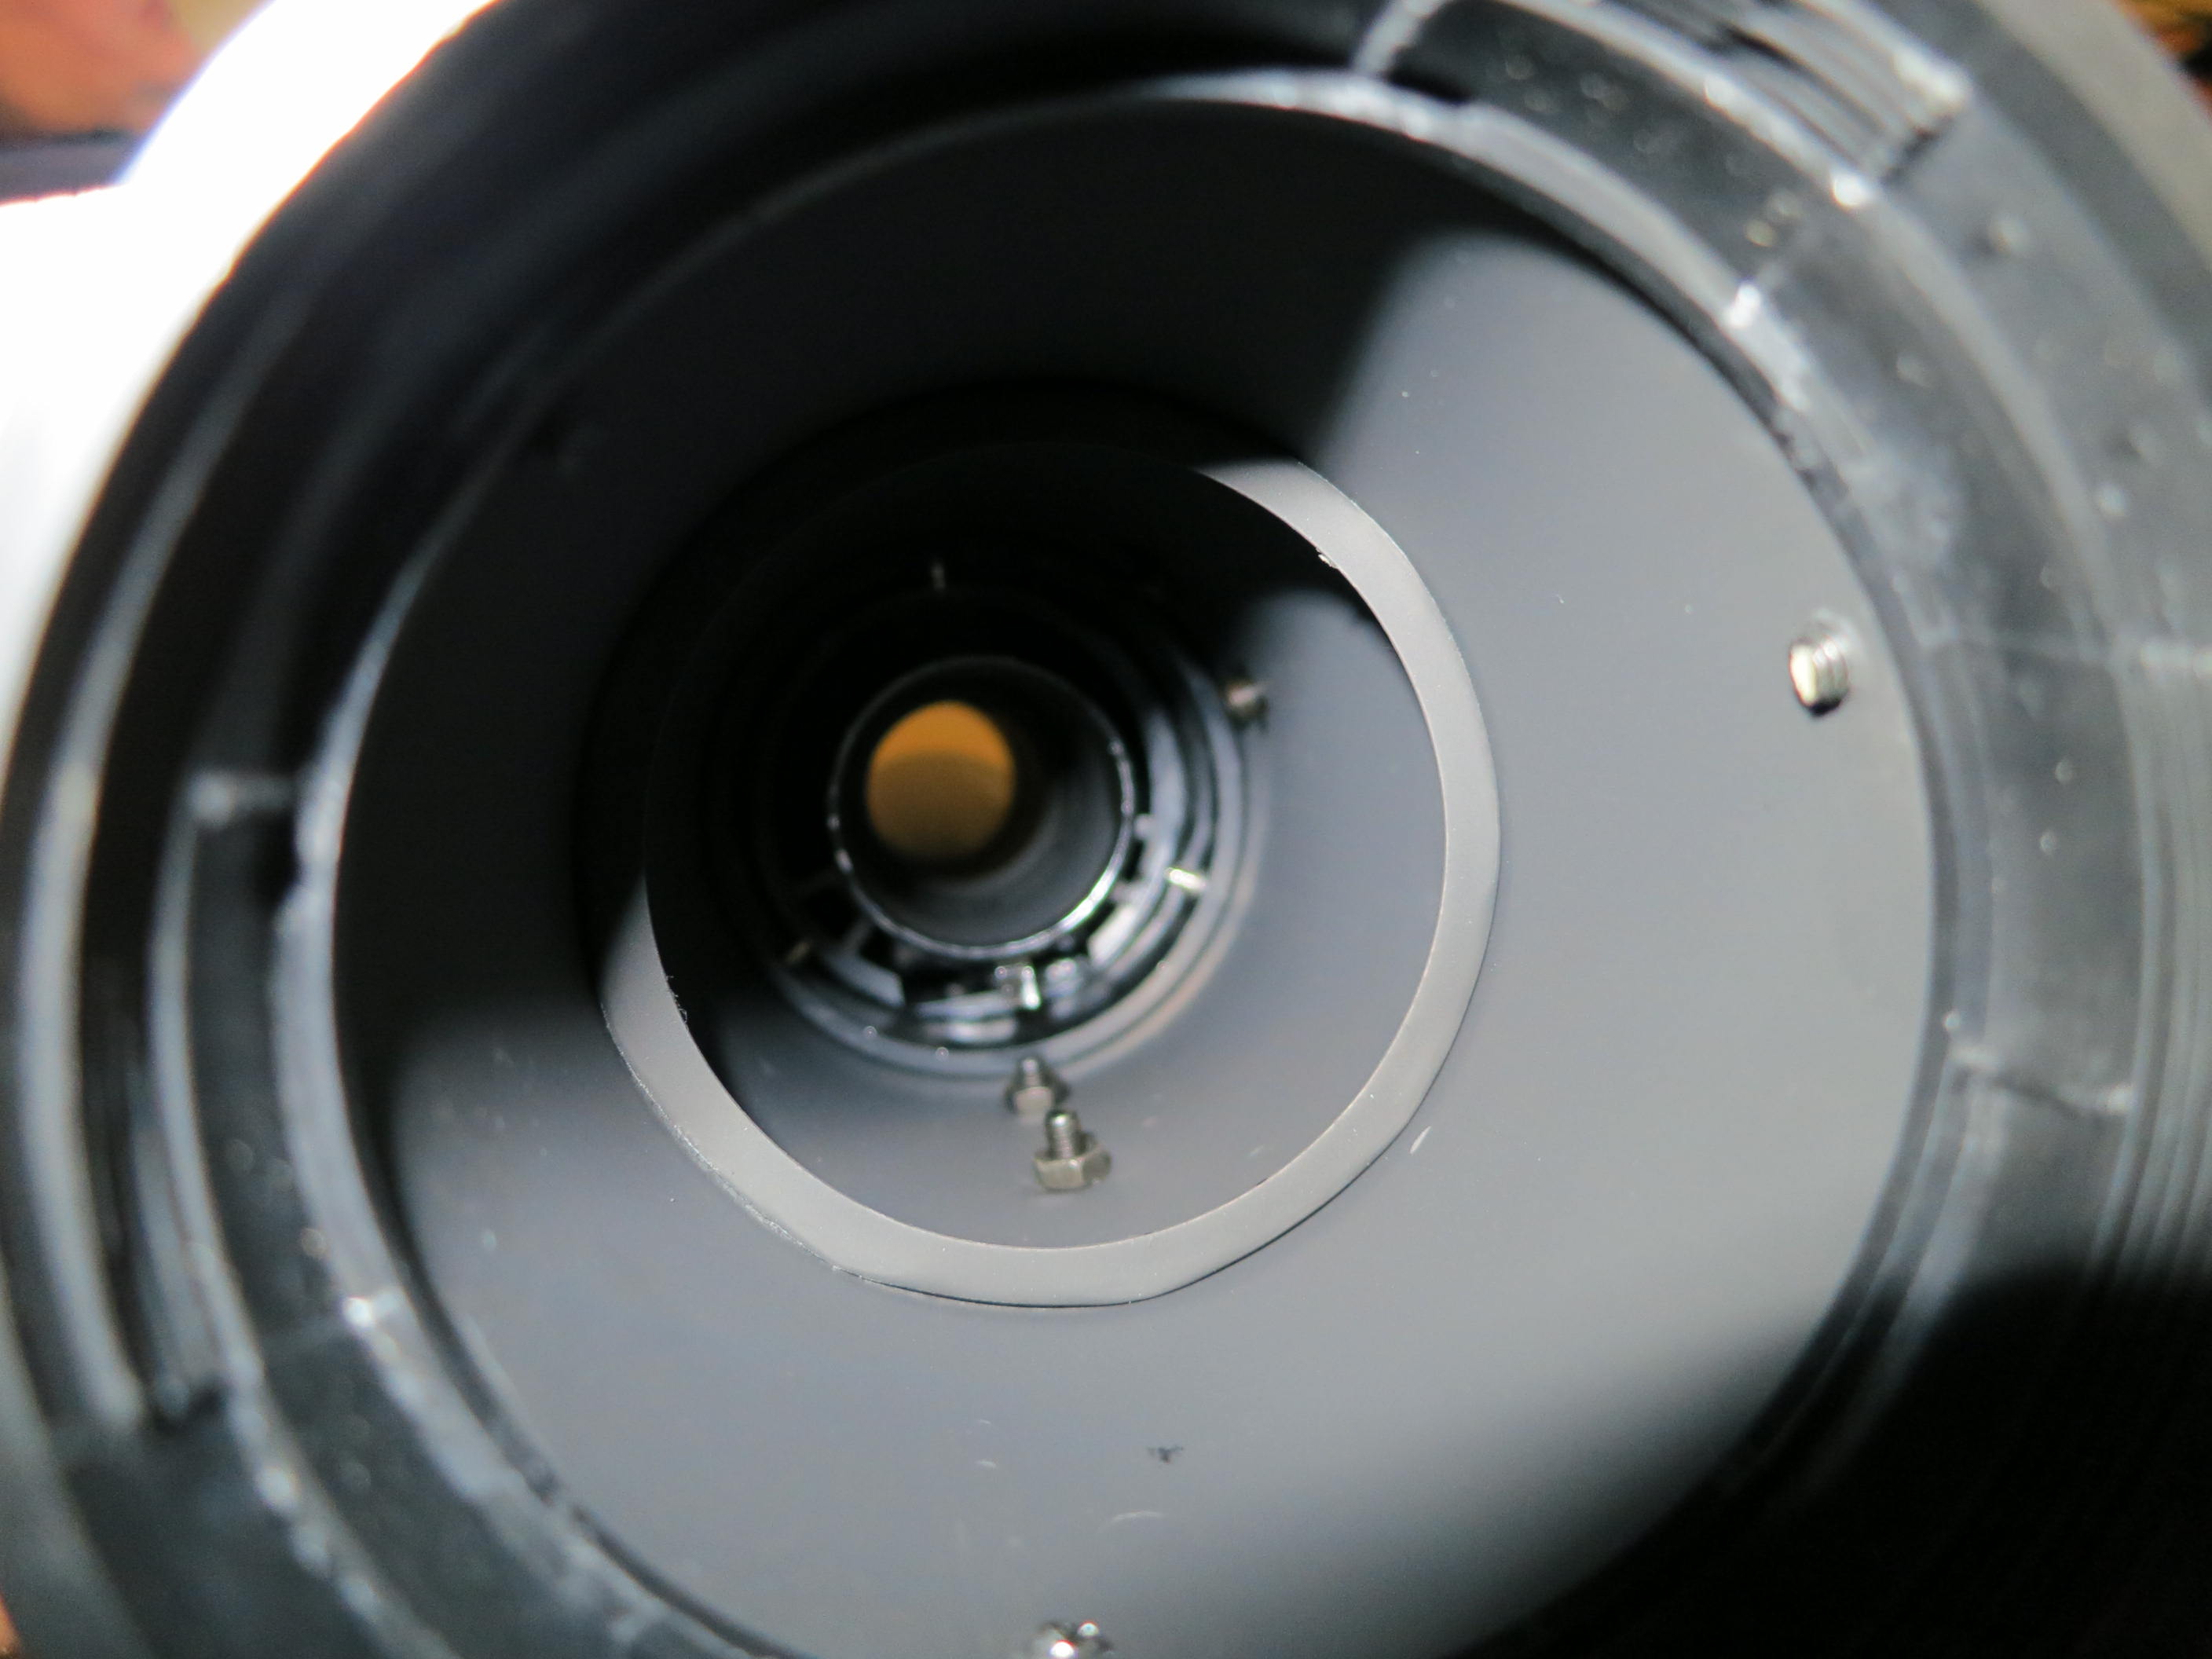
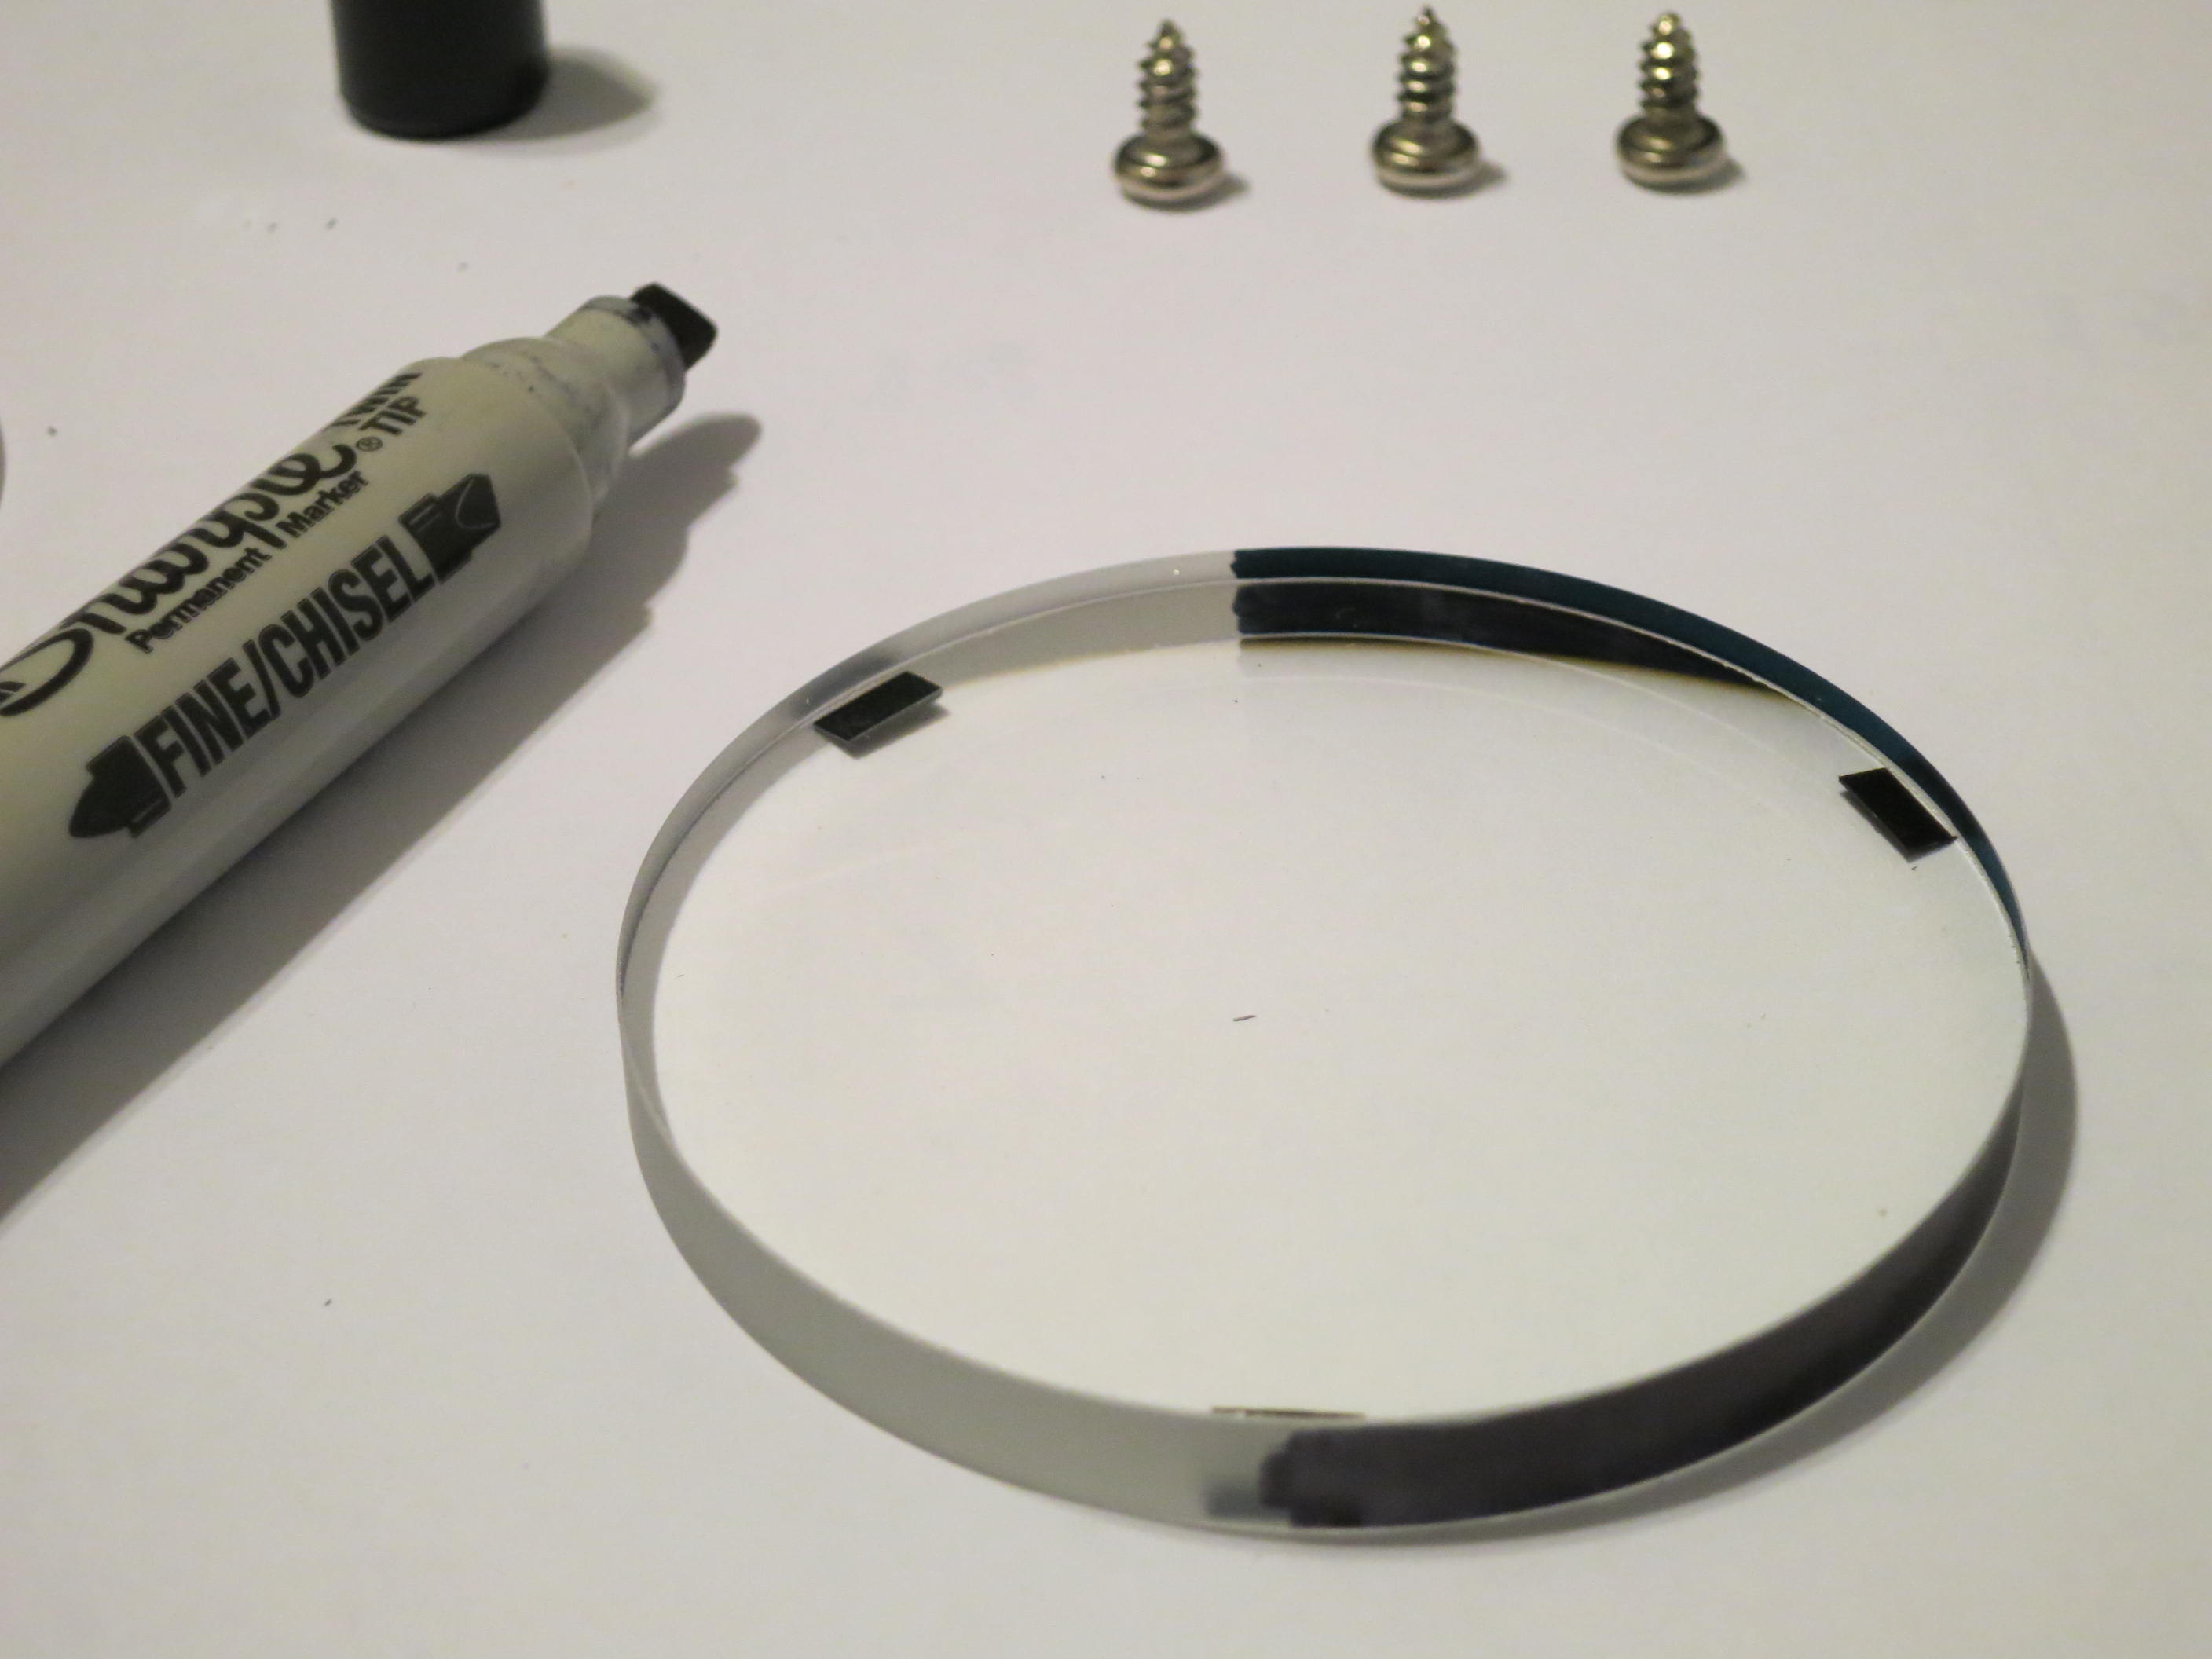
But there’s a problem: the bolts that hold the ludicrously short dovetail (LSD henceforth) on the scope are threaded into nuts inside the tube. You can see those nuts and bolts at the bottom of the tube in the middle distance in the above photo. But you can only see them because I had to remove the objective lens to get this picture.

IMG_0803

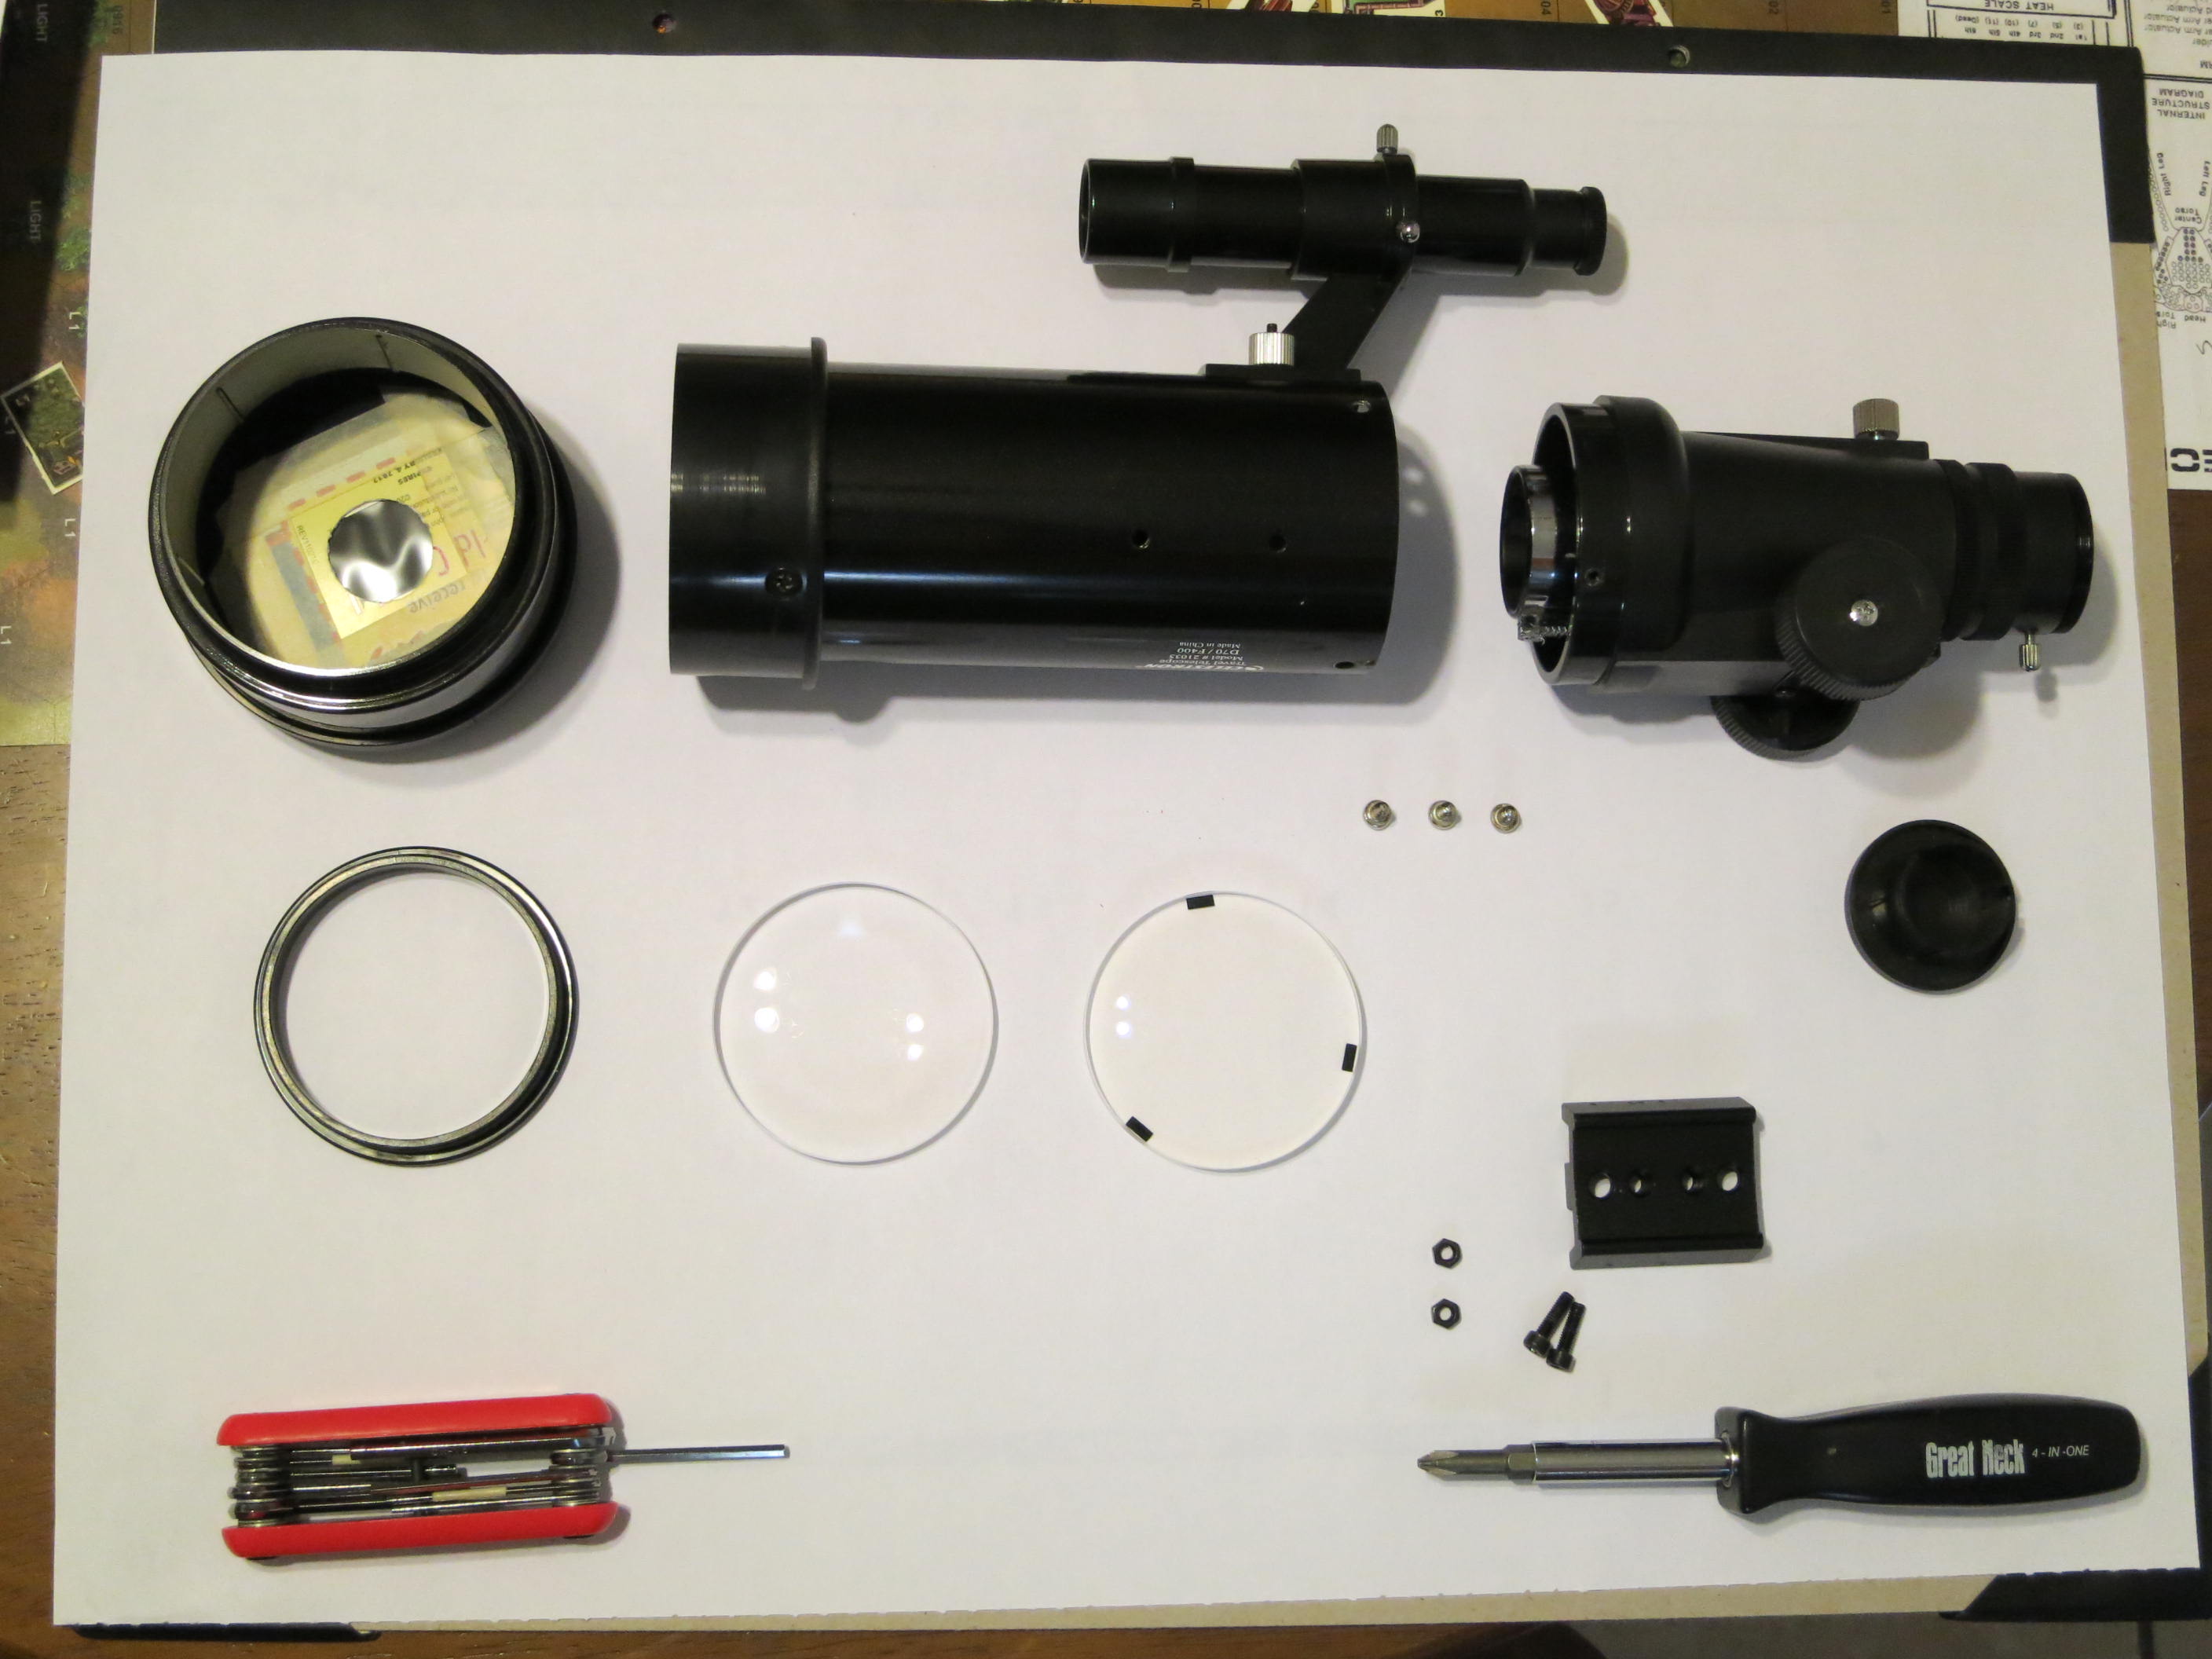
Well, in for a penny, in for a pound: I disassembled the whole damn scope. Here are the bits. The hex wrench set and screwdriver are mine, the solar film inside the lens cap (described here) is one of my hacks, but the rest is as it came from the factory. Only, you know, taken apart. From 12:00, the bits are:

  • the tube with the finder still attached;
  • three screws for attaching the focuser to the tube;
  • said focuser;
  • the black plastic dust cap from the focuser;
  • the LSD, its two hex bolts, and their nuts;
  • the two pieces of glass that make up the objective lens;
  • the retaining ring for the objective lens;
  • the dust cap (with solar film) for the objective lens, with the dew shield inside.

The dew shield slides off, and the retaining ring for the objective lens simply unscrews. There’s nothing else holding the two components of the objective lens in; once the retaining ring is off you can simply tilt the tube down and let them fall out–onto something soft (so they don’t get scratched), that isn’t your hand (so they don’t get smudged with oils). The focuser is held into the tube with the three screws, and the LSD is held on with the two bolts and their nuts. So there are really only five fasteners holding the scope together, or six if you count the objective lens retaining ring.

IMG_0804

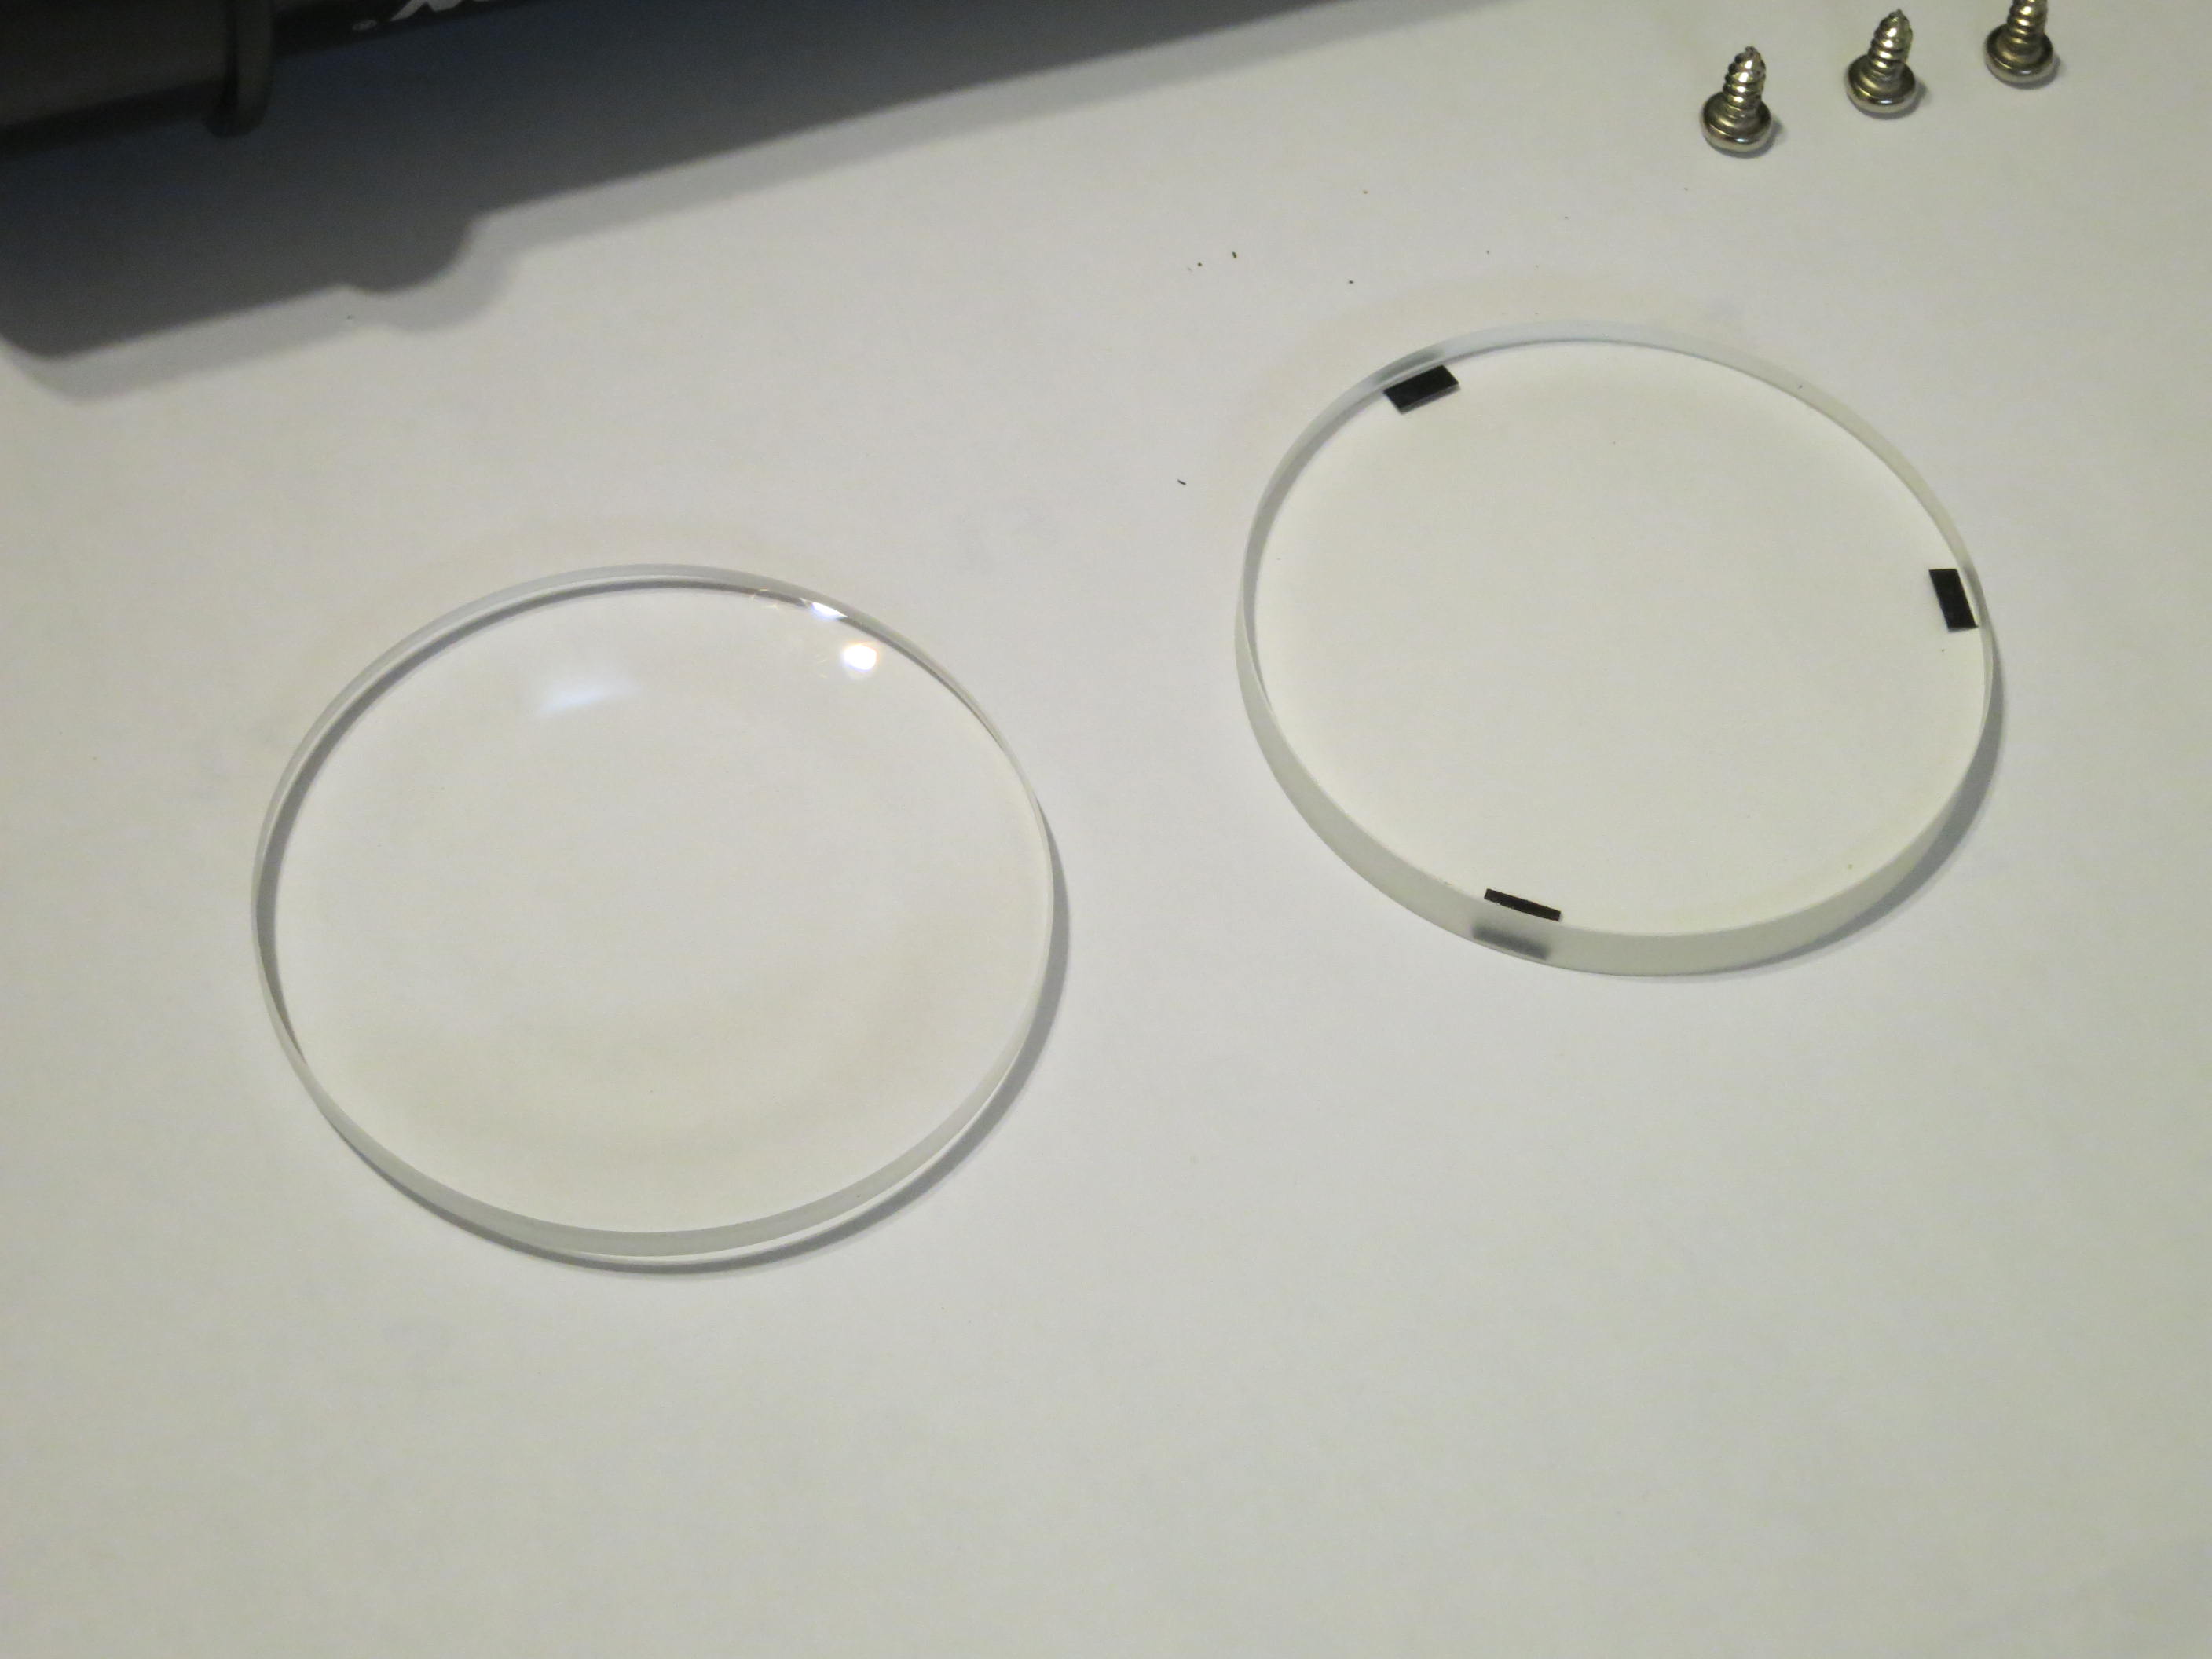
So, about that objective lens. This is an achromatic doublet, meaning that it has two pieces of glass of different compositions (the ‘crown’ and the ‘flint’), to bring more than one color of light to focus at once.  In the above photo, the crown is on the left and the flint is on the right. They are different colors, but I’m not sure if that’s because of different light transmission or different coatings. Note the three little foil spacers on the flint, which keep the two lenses at the proper distance.

IF you ever disassemble a multi-element lens, it is extremely important that you keep the parts not only in the right order, but also facing the right way, or you are going to waste a lot of time trying different arrangements (and risking damage to the glass) until you discover how they go together. Better to just keep track of them as they come out.

IMG_0806

Next item: unless their edges are blackened, lenses suffer from internal  reflections, which cause reduced contrast at the eyepiece. Lots of cheap scopes and eyepieces have un-blackened lens edges, so whenever I take something apart, I blacken the edges. I use a sharpie, two coats, but I’m sure there are other ways.

Aaanyway, the retaining ring for the objective lens is almost always too tight when the scope ships from the factory, and simply unscrewing the ring and gently shaking the tube to settle the lenses is often enough to improve collimation. And that’s all I did here.

So how’d it work out? Last summer, I wrote:

The scope starts to pant around 40x and anything north of 60x is just bad…. Trying to achieve focus on planets is maddening. Jupiter goes from a vertical fan of red light on one side of focus to a horizontal fan of blue light on the other, and only sort of flirts with being a clean disk in between those extremes, at an infinitesimally tiny point that the rack-and-pinion focuser tends to shoot right past.

But Saturday night out at the Salton Sea, the reassembled Travel Scope 70 was like a brand new scope. Images were still pretty crisp at 67x with a 6mm Orion Expanse, and going up to 133x with a Barlow did not just add empty magnification. Here are my observations on different objects.

Polaris

At midnight, I split Polaris with the TS70 using the 6mm Expanse. I note this because In his review of the TeleVue 76 (an $1800 scope), Ed Ting wrote,

There was a time, not terribly long ago, when splitting Polaris was said to be a good test for a three inch scope. In today’s brave new apochromatic world, however, splitting Polaris is something of a joke.  Polaris is easy.  The double-double is easy.

That’s cool, but the TS70 is not an apochromat (a three-lens-element scope with better control of false color and therefore usually sharper optics than an achromat), nor is it a three-inch scope (2.75″ to be exact). So the fact that Polaris was cleanly split at relatively low magnification (67x) has to be a win.

Epsilon Lyrae

What about the double-double, aka Epsilon Lyrae? I Barlowed the 6mm Expanse to get 133x, which is where I run out of eyepieces and Barlows to increase the magnification on this scope. The northern member, ε1, was clearly elongated but not cleanly split, but ε2 was cleanly split. That’s a little nuts, because ε2 has a narrower separation (2.3 arc seconds) than ε1 (2.6 arc seconds), so it should be harder. I can think of several possible explanations, most having to do with the  fact that the ε1 pairs were lined up horizontally in the sky at 12:20 AM, whereas the ε2 pairs were lined up vertically:

  • the scope might have some astigmatism that is more pronounced horizontally than vertically;
  • my eyes might be more sensitive to vertical than to horizontal separations (I have no idea if this is true, but it’s possible. Maybe I should check some time.);
  • the separations were so seeing-dependent (even ε2 was not cleanly split all the time) that any unevenness in the atmospheric turbulence between me and the stars–say, the heat plume from a distant campfire–might have thrown things one way or another;
  • the more pronounced brightness difference between the ε1 components (magnitudes 4.7 and 6.2) compared to the ε2 components (5.1 and 5.5), although not normally a factor, might have made that one a tougher split since I was working at the hairy edge of what the scope and the conditions would support.

Anyway, since the closer pair of the double-double was cleanly split even under the less-than-perfect conditions Saturday night, I feel confident saying that this scope will split the double-double.

Jupiter

From my notebook:

1:50 AM. Jupiter in TS70 with 25mm Plossl (16x), just a bright spot. In 12mm Plossl (33x), a disk with two bands. In 6mm Expanse (67x), hints of more than 2 belts during moments of steady seeing, but bad seeing easily visible in image–Jupiter looks like it is on fire. Barlowed 6mm Expanse (133x): this is too much mag. No new detail, and previously seen belts and zones are harder to make out. No problem focusing using moons, though–I think problems are seeing, not scope.

3:57 AM. TS70 to Jupiter, in 6mm Expanse (67x, definitely more than 2 belts/zones showing now that Jupiter is higher in the sky. Planet is still visibly “burning” in the bad seeing. Three to four belts visible, meaning at least two different belts in addition to the bold equatorial belts, but hard to hold both extra belts at one.

Trapezium in Orion

Again from the notebook:

  • 25mm Plossl (16x) – 2 components (3 visible, but only 2 cleanly split)
  • 17mm Plossl (24x) – 3 components
  • 12mm Plossl (33x) – 4 components cleanly split

TS70 waxing gibbous moon 2013-10-12

Misc

Mars was a visible disk in 6mm Expanse, but swimming in the near-horizon murk near Regulus.

M81 and M82 easily visible in 25mm Plossl (16x), showing some detail in 12mm Plossl (33x).

M31, M32, and M110 visible in one field with 12mm Plossl (33x).

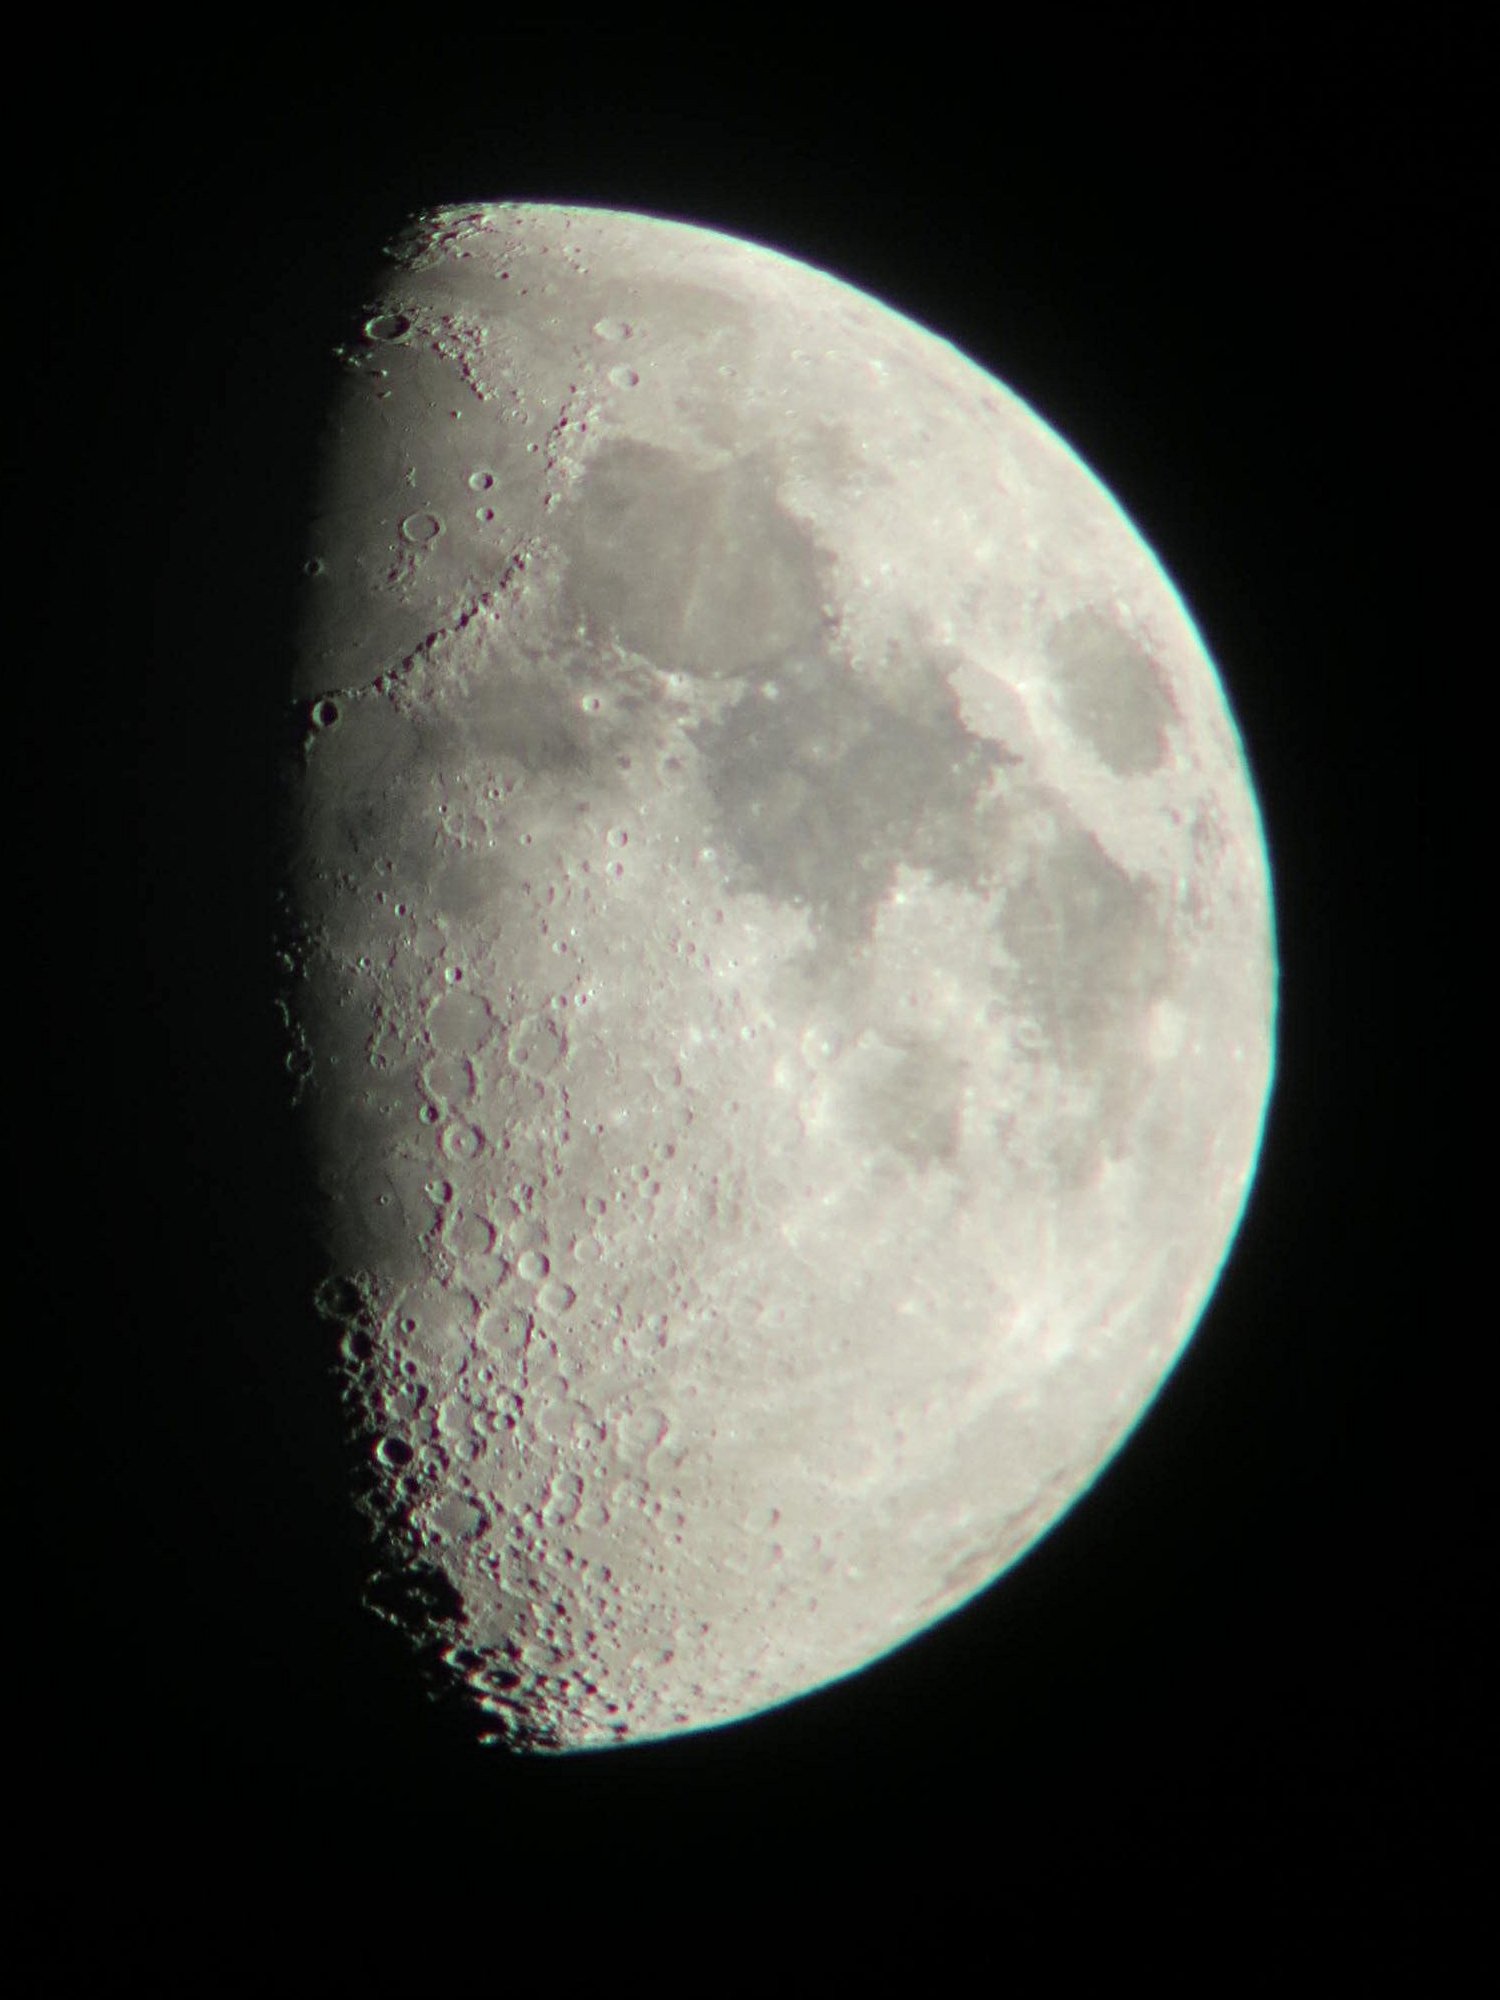
I spent some time on the moon, and snapped the photo above using a Canon S100 point-and-shoot and a 25mm Plossl. I flip-flopped it left-to-right and lightly sharpened it in GIMP, but didn’t mess with the brightness or color. It’s not an amazing image–a 90mm Mak will thoroughly spank this scope (proof)–but it’s not bad.

Conclusion

So, I have to revise my opinion of this scope. As supplied, I still have major reservations:

  • the tripod is wretched, and struggles to hold a small point-and-shoot digital camera stably, let alone a telescope;
  • the finder is a joke: too small to start with, then stopped down, and using plastic lenses to boot. But it makes a decent sight tube if you strip out the guts. London thinks the stripped version is the bee’s knees;
  • supplied backpack is okay, but no pockets inside or out, and only one partial divider inside (not that you’re buying this for the backpack, just sayin’);
  • eyepieces are nothing special and replacing them should be a top priority;
  • as supplied, my scope had two major problems: the LSD, which all TS70s ought to share, and badly miscollimated optics on this sample, which were easy enough to fix by completely disassembling the telescope and voiding the waranty. Also, focus is still a hairy procedure at high powers, and it is easy to overshoot best focus.

However, if you’re willing to buy or build a new mount and put in a little elbow grease, there is a surprisingly capable scope lurking inside this unassuming package–one that is capable of doing useful work on the observing field. Even with mostly plastic, jokey accessories, this scope is still a decent deal, although I shudder to think about the many unfortunate users who try to use the scope on the supplied tripod.

I note that according to the commonly-used “50x per inch of aperture” rule of thumb for max magnification, a 2.75-inch scope ought to be good up to 138x, which is pretty darned close to what I was working at (133x). So to be fair all I have established here is that the scope is adequate, according to one widely-used and fairly conservative guideline. But it’s so much better now than it was last summer–an actual observing tool, not just a toy. And that’s a win.

h1

Gear reports: Explore Scientific eyepieces, Orion Apex 127 Mak, Celestron Travel Scope 70

July 16, 2012

Apex 127 (left) and Travel Scope 70 (right) under dark skies on Mount Baldy. The Apex is on a SkyWatcher AZ4 mount, and the TS70 is on a Manfrotto CXPRO4 with a Universal Astronomics DwarfStar alt-az head. Photo by Terry Nakazono.

As promised in the last post, here are my thoughts on the scopes and charts I used up on Mount Baldy Saturday night. I haven’t had half of this stuff long enough for these to be considered true reviews, so I’m calling them “gear reports”.

Explore Scientific eyepieces–For  a long time my workhorse eyepieces have been 32mm and 12mm Plossls and the 6mm Expanse. The 24mm ES68 gives the same true field as the 32mm Plossl but with higher magnification and a larger apparent field–68 degrees versus 52. The 14mm and 8.8mm ES82s give me a nice pair of mid-to-high power options, without taking business away from the 6mm Expanse.

How important is all that apparent field of view? I’ve also had the opportunity recently to look through a few TeleVue Ethos 100-degree eyepieces, and here are my impressions.

  • Ethos: I could not quite see all of the field of view at once. I had to actually move my head around to see the field stop. It was nice–when I first looked in the eyepiece, at what was in the middle of the field, I could not immediately see the field stop in any direction. It actually was like looking through a window into space. I can see why people shell out big bucks for this experience (think $600 and up for the TeleVue Ethos models and $400 and up for the other brands).
  • ES82: I can see all of the field and the field stop at once, but it is so far out to the edge of my field of view that I am not really aware of it. Very comfortable, too, in terms of eye placement and eye relief.
  • ES68 and Orion Expanse (66-degree apparent field): ditto. For me, the jump from 52 degrees to 66 or 68 degrees is much more noticeable than the jump from the sixties up to 82–or back. I never went from one of the 82s to one of the sixties and thought, “oh, hey, where did my extra field go?”, which definitely does happen when I go directly from a widefield to a Plossl. My only explanation is that, at least for me, 66-68 degrees is over a threshold where additional apparent field makes little difference, until the I-can’t-see-it-all-at-once threshold I get with the Ethos.
  • Plossls (52-degree apparent field): I like Plossls. They’re good, solid workhorse eyepieces, that can handle a wide range of focal ratios and tend to be sharp and have good light throughput. They were my go-to eyepieces for years. But, like many, many stargazers before me, I am spoiled now. The fact is, after using 66-82 degree eyepieces (I’ve had a pair of 68-degree Orion Stratuses for a couple of years, and just not used them much), going back to the Plossls is like being struck with tunnel vision: I am acutely aware that a lot of my visual real estate is occupied by non-sky inside-of-eyepiece black nothingness. That said, the effect really only jumps out at me when I swap a widefield for a Plossl back to back in the same scope. Saturday night I would be observing with widefields in the Apex and then wander over to the TS70 with the 32mm Plossl and not notice the sudden decrease in field. So I’m not getting rid of my Plossls anytime soon. For one thing, they all weigh much less than their widefield counterparts, and so play better in small scopes and travel kits.

By the way, if you’re in the market for budget Plossls and Expanse clones, check out the Black Knight Super Plossls and Enhanced Super-Wides at OWL Astronomy.

Apex 127–Under dark skies, a potent deep-sky instrument. Its maximum true field of just a bit over a degree will frame almost all deep sky objects, except for the very closest open clusters (like the Pleiades and Hyades). Everything I tried for, I found–my problems with the two open clusters were not that I could not see them, but that I could tell exactly what parts of the rich Milky Way starfields were supposed to be the clusters–more on this farther down. It’s also a planet-killer and excellent double-star scope. One night this spring I was trying to split a particularly tough double with this scope. It refused to budge at 257x, so I Barlowed my 6mm expanse to give 514x, and finally saw that stripe of black sky between the two stars. That’s about 100x per inch of aperture, or twice the rule-of-thumb “maximum effective magnification” of 50x per inch. Which means it’s a damn fine scope.

Travel Scope 70–Four things about this scope, three good, and one not so good. The good stuff first.

  • It costs next to nothing. As I’ve pointed out in other posts, you can’t buy a 9×50 right-angle correct-image finder for what they’re charging for this scope.
  • It’s small and light. I think it would ride on the same tripod as my SV50 and the scope itself takes up hardly any more room, but 70mm gathers roughly twice as much light as 50mm (5*5=25, 7*7=49). It has the same focal length as the venerable Short Tube 80 but weighs about half as much. You could think of it as a Short Tube 70, but its focal ratio of 5.7 is a hair more forgiving. That combined with the slightly smaller aperture should knock down the chromatic aberration a bit, compared to the ST80, and indeed I’ve found the CA unnoticeable in casual use, even on the moon and  planets (that is, I’m sure it’s there if one goes hunting, but it’s never risen to the level of attracting my attention at the eyepiece).
  • The optics are wonderfully clear. The low-power views are really bright and contrasty. I noticed this the first night I had the scope. I was cruising the summer Milky Way from my driveway, trying the 12.5x view with the 32mm Plossl for the first time. Now, Lyra was dead overhead, and atmospheric problems are almost always minimized at the zenith, but still, the view was bright, and I found the Ring Nebula, M57, right away. I thought “No way, there’s just no way the Ring is that easy at 12.5x. Must be an out-of-focus star.” So I started working my way up in magnification, and sure enough, it was the Ring after all. I noticed the same thing again Saturday night. I couldn’t see much detail on most of the Messier objects at that magnification, but they just jumped out of the background starfields, even the smaller ones. If you like low-power scanning, this scope is a blast under dark skies and still a fun ride even under so-so skies.

Now, the not-so-hot:

  • It’s hard to push the magnification, and I don’t like the result when I do. A 12mm eyepiece gives 128x in the Apex 127, 108x in the 90mm Mak, and 100x in the XT10, but only 33x in this  scope. A 6mm eyepiece gets you to 67x, but it ain’t worf it. The scope starts to pant around 40x and anything north of 60x is just bad. I noticed this the first night out, looking at Saturn and the moon, and it was still true this weekend. I don’t know if its astigmatism or poor collimation or what, but trying to achieve focus on planets is maddening. Jupiter goes from a vertical fan of red light on one side of focus to a horizontal fan of blue light on the other, and only sort of flirts with being a clean disk in between those extremes, at an infinitesimally tiny point that the rack-and-pinion focuser tends to shoot right past. It’s actually really puzzling to me that a scope that gives such clear, contrasty images at low power goes to crap so fast as the magnification goes up. (In case you’re wondering, we used exclusively low-power eyepieces with this scope for the Venus transit.)

So in the end the TS70 is kind of a one-trick pony. It is awesome for scanning around at low power and surfing the Milky Way. That’s the one thing it can do that neither of my Maks can. But unless you get a much better sample than I did, forget about doing any serious work at even moderate magnifications. The 90mm Mak is a much more versatile tool–it can do almost everything except widefield scanning. So at least the two small scopes complement each other.

UPDATE: the TS70 performs MUCH better after having been disassembled and reassembled (details in this post). It’s not hard, all it takes is a screwdriver. Blackening the lens edges with a Sharpie improves the scope’s already decent contrast, and shaking the lens cell a little while the objective lenses are loose will improve the collimation. After doing only that, I can now take this scope up to at least 133x without the image falling apart. It’s like a whole new scope. That said, there are still better choices out there – see my astronomy wish-list for beginning stargazers for some suggestions.

Actually the awesome low-power views of the TS70 have inspired me. A small ED refractor like the Astro-Tech AT72ED ought to give equally good low-power views and be able to take magnification well, and could potentially put both the TS70 and the 90mm Mak out of business. I don’t know if it actually will, but I aim to find out. So I think one of those will be my next big astro purchase–once I save up for it.

In the meantime, since the TS70 performs like a superfinder anyway, I’m going to keep scheming on how to turn it into one. I’d love to have it mounted side-by-side with the Apex 127, so I’d have a rich-field scope and a planet-killer on the same mount.

Pocket Sky Atlas–Since I started out in astronomy, the PSA has been essentially the only atlas I’ve used. It has stars down to magnitude 7.6 and about 1600 deep-sky objects. That includes all the Messiers, all the Caldwells, and all the Herschel 400s, plus another thousand or so, so it’s covered my needs and then some. The only time I’ve printed up my own finder charts has been for hunting quasars. I haven’t felt the need to move up to a “deeper” atlas until very recently.

I started thinking about a deeper atlas after observing with Terry Nakazono last month. His most-used atlas is the Observer’s Sky Atlas, which covers the whole sky to mag 6 but also has enlarged charts to mag 9 for finding 250 deep sky objects, including all the Messiers. He also prints out detailed finder charts from the Tri-Atlas (a huge free atlas in three versions: mag 9, 11, and 13). He was surprised that I’ve gotten along as well as I have with just the PSA.

Part of the difference in preference probably has to do with the instruments that we use and how we get on target. Terry’s most-used scope is the SkyScanner 100, which has a red-dot finder. So he gets in the neighborhood–or closer, sometimes you can really bullseye things with an RDF–with the dot finder and then star-hops to his targets at the eyepiece. In contrast, I use a 9×50 RACI finder on whatever scope I am observing with (I only have one, and just move it around among scopes), and do almost all of my star-hopping with the finder alone. The 50mm finder does not go nearly as deep as the 100mm reflector–it simply shows fewer stars–so I often use the geometrical method of centering the finder on an unseen target (this is detailed by Harvard Pennington in The Year-Round Messier Marathon Field Guide and by Stephen Saber in his post on “sharpshooting” deep-sky objects–search for it here). I hadn’t given this much thought before Terry brought it up, but my less-deep atlas suits my finder-driven navigation, whereas eyepiece starhopping really requires that you be able to see as many charted stars as possible to keep from getting lost. So we have each gravitated toward the atlas that best suits our observing style–or rather, I started with PSA and never had a reason to gravitate away.

Until now, that is. The problem is not that the PSA doesn’t show enough deep-sky objects. I’ve only seen about a fifth of its 1600 plotted DSOs. The problem, as Terry pointed out, is that it just doesn’t show enough stars, at least for some problems. In trying to track down some of those small open clusters in Cygnus and Cassiopeia, I found that the plotted symbol in the PSA covered a good-sized field that was striped and mottled with star chains and asterisms of the summer Milky Way. The geometrical relationships shown in the PSA just weren’t enough. I couldn’t go to “the” cluster of stars that made an equilateral triangle (or whatever) with the nearest guide stars, because there half a dozen plausible candidates (actually, this might be a not-enough-DSOs plotted problem as well as a not-enough-stars problem). I need to see some of the fainter stars in between plotted on the chart, to break up those rich starfields into manageable–and interpretable–chunks.

So, to make a long story short, I ordered the first volume of Uranometria 2000.0, a mag 9 atlas, and I’ll get the other two volumes as funds allow. Stay tuned.